• Ships of Scale has incorportated an extra level of security when you log In. Please follow on-screen prompts to acknowledge that you are not a robot via a "Check Box" or a "Pictorial Check Box Puzzle". This is needed due to higher level of AI Activity Security.
  • SUBSCRIBE TO SHIPS IN SCALE TODAY!

    The beloved Ships in Scale Magazine is back and charting a new course for 2026!
    Discover new skills, new techniques, and new inspirations in every issue.

    NOTE THAT OUR NEXT ISSUE WILL BE July/August 2026
  • Win a Free Custom Engraved Brass Coin!!!
    As a way to introduce our brass coins to the community, we will raffle off a free coin during the month of August. Follow link ABOVE for instructions for entering.

Fair American 1:48 by Model Expo

My latest update is question to the community, and I’ll be putting my nooboscity on full display.

Looking for help on placement of the planking battens to assist with laying out of planking belts.

The planking guide included in the kit says to place the first batten at the mid-point of the turn of the bilge starting at mid-ships bulkhead where the hull us the widest. The problem is that the planking guide that comes with Fair American is a standard guide Model Shipways includes in many of their kits and seems to be based largely on a schooner hull form like Bluenose or Elsie.

On the Fair American, the turn of the bilge appears to be much higher up the hull than the mid-point between the garboard strake and the bottom of the wales, so that if I placed the first batten at the turn of the bilge I would wind up with two very wide planking belts (after placement of the second and third battens) below the first batten and two very narrow belts above. Is that correct? All the pictures and tutorials I have seen appear to show the battens more or less evenly spaced between the garboard strake and the wales.

Also, on Fair American, the widest part of the ship (the first contact point for the batten), as measured between the garboard and wales is not amidships, but farther aft, almost near the last frame. It would stand to reason that this is the measurement from which the number of planks is derived, but is it meant to be the defining point for the planking belts? Or when referring to the widest part of the ship, are they talking about in the beam, which would indeed be amidships, but not where the planks are at their widest?

I’m trying to work my planking technique up from over-simplified to something more accurate, but I am limited in my ability to mill my own planking material and have to rely on kit-supplied stock. Those are of course too narrow to cut properly spiled planks from, but I think I can do better than the purely TLAR approach I’ve followed in the past.

Thanks for bearing with the world’s wordiest question. Happy to hear the thought of the experts.
 
Last edited:
Previous query about positioning of planking battens seems to have been overcome by birthday wishes (thank you, all!) without eliciting any advice or suggestions so plunged recklessly onward. Perhaps with some photos I can get some feedback.

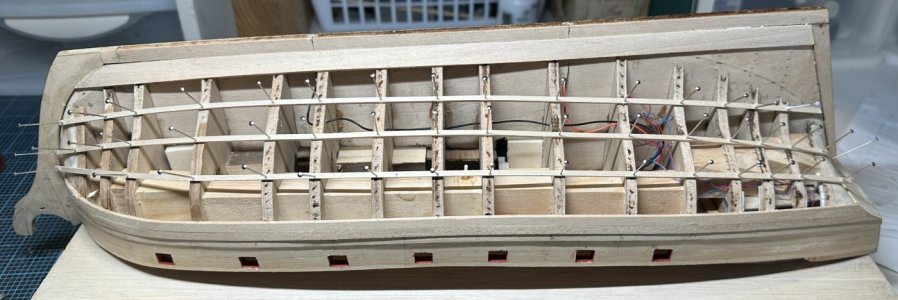
I started at my best estimate of amidships and placed the first batten midway between wales and the garboard strake. After that was laid down, trying to follow smooth curves. The 2nd and 3rd battens were placed at the midpoint above and below the 1st batten at the amidships bulkhead.
IMG_7620.JPG
Here is what she looks like with the battens in place.
IMG_7621.JPG
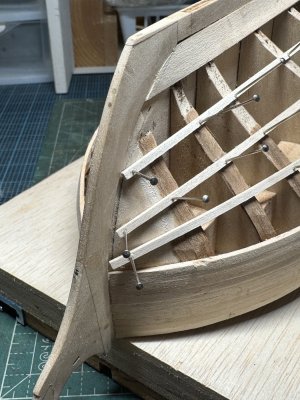
But looking forward, one can see that the battens are no longer evenly dividing the distance between wales and garboard.

IMG_7622.JPG
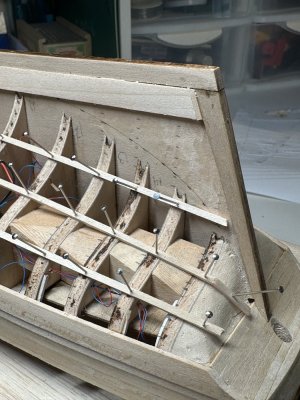
Even more pronounced aft. I was expecting to need some stealers, but this seems extreme.

Is this how it should turn out, or am I doing something wrong? Or rather the more correct question is: WHAT am I doing wrong?
 
Last edited:
Thank you for those, Paul. I had the David Anscherl primer, but not the second one. I managed to miss the line in David’s primer that says, “I divide the girth off into four equal bands by means of paper tick strips.” Looks like a re-do on the battens is in order. I think I also need to rip out the garboard to do some more shaping on that. Hopefully I’ve still got a couple of spare garboard planks from my first FA kit.
 
When I did this I started by using 1 mm tape to lay out bands (of equal width along the length of the ship at each station line). Sometimes that looked wonky (unnatural), so I simply moved the tape (marginally) until the lines represented a natural looking flow. Tick strips are nice - but I made a bunch of copies of this fan thing and used that to divide each band into plank widths. At the broadest point of each band (midships) you want to use full size planks.

 
I think I also need to rip out the garboard to do some more shaping on that.
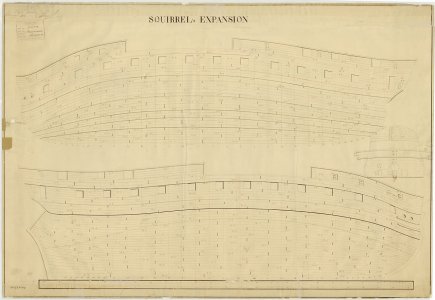
Maybe study some planking expansion drawings to get a feel for the lay of the garboard strake. They all show the shape of the garboard and how it ends at the boxing joint, not up onto the stem like in the photos above.
Allan

Inboard and outboard planking expansion. You can see that the garboard ends at the forward end of the boxing joint
1791749800375.jpeg
 
When I did this I started by using 1 mm tape to lay out bands (of equal width along the length of the ship at each station line). Sometimes that looked wonky (unnatural), so I simply moved the tape (marginally) until the lines represented a natural looking flow. Tick strips are nice - but I made a bunch of copies of this fan thing and used that to divide each band into plank widths. At the broadest point of each band (midships) you want to use full size planks.

I’ve got a planking fan, but I was using that to transfer measurements to the tick strips. I think what you’re describing is cutting the fan into tick strips. That hadn’t even occurred to me. Bound to be more precise.
 
Back
Top