• Ships of Scale has incorportated an extra level of security when you log In. Please follow on-screen prompts to acknowledge that you are not a robot via a "Check Box" or a "Pictorial Check Box Puzzle". This is needed due to higher level of AI Activity Security.
  • SUBSCRIBE TO SHIPS IN SCALE TODAY!

    The beloved Ships in Scale Magazine is back and charting a new course for 2026!
    Discover new skills, new techniques, and new inspirations in every issue.

    NOTE THAT OUR NEXT ISSUE WILL BE July/August 2026
  • Win a Free Custom Engraved Brass Coin!!!
    As a way to introduce our brass coins to the community, we will raffle off a free coin during the month of August. Follow link ABOVE for instructions for entering.

USS Constitution - Model Shipways

Curses! This phone app is annoying..

So let's try this again. Repeating:

I finally got the rope walk head assembly sorted out. It took several passes to get the spacing of the flange bushings correct. It wasn't that I didn't have the correct dimension. I did. From Center to Center was 45 mm. But no matter how carefully I marked the plywood and positioned the centering holes, there was just enough slop in the drill press to render the early attempts useless.

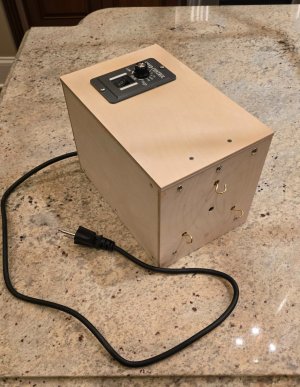
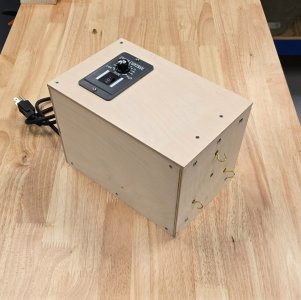
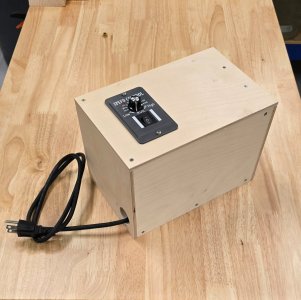
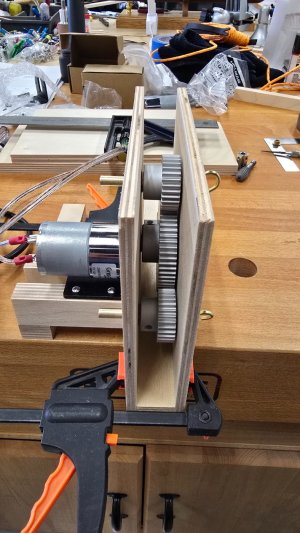
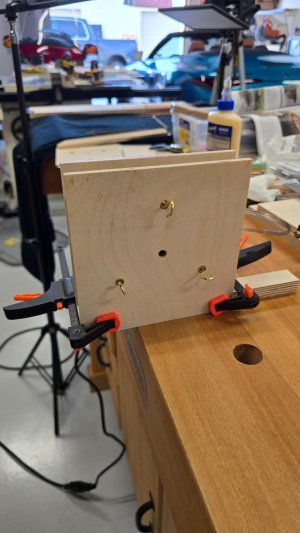
Long story short, I tested the yet to be completed assembly and everything looks fairly good. Here are photos and a short video demonstration.

Note: I'm not sure I need a 4th hook at the front of the drive. But I left material on the three orbital gears to allow me to push everything forward to allow a connector between the motor's shaft and the central gear. I'll connect the fourth hook assembly to the forward end of that connector, passing it through the central gear.
20261024_133344.jpg

20261024_133406.jpg

View attachment compressed_demo_final.mp4
 
Last edited:
Curses! This phone app is annoying..

So let's try this again. Repeating:

I finally got the rope walk head assembly sorted out. It took several passes to get the spacing of the flange bushings correct. It wasn't that I didn't have the correct dimension. I did. From Center to Center was 45 mm. But no matter how carefully I marked the plywood and positioned the centering holes, there was just enough slop in the drill press to render the early attempts useless.

Long story short, I tested the yet to be completed assembly and everything looks fairly good. Here are photos and a short video demonstration.


View attachment 645874

View attachment 645875

View attachment 645877
awesome. congratulations!
 
Congratulations Peter! You’ve brought your perfectionist side to your "ropewalk" as well; it looks fantastic. From now on, you won’t have to worry about the rope. Don't forget to lubricate the bushings. :)
 
Last edited:
I have a follow-up question. There seem to be two competing methods for twisting rope. The first is the method used by Chuck Pissaro with his Rope Rocket, and by Ropes of Scale. This is a two-pass process, where in pass one, the threads are twisted by spinning them on individual rotating hooks on the head stock. The second pass spins a disc with the other ends of the line on separate hooks. This pass lays the rope.

Others use a one pass method, like in the video by Halat Makinasi. In this systemThis is the method Mustafa uses. (I suppose that should be endorsement enough for the one step process.)

My head unit is close to being done, so I'm debating between the processes before I put the effort into the tail stock.

I am not going with vertical or planetary type systems.

Jack, you'll appreciate this. I asked my A/I agent the question, and the response was, it's basically a toss up.

If any of you have tried both methods, I'd be interested in your experience and preference.
 
I have been following your Constitution build and I just finished the Harriet Lane and decided to take the "leap of faith" and start a older kit of the Mamoli Constitution ( and I mean old). I tried searching SOS for any builds done on this kit and didn't have much success. Is there anyone out there that has done a build on this kit, if so I would very much like to see that log to prepare for any for seeable issues. Thanks.
 
I have been following your Constitution build and I just finished the Harriet Lane and decided to take the "leap of faith" and start a older kit of the Mamoli Constitution ( and I mean old). I tried searching SOS for any builds done on this kit and didn't have much success. Is there anyone out there that has done a build on this kit, if so I would very much like to see that log to prepare for any for seeable issues. Thanks.
Good luck with the Connie! I'd love to see some pictures if your Harriet Lane.
 
Good luck with the Connie! I'd love to see some pictures if your Harriet Lane.
Send me your email address and I will send some directly to you, I am relatively new to SOS and have yet to figure out how to take my photo's from my phone and get them to my lap top and then to the site. I have my techie daughter coming over today and maybe we can get this figured out. Thanks for the inquiry, you ship is really coming along.
Dave
 
I have a follow-up question. There seem to be two competing methods for twisting rope. The first is the method used by Chuck Pissaro with his Rope Rocket, and by Ropes of Scale. This is a two-pass process, where in pass one, the threads are twisted by spinning them on individual rotating hooks on the head stock. The second pass spins a disc with the other ends of the line on separate hooks. This pass lays the rope.

Others use a one pass method, like in the video by Halat Makinasi. In this systemThis is the method Mustafa uses. (I suppose that should be endorsement enough for the one step process.)

My head unit is close to being done, so I'm debating between the processes before I put the effort into the tail stock.

I am not going with vertical or planetary type systems.

Jack, you'll appreciate this. I asked my A/I agent the question, and the response was, it's basically a toss up.

If any of you have tried both methods, I'd be interested in your experience and preference.
yeah that AI thing is great except when it's not... and it sucks more often than not
 
Last edited:
I have a follow-up question. There seem to be two competing methods for twisting rope. The first is the method used by Chuck Pissaro with his Rope Rocket, and by Ropes of Scale. This is a two-pass process, where in pass one, the threads are twisted by spinning them on individual rotating hooks on the head stock. The second pass spins a disc with the other ends of the line on separate hooks. This pass lays the rope.

Others use a one pass method, like in the video by Halat Makinasi. In this systemThis is the method Mustafa uses. (I suppose that should be endorsement enough for the one step process.)
I’ve never tried the first method, although I’ve watched videos demonstrating it and seen some very impressive results. Since I’m perfectly happy with the results I get using my own method, I’ve never felt the need to try the first approach.
 
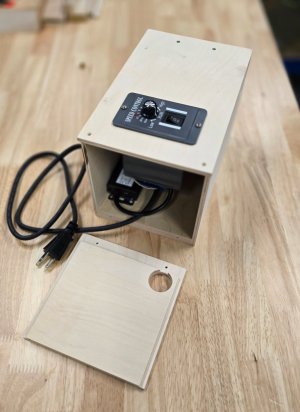
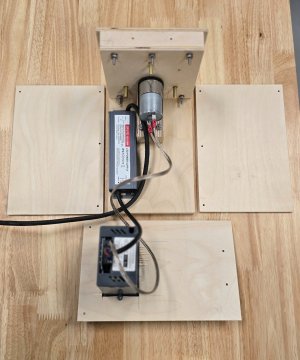
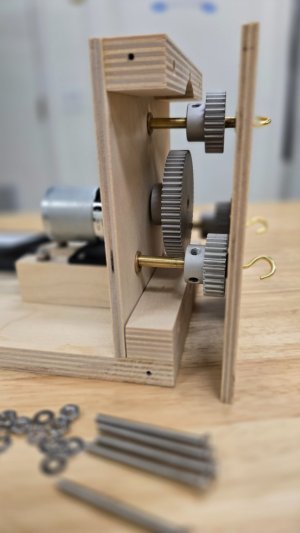
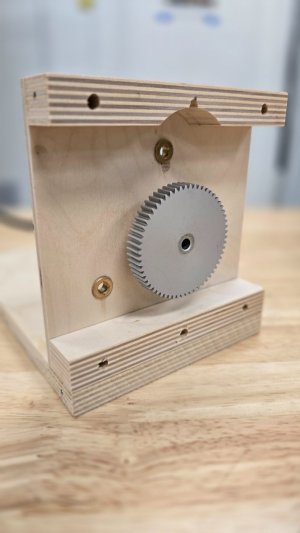
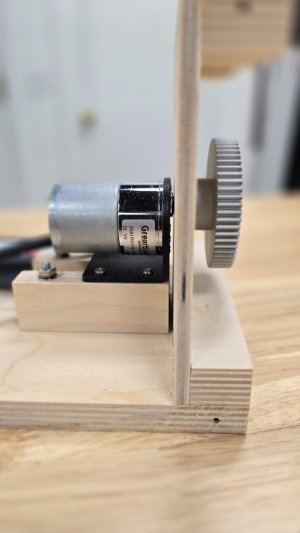
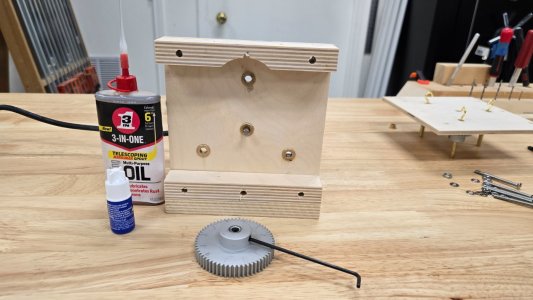
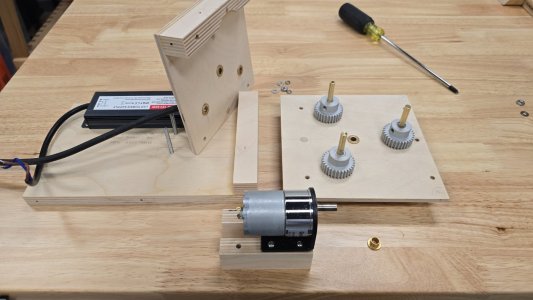
As I disassemble this rope walk-in stages, turns out there is not really a whole lot to discuss, but for anybody looking to make their own, you might benefit from seeing the pieces and how they fit together.

20261027_122807.jpg

20261027_122755.jpg

20261027_123815.jpg

20261027_124533.jpg

20261027_125308.jpg

20261027_125407.jpg

20261027_125552.jpg


Upon reassembly, I'm using Loctite to secure the set screws on the axles and putting a small film on the inside of the bearings. That last bit isn't really necessary given that these are (supposedly) self lubricating bushings.
20261027_130004.jpg

20261027_130927.jpg

I am awaiting an order from a company called wawak for a supply of Guterman Mara thread indifferent sizes and colors.

Much is said online about Guterman E series thread, but that evidently is only available to wholesalers. I asked my AI expert about this and he said there are marginal differences in sheen and fuzz between the E and Mara series. Given that my AI agent also said that Ropes of Scale uses E Series threads, I should be able to see a difference when I experiment with the Mara.

We shall see..
 
your machine is looking great!
The only thing I haven't been able to find with MARA is thread that is finer than 0.2 mm. I think I'll just live with that even though there is some rigging that calls for finer than 0.2 mm. I also abandoned the idea of changing the twist of the strands. I'll live with the S twist.
 
As I disassemble this rope walk-in stages, turns out there is not really a whole lot to discuss, but for anybody looking to make their own, you might benefit from seeing the pieces and how they fit together.

View attachment 646844

View attachment 646845

View attachment 646846

View attachment 646847

View attachment 646848

View attachment 646849

View attachment 646850


Upon reassembly, I'm using Loctite to secure the set screws on the axles and putting a small film on the inside of the bearings. That last bit isn't really necessary given that these are (supposedly) self lubricating bushings.
View attachment 646851

View attachment 646852

I am awaiting an order from a company called wawak for a supply of Guterman Mara thread indifferent sizes and colors.

Much is said online about Guterman E series thread, but that evidently is only available to wholesalers. I asked my AI expert about this and he said there are marginal differences in sheen and fuzz between the E and Mara series. Given that my AI agent also said that Ropes of Scale uses E Series threads, I should be able to see a difference when I experiment with the Mara.

We shall see..
You can buy thread directly from Ropes of Scale if you want - but he sells it in 'life-time' supply volume only.
 
Hey Peter! Just catching up with your posts. I'm not a ropewalk guy, so much of this is over my head (what isn't?!?), but I was pretty darn amazed when I simply saw that you drilled holes in the ends of the brass rods for the eye screws. Cool!
 
Hey Peter! Just catching up with your posts. I'm not a ropewalk guy, so much of this is over my head (what isn't?!?), but I was pretty darn amazed when I simply saw that you drilled holes in the ends of the brass rods for the eye screws. Cool!
Thanks Gregg,
What I didn't mention in my previous post, is that one of the cup hook screws came loose, bringing into question my entire methodology on that. The threads in the copper rod that I "tapped" using the steel screw are pretty thin. The thread in the hole where the cup hook screw came loose was stripped. There was very little epoxy on that thread, so I loaded up the hole and shoved the hook back in. It remains to be seen how well that repair holds up.

Part of my reasoning for making the unit dis-assemble-able (is that even a word?) was that I can go back in and make repairs as needed. I will test this unit shortly and report back on its durability. But I am planning on designing a better alternative for the hooks. I just wish someone made small cup hook screws with machine threads - in small sizes. But, I'm sure I'll come up with something...
 
Back
Top