I hear you I have many with mine as well but we work with what we have and we will be the only one who knows in the end.Thanks. Yes, I agree that the mother ship shows a different arrangement in the region of the waterway. I am not at all satisfied with my work but I'm not sure if I will pursue a fix. My ship model is POB and I did not appreciate the implications of that. I should have planned to cut off the bullhead frames from the very beginning. Alas. My first build and it contains many shortcomings. As for you - keep up the good work!

-
LUCZORAMA SHIPWRECK SCAVENGER HUNT GIVEAWAY. 4 Weeks of Fun • 1 Legendary Prize ((OcCre’s Fram Ship)) • Global Crew Welcome!
**VIEW THREAD HERE**
You are using an out of date browser. It may not display this or other websites correctly.
You should upgrade or use an alternative browser.
You should upgrade or use an alternative browser.
Wasa build
- Thread starter mgovey
- Start date
- Watchers 8
-
- Tags
- billing boats vasa

Agreed. It would seem we need to build every ship twice...I hear you I have many with mine as well but we work with what we have and we will be the only one who knows in the end.
Finally able to get some work done today as I finally got my stain from curbside I ordered 3 days ago. Here is the kicker the paint from Artesanía in Spain got here before I could pick up my curbside lol. While I was at it made a few grates and some work on doors. 


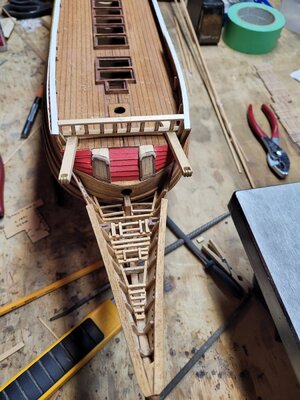
Yes, but are the fishes ready for what's coming from the head?Bow work so far the heads installed and ready for anything.
View attachment 222873
View attachment 222874
View attachment 222875
I wish I had thought about waxing them after the patina. It might have held the dark color better.Bit more work done on stern today filled in back area did another of the round areas.
I also played with these bright cannons to see how to make more like a cannon. I think I came across something from doing staindglass. I first start by tinning them them add the rod then use black patina then wax them to make then a more metal bronze look. I like the outcome. Also tinned the wheels and trying copper tape tinned for the metal areas of the guns.View attachment 224016View attachment 224017View attachment 224018
Can now start to see the colors of this ship come together. 

The red strikes me as very accurate relative to the 1:10 at the museum. Well done!
It seems to be a basic red used the rest of the colors I ordered Artesanía they seem to have the colors for this ship.The red strikes me as very accurate relative to the 1:10 at the museum. Well done!
More painting done . All this detail you can never capture in photos.


Getting around to closing in the galley area. 

Clever idea to plank around (up to) the carvings on the quarter gallery. It makes them look more integrated.
Yes because of the depth of the plastic one of two ways to go. Either this way or sand them down and thin them out. This way seem more stable and the extra wood makes the galley stronger.Clever idea to plank around (up to) the carvings on the quarter gallery. It makes them look more integrated.
How could I not paint to see how it looks. Now just 3 more to go


So for anyone doing the BB Wasa. I have the kit release around the 90 so may have changed the plastic carvings unless they have changed I found 1 of 2 ways to maybe do. This is for the galley area. I first start by inclosing the area then bend and install the plastic pieces. I then fill the spaces with the roof to give a filled in look and make the carvings to scale. The other way would be to sand them down and then add them. From what I can see that is what I will be doing for the ones under the roof areas but hope to remove enough plastic to thin out enough for scale. The other advice is the width of the pieces seem too wide and could have been narrowed as well. I hope the photos give you an idea of work done.


Really nice clean tight work mgovey!
So the worst part of this build is finally behind me after 30 or more years. It was the part I was putting off and came out quite nicely. I will now tackle to gun ports next. As a young man when I first started this ship there was no real internet so how was I to know that I should have done them when I first did the hull and now need to try and correct it. I am thinking of building boxes and installing them fro


 m the outside. I will try a few things before I rip into the hull first. As a last resort it may be just blackened squares with cannon sticking out. The only one who will know is me. And once I'm gone not really anyone. I never stated this ship to enter any contest but to challenge myself.
m the outside. I will try a few things before I rip into the hull first. As a last resort it may be just blackened squares with cannon sticking out. The only one who will know is me. And once I'm gone not really anyone. I never stated this ship to enter any contest but to challenge myself.Congratulations! You have built something not only beautiful - but an accurate representation of the mother-ship. Bravo! I think you have done a marvelous job capturing these unique galleries along with the stern detailing! Looking forward to more...
Thats looking spectacular. Well done. ")