Best method to Line Out a second planking?

Joined
Mar 4, 2023
Messages
70
Points
78

Location
SW Ohio
So, I'm having great fun working on my Harvey build (https://shipsofscale.com/sosforums/threads/build-log-harvey-1847-artesania-latina.11560/) and am close to finishing up my base plank layer (I'm a rookie, so chose to go this route until the day I'm smart enough to successfully pull off a POF). After the last few pieces, some filler, and a heck of a lot of sanding I'll be ready to proceed with the finish planking. This, however, brings me to a question:

What is the best method to Line Out for a second planking?

I've read quite a bit on laying out for the POF, but I'm not sure I've seen anything about laying out for the second (finish) plank layer. Can the thoughts / idea suggested for a POF be applied to a POB?

I welcome your thoughts and suggestions. In the meantime, I'm gonna go sand this thing.
 
The method used by those who plan the width of planks is to use a fan chart. The widths on the fan chart are measured with a ruler or compass and transferred to the hull and marked on the frame or bulkhead lines. The vertical lines on the first planking which mark the location of each bulkhead a frame every X'th interval along the hull would have been drawn onto the first planking layer earlier in construction. Attached below is a document describing this method. Also, here is a video showing this method:


The next method uses a table of values to determine the width of the planks, instead of a fan chart.


I personally work free-form, fitting planks by eye in pairs (port and starboard). Like in the second video above, planks were added from the topmost fully continuous deck, moving down, and from the keel, moving up, with the gap being closed ideally at the turn of the bilge or just above that. The width of the planks, how sharp they are tempered and how far along the length they are tapered, is determined by eye, slowly choosing the location and amount of taper of each plank while monitoring the gap in the hull as it slowly closes. It takes some experience and a good eye for proportion to keep the pattern of the planks symmetrical, including symmetrical placement of stealers and drop planks. Some people do it this way, but most use the fan-chart method and plan their plank widths precisely. The last three planks which close up the gap in the hull are carefully shaped to each cover 1/3 of the gap evenly, so that the final plank does not appear too narrow or too wide, in contrast with the other planks.

After you plank a couple model hulls, you'll have selected a method you prefer best.

Plank seams vary from one type of ship to another, and time period, but for the most part, each ship would be unique in the pattern of its planks. It may be difficult to find information on how your model type would have been planked. An example of a pattern unique is shown for the Swedish man-of-war Wasa, where planks were laid with scarf joints, with plank sizes heavily influenced by what timber was available at the shipyard:
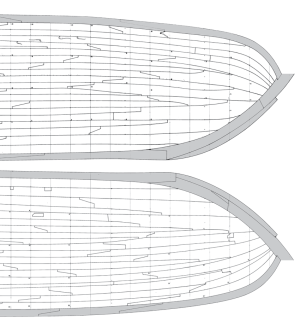
Hull Planking by Dutch - example Wasa.png

Most people just have butt seams at the ends of each plank. This is probably what you will choose for the Harvey, since scarf planks were used on larger and much earlier vessels, and usually not for the whole hull like Wasa, but only in some portions of the hull. Below is an example of how stealers are generally used, and how drop planks are different in English and Dutch styles.
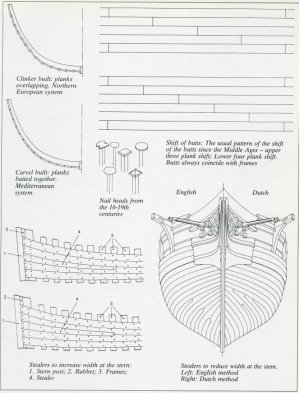
Hull Planking Styles.JPG
 

Attachments

Last edited:
Very good, and thank you. I've seen the method that you suggest in my reading. I was unsure if I could use the method on a first plank layer. Your suggestion to use it clarifies that it can be used. Again, thank you!
 
Eventually, through time you will find the easiest way to plank a hull. And eventually your ship will sink.
 
lining the hull is very useful till you realize every board needs to lay in their natural position. i do fore and aft and midship. also i have never posted my build because i am lazy and because there are people on this forum who do not sleep, and they are pretty much always correct on their advice. the first person with whom i followed on this forum said 90% of my time would be research and the other is building. Thanks, Justin, for I have installed my first two planks on my hull, and you are 3-d printing every piece of the SOTS emblems. I am so humbled by all of your attempts at this hobby. YT from Canada has some of the best work i have seen besides all you scratch guys from the top of the league. if i am to fit 21 boards into the same location on a hull with three main locations mid, fore and aft, i will need to read more, and more, and more .... Thanks, Justin, can i not just get on the ship and retire now. i will take first watch and take up knitting! can you imagine what these sailors would have seen in 1500-1600 century oceans? i can only feel they were awed by their surroundings with pools of sardines and whales and dolphins and birds all trying to get their piece of supper. what if you were the first guy to throw a mono-filament line with a modern reel and rod off of that ship. what would you reel in? imagine unpolluted water for as far as you can see. imagine.... why does my brain still want to think in inches when my model is metric. best part is all my exes, live in Texas.
 
Does nobody not use proportional dividers anymore to lay out their planking?
These are dividers that you spread out over a distance and divide that space into a desired number number of equal spaces.
First you lay out your basic planking with wood strips. At the widest space between the strips along the hull frames, you measure out how many of your planking strips will fit between the space. Then you set the proportional divider's slider to that number. Now when you spread out the dividers between
the strips at each frame, the opposite end of the dividers will give you an equal measurement of each plank width at the frame that you can mark on the frame. These dividers are not cheap. I bought mine while I was in art school on the late 60's and they cost $60.00. So who knows how much they cost now.
 

Attachments

Does nobody not use proportional dividers anymore to lay out their planking?
These are dividers that you spread out over a distance and divide that space into a desired number number of equal spaces.
First you lay out your basic planking with wood strips. At the widest space between the strips along the hull frames, you measure out how many of your planking strips will fit between the space. Then you set the proportional divider's slider to that number. Now when you spread out the dividers between
the strips at each frame, the opposite end of the dividers will give you an equal measurement of each plank width at the frame that you can mark on the frame. These dividers are not cheap. I bought mine while I was in art school on the late 60's and they cost $60.00. So who knows how much they cost now.
now i find out about a tool which would save me time. i appreciate the info.
 
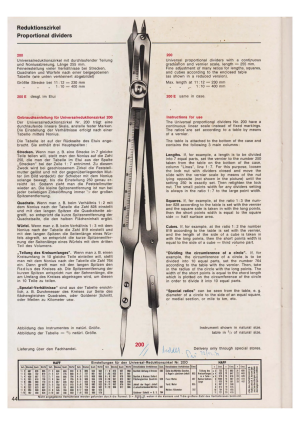
Proportional dividers are extremely useful, not only for dividing lines into equal parts when planking, but also for scaling plans from any one scale to any other scale. They have a host of other features, as well. (See instruction sheet below.)

MicroMark and/or Model Expo presently sell a 6" proportional divider made by Alvin for almost $100. Please accept my sympathies if you've purchased one. Note that the proportional dividers sold for artists' use are not suitable for modeling purposes. Inexpensive brass "paperweights" made in India and Pakistan are useless, as are those scaled for navigation. Proportional dividers scaled and marked for "lines and circles" will work for modeling, but poorly. You are far better off spending your money on a used top-of-the-line scientific instrument that will do everything the instrument is capable of doing at a high degree of accuracy and convenience of use. Note that while 6", 7", and 8" proportional dividers are (or were) made, it is the 10" decimally scaled proportional divider that is preferred for modeling because its larger size permits a wider range of accurate measurements.

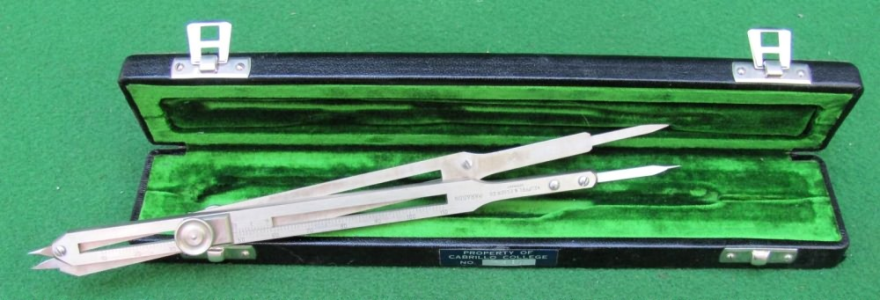
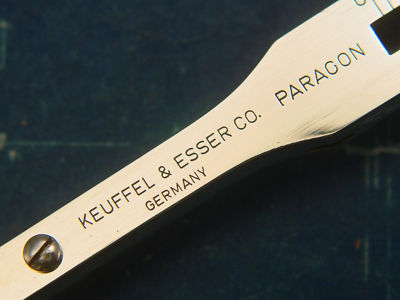
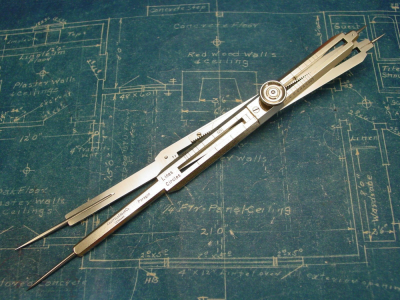
Pictured below, a used Keuffel and Esser Paragon model 10" "Universal" proportional divider can be found on eBay and similar sites for between $75.00 and $250.00. The price spread reflects condition. As a precision scientific instrument, most all are in fine shape as users. At one end of the range would be a "mint in the box" example. At the other would be an acceptable "user," frequently with somebody's initials scratched into it and a beat-up case.

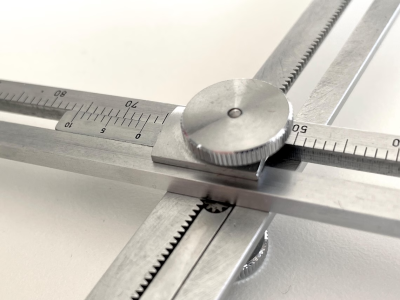
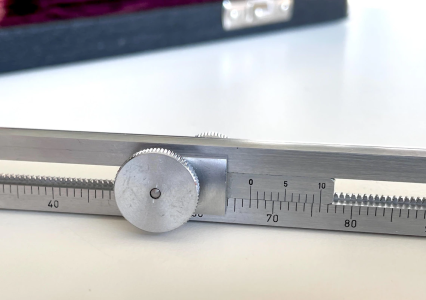
The K&E Paragon branded model, made by Haff of Switzerland and also sold under the Dietzgen and Bowen labels, is the finest proportional divider ever made and was produced in relatively large numbers virtually unchanged for nearly a hundred years before CAD made manual drafting obsolete in the drafting profession. Unlike all other proportional dividers, it is decimally scaled. Any ratio can be set between the two ends of the dividers using its decimal equivalent on the scale. (One can set any proportion on any proportional divider, but will have to do so by fitting the points to drawn proportionate lengths, a fiddly process, because non-decimally scaled proportional dividers only provide very limited discrete scale markings on the instrument.) The Universal decimally scaled divider is grossly adjusted using a rack and pinion adjustment knob and has a Vernier adjustment mechanism to permit accurately indexed decimal settings to three places (thousandths.) The points are adjustable if necessary. The instrument is made of "German silver," a cupro-nickel alloy. It comes in a hard sided velvet lined case with a "cheat sheet" of settings and applicable formula for determining decimal equivalents mounted on a metal plate on the bottom of the case.

These were once plentiful in the days when many professionals were unloading their drawing instruments on eBay in favor of CAD. Now they are sought after by the large collectors' market, but the collectors are usually interested only in pristine examples, so "users" remain relatively common on eBay.

If you are ever in the mood to treat yourself to an exquisite toy, you won't be disappointed by one of these.


1739273332772.png

1739273452252.png

1739273534003.png

1739273633973.png

1739272732407.png

Note below: This is a non-decimally scaled proportional divider in the Keuffel and Esser Paragon line (their finest instrument line.) Note the difference in the scaling on the instrument. The "Universal" decimally scaled instrument above permits an infinite range of proportional settings using the scaling on the instrument directly. The one below doesn't. The one below works the same way but doesn't have the scaling you want.

1739273141164.png
 
Last edited:
I now stand humbly schooled. Redface Who knew there was so much to proportional dividers. Certainly not me. Thank you for taking the time to fully explain them to us. I will now be looking for a quality pair (I'm glad no one got me the cheap pair I put on my Christmas wish list ROTF). I am, however, a firm believer in, "you get what you pay for - most of the time."
 
Last edited:
I have a nice set of proportional dividers I got from my Dad. He used them when airplanes still had navigators. Unfortunately, they’re ruled for knots indicated airspeed and nautical miles, so I haven’t used them much for modeling yet.
 
Proportional dividers are extremely useful, not only for dividing lines into equal parts when planking, but also for scaling plans from any one scale to any other scale. They have a host of other features, as well. (See instruction sheet below.)

MicroMark and/or Model Expo presently sell a 6" proportional divider made by Alvin for almost $100. Please accept my sympathies if you've purchased one. Note that the proportional dividers sold for artists' use are not suitable for modeling purposes. Inexpensive brass "paperweights" made in India and Pakistan are useless, as are those scaled for navigation. Proportional dividers scaled and marked for "lines and circles" will work for modeling, but poorly. You are far better off spending your money on a used top-of-the-line scientific instrument that will do everything the instrument is capable of doing at a high degree of accuracy and convenience of use. Note that while 6", 7", and 8" proportional dividers are (or were) made, it is the 10" decimally scaled proportional divider that is preferred for modeling because its larger size permits a wider range of accurate measurements.

Pictured below, a used Keuffel and Esser Paragon model 10" "Universal" proportional divider can be found on eBay and similar sites for between $75.00 and $250.00. The price spread reflects condition. As a precision scientific instrument, most all are in fine shape as users. At one end of the range would be a "mint in the box" example. At the other would be an acceptable "user," frequently with somebody's initials scratched into it and a beat-up case.

The K&E Paragon branded model, made by Haff of Switzerland and also sold under the Dietzgen and Bowen labels, is the finest proportional divider ever made and was produced in relatively large numbers virtually unchanged for nearly a hundred years before CAD made manual drafting obsolete in the drafting profession. Unlike all other proportional dividers, it is decimally scaled. Any ratio can be set between the two ends of the dividers using its decimal equivalent on the scale. (One can set any proportion on any proportional divider, but will have to do so by fitting the points to drawn proportionate lengths, a fiddly process, because non-decimally scaled proportional dividers only provide very limited discrete scale markings on the instrument.) The Universal decimally scaled divider is grossly adjusted using a rack and pinion adjustment knob and has a Vernier adjustment mechanism to permit accurately indexed decimal settings to three places (thousandths.) The points are adjustable if necessary. The instrument is made of "German silver," a cupro-nickel alloy. It comes in a hard sided velvet lined case with a "cheat sheet" of settings and applicable formula for determining decimal equivalents mounted on a metal plate on the bottom of the case.

These were once plentiful in the days when many professionals were unloading their drawing instruments on eBay in favor of CAD. Now they are sought after by the large collectors' market, but the collectors are usually interested only in pristine examples, so "users" remain relatively common on eBay.

If you are ever in the mood to treat yourself to an exquisite toy, you won't be disappointed by one of these.


View attachment 500694

View attachment 500695

View attachment 500696

View attachment 500697

View attachment 500692

Note below: This is a non-decimally scaled proportional divider in the Keuffel and Esser Paragon line (their finest instrument line.) Note the difference in the scaling on the instrument. The "Universal" decimally scaled instrument above permits an infinite range of proportional settings using the scaling on the instrument directly. The one below doesn't. The one below works the same way but doesn't have the scaling you want.

View attachment 500693
Sir, this is a wonderful lesson on these amazing tools. Thank you for taking the time to tell us about these things. I hope that I am able to find a nice pair for a decent price.
 
I have a nice set of proportional dividers I got from my Dad. He used them when airplanes still had navigators. Unfortunately, they’re ruled for knots indicated airspeed and nautical miles, so I haven’t used them much for modeling yet.
It's not impossible to use a navigational scaled proportional divider for measurement conversions. It's just that its scaling is designed for speed and distance conversions. Here's how:

1. Forget the scaling on the instrument.

To divide a length into equal increments, such as for planking:

A. Determine how many planks will bear on the frame or section of frame you want to divide.
B. Set the dividers so that one end spans a basic measurement on your rule, be it inches, centimeters, or whatever increment is convenient, for distance equal to the basic measurement times the number of planks you want and the other end spans the distance of a single increment you are using as the basic measurement.


For example, if you want to span measure the individual width of six planks on a frame, set one side of your dividers to 6" using your rule and the other side to 1" using your rule.

Now, with your dividers set to these distances (manually by "eyeball," rather than using the scale.) any distance you measure with the "wide end," will yield one sixth the distance measured. Once your dividers are set to a ratio, in this example, 1:6, that ratio should be used to divide the planked distance over each frame to divide it by six
 
Sir, this is a wonderful lesson on these amazing tools. Thank you for taking the time to tell us about these things. I hope that I am able to find a nice pair for a decent price.

There are four 10" decimally scaled proportional dividers for sale on U.S. eBay at the moment. Two are from Bruning, one for $87.00 and one for $84.00. One from Bowen for $70.00. Bruning and Bowen were very respectable, but smaller and less well-known U.S. drafting instrument companies. One from long-established and better known Keuffel and Esser company for $190.00. All appear to be made by Haff in Germany and labeled for U.S. sale by U.S. instrument companies and are essentially identical. The Brunings and Bowen models are less expensive because they aren't pristine (although should polish up nicely) and/or have worn cases. The K&E appears nearly mint with a case in good condition and, together with its more collectable K&E label, is correspondingly more expensive. I would say all four are reasonably priced in the present market, considering variations in label, condition, and collectors' demand. The Brunings are "make offer," so you may be able to get them for less.

See:


Happy hunting!
 
Last edited:
Thanks for all the helpful information in this thread.
One question: what do you do with the divider if it is not an exact number of planks on the widest point, but lets say 15.5 planks?
 
Back
Top