
• SUBSCRIBE TO SHIPS IN SCALE TODAY!

    The beloved Ships in Scale Magazine is back and charting a new course for 2026!
    Discover new skills, new techniques, and new inspirations in every issue.

    NOTE THAT OUR NEXT ISSUE WILL BE July/August 2026
  • Win a Free Custom Engraved Brass Coin!!!
    As a way to introduce our brass coins to the community, we will raffle off a free coin during the month of August. Follow link ABOVE for instructions for entering.

Older but not wise

Joined
Mar 4, 2026
Messages
11
Points
58

Location
Cornwall
Hello fellow salty dogs. Back to model ship building recently after a 10 year break. Maddening as I THINK I can pick up where I left off, only to find that my physical skills are very rusty and I haven't got my modellers eye in yet (the part of the brain that analyses, spots problems in advance and formulates plans on the fly). I can remember when I was reasonably OK at all this but currently someone forgot to tell my hands, eyes and brain!"

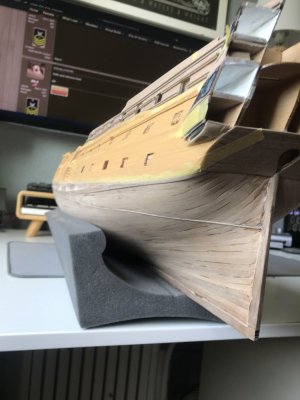
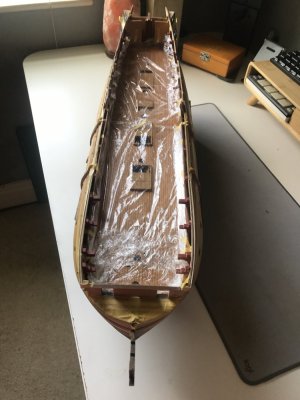
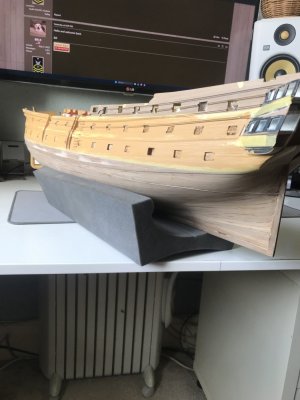
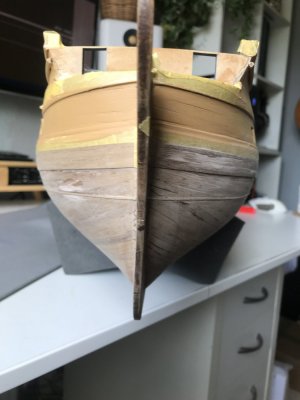
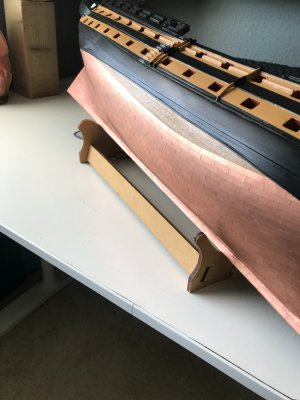
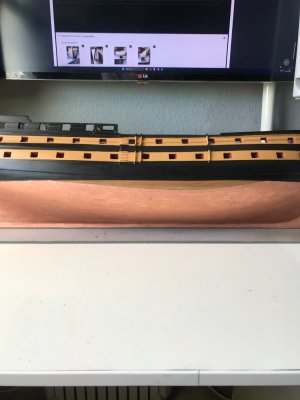
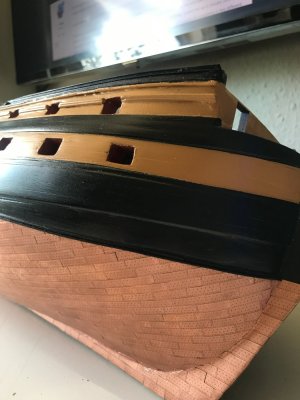
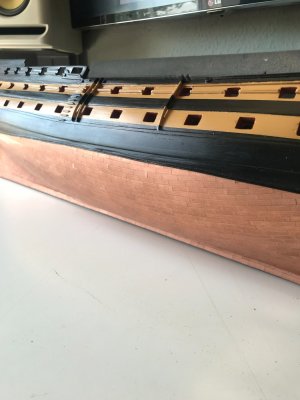
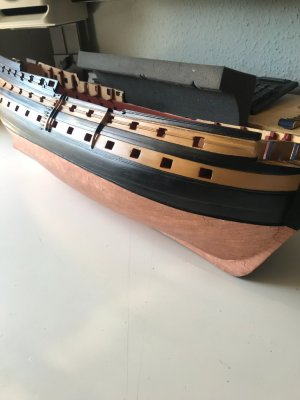
Anyway enough prattle, currently building Victory Models HMS Vanguard 1787 (1:72) which I barely started 10 years ago and during the intervening period, the bow snapped off completely not once, but twice (in two different places), the main keel frame (made of MDF) had become warped due to moisture getting in at some point, the bulwark patterns snapped in multiple places and general calumny all over the place. So, notwithstanding my 10 year hiatus, over the past 6 months I have been repairing, straightening and rebuilding as well as laying the first and second planking, whales, rails and quarter galleries. This brings me to where I currently reside at laying down the two yellow stripes along her gunports.

Cheers
 
Hello fellow salty dogs. Back to model ship building recently after a 10 year break. Maddening as I THINK I can pick up where I left off, only to find that my physical skills are very rusty and I haven't got my modellers eye in yet (the part of the brain that analyses, spots problems in advance and formulates plans on the fly). I can remember when I was reasonably OK at all this but currently someone forgot to tell my hands, eyes and brain!"

Anyway enough prattle, currently building Victory Models HMS Vanguard 1787 (1:72) which I barely started 10 years ago and during the intervening period, the bow snapped off completely not once, but twice (in two different places), the main keel frame (made of MDF) had become warped due to moisture getting in at some point, the bulwark patterns snapped in multiple places and general calumny all over the place. So, notwithstanding my 10 year hiatus, over the past 6 months I have been repairing, straightening and rebuilding as well as laying the first and second planking, whales, rails and quarter galleries. This brings me to where I currently reside at laying down the two yellow stripes along her gunports.

Cheers

Hi Salty, welcome back!
Do you happen to have any photos? Otherwise, it would be great to follow along if you start a build log!
 
Welcome and never fear, muscle memory passive recall will soon get you back almost to where you left off.

Eyesight and dexterity may not be what they used to be, but leverage your patience and wisdom, then have fun!
 
Hi Salty, welcome back!
Do you happen to have any photos? Otherwise, it would be great to follow along if you start a build log!

Hi Salty, welcome back!
Do you happen to have any photos? Otherwise, it would be great to follow along if you start a build log!
Hello Peter, Happy to start a build log, took a few photos this morning to show the current position.

Van 1.jpg

Van 2.jpg

Van 3.jpg

Van 4.jpg
 
Hello fellow salty dogs. Back to model ship building recently after a 10 year break. Maddening as I THINK I can pick up where I left off, only to find that my physical skills are very rusty and I haven't got my modellers eye in yet (the part of the brain that analyses, spots problems in advance and formulates plans on the fly). I can remember when I was reasonably OK at all this but currently someone forgot to tell my hands, eyes and brain!"

Anyway enough prattle, currently building Victory Models HMS Vanguard 1787 (1:72) which I barely started 10 years ago and during the intervening period, the bow snapped off completely not once, but twice (in two different places), the main keel frame (made of MDF) had become warped due to moisture getting in at some point, the bulwark patterns snapped in multiple places and general calumny all over the place. So, notwithstanding my 10 year hiatus, over the past 6 months I have been repairing, straightening and rebuilding as well as laying the first and second planking, whales, rails and quarter galleries. This brings me to where I currently reside at laying down the two yellow stripes along her gunports.

Cheers

Hello fellow salty dogs. Back to model ship building recently after a 10 year break. Maddening as I THINK I can pick up where I left off, only to find that my physical skills are very rusty and I haven't got my modellers eye in yet (the part of the brain that analyses, spots problems in advance and formulates plans on the fly). I can remember when I was reasonably OK at all this but currently someone forgot to tell my hands, eyes and brain!"

Anyway enough prattle, currently building Victory Models HMS Vanguard 1787 (1:72) which I barely started 10 years ago and during the intervening period, the bow snapped off completely not once, but twice (in two different places), the main keel frame (made of MDF) had become warped due to moisture getting in at some point, the bulwark patterns snapped in multiple places and general calumny all over the place. So, notwithstanding my 10 year hiatus, over the past 6 months I have been repairing, straightening and rebuilding as well as laying the first and second planking, whales, rails and quarter galleries. This brings me to where I currently reside at laying down the two yellow stripes along her gunports.

Cheers
Sounds like me! Building the King of the Mississipi. Trying to manage tiny( to me) parts. Hard with these old eyes.
 
Welcome back to the hobby and to SoS. Noticed you are in Cornwall. I lived there a few years as a kid. We were in Newquay. Great place and very fond memories
Look forward to seeing more of your build
 
Hello fellow salty dogs. Back to model ship building recently after a 10 year break. Maddening as I THINK I can pick up where I left off, only to find that my physical skills are very rusty and I haven't got my modellers eye in yet (the part of the brain that analyses, spots problems in advance and formulates plans on the fly). I can remember when I was reasonably OK at all this but currently someone forgot to tell my hands, eyes and brain!"

Anyway enough prattle, currently building Victory Models HMS Vanguard 1787 (1:72) which I barely started 10 years ago and during the intervening period, the bow snapped off completely not once, but twice (in two different places), the main keel frame (made of MDF) had become warped due to moisture getting in at some point, the bulwark patterns snapped in multiple places and general calumny all over the place. So, notwithstanding my 10 year hiatus, over the past 6 months I have been repairing, straightening and rebuilding as well as laying the first and second planking, whales, rails and quarter galleries. This brings me to where I currently reside at laying down the two yellow stripes along her gunports.

Cheers https://hamsterwheelbreaker.com/

I appreciate the detailed explanation. Posts like this are much more useful than short comments because they provide context and real-world experience. It's always easier to understand a topic when someone shares what actually worked, what didn't, and what they would do differently next time. Thanks again for taking the time to write it all up.
 
Thanks so much for the encouragement gentlemen.

I do not possess an airbrush so had to make do with a couple of budget brushes from my daughters watercolour set (don't tell her!). Must get an airbrush!

Thereafter, I painted her black stripes giving both yellow ochre and black stipes each with 4 coats of thinned down water based paint with a light sanding with 400 and 600 grade wet and dry sandpaper in between each coat. I then coated everything (above the copper line) in two coats of matt clear varnish.

That brings me to coppering. Never coppered before

Again I watched many YouTube videos and read many build logs by way of preparation. Vanguard has about 2600 individual 1:72 scale copper tiles. To date, I have almost finished the starboard side of Vanguard and have learnt a lot during the process. Just little things, when to trim a tile (before placement or in-situ), how to trim a tile (small scissors, large scissors, craft knife), best method of covering small gaps. Also what lines to to take, how to keep things as neat as possible. Victory models are quite generous and provided perhaps 100 extra tiles per side to account for errors (and I made plenty - would say I ripped off and replaced at least 30 tiles) I also elected to apply glue to the back of the copper tile rather than the hull which helped me judge amount better and so limit squeeze out and clean up. Overall, I was at bit better by the end of the starboard side coppering than I was at the beginning and I am hoping to do a better job of the port side, but hey, I may have already reached my coppering zenith!.


I would mention that I also purchased a cheap £15 set of modellers spectacles with interchangeable magnifying lens which helped massively and allowed me to get better alignment of tiles and also give my family a good laugh as they gave me pupils the size of tennis balls!


Port side to copper now............

van 2.jpg

van 4.jpg

van 5.jpg

van 6.jpg

van 7.jpg
 
It is unfeasibly hot in the UK at the moment and it has been over 32 degrees at midnight down here in Cornwall lately with no aircon! So, sweat dripping into my eyes whilst I painstakingly place 1250 individual copper tiles onto the port side was not an adventure I chose to have, so.....

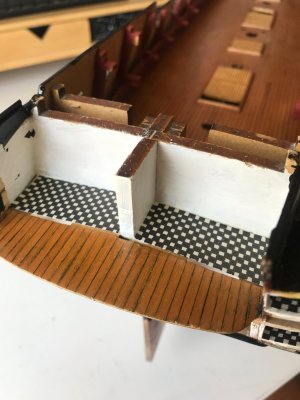
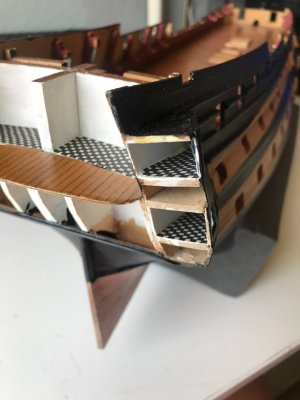
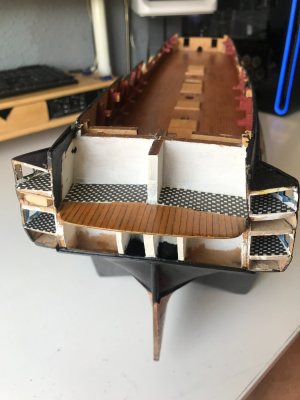
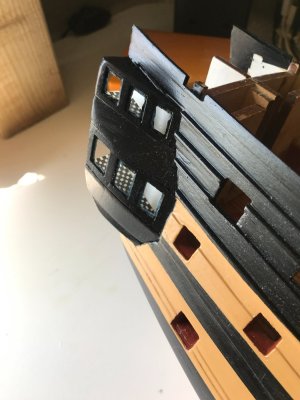
By way of a small distraction from the coppering, I decided to put a chequerboard floor in the quarter and rear galleries. Not sure if any of this will be seen but it was fun and simple to do. I made paper templates to fit the quarter and rear gallery spaces and then traced around them onto stiff white card which I then simply drew a chequerboard pattern onto and coloured with a black gel pen. A bit of PVA glue and it was all done and dusted. More importantly I could achieve this whilst I slowly evaporated.

Have to say that I have a new found respect for my fellow modellers in very hot places (Florida, South America, Australia, Spain, Portugal, etc) who manage to build amazing models in satanic heat.

So only a small update, and I will continue with the port side coppering when the temps drop down a bit (next week we are told).

van 8.jpg

van 9.jpg

van 10.jpg

van 12.jpg
 
It is unfeasibly hot in the UK at the moment and it has been over 32 degrees at midnight down here in Cornwall lately with no aircon! So, sweat dripping into my eyes whilst I painstakingly place 1250 individual copper tiles onto the port side was not an adventure I chose to have, so.....

By way of a small distraction from the coppering, I decided to put a chequerboard floor in the quarter and rear galleries. Not sure if any of this will be seen but it was fun and simple to do. I made paper templates to fit the quarter and rear gallery spaces and then traced around them onto stiff white card which I then simply drew a chequerboard pattern onto and coloured with a black gel pen. A bit of PVA glue and it was all done and dusted. More importantly I could achieve this whilst I slowly evaporated.

Have to say that I have a new found respect for my fellow modellers in very hot places (Florida, South America, Australia, Spain, Portugal, etc) who manage to build amazing models in satanic heat.

So only a small update, and I will continue with the port side coppering when the temps drop down a bit (next week we are told).

View attachment 618855

View attachment 618856

View attachment 618857

View attachment 618858
Beautiful !
 
Back
Top