• Ships of Scale has incorportated an extra level of security when you log In. Please follow on-screen prompts to acknowledge that you are not a robot via a "Check Box" or a "Pictorial Check Box Puzzle". This is needed due to higher level of AI Activity Security.
  • SUBSCRIBE TO SHIPS IN SCALE TODAY!

    The beloved Ships in Scale Magazine is back and charting a new course for 2026!
    Discover new skills, new techniques, and new inspirations in every issue.

    NOTE THAT OUR NEXT ISSUE WILL BE July/August 2026
  • Win a Free Custom Engraved Brass Coin!!!
    As a way to introduce our brass coins to the community, we will raffle off a free coin during the month of August. Follow link ABOVE for instructions for entering.

1980's Billing, Boat Cutty Sark, model to finish now i have time.

Joined
Sep 4, 2026
Messages
2
Points
1
Hi SOS,
I started this model sometime during 1986, and got the frames and 75% of the hull planking fitted. The advent of children and family life soaked up any spare time I had.
I am now retired and I am attempting to finish the model. This is my first wooden boat build.
What I was hoping is that may be someone whom might have some notes on the best assembly sequence. I don't want to "glue myself out" of some area of the hull.

Thanks for any advice you might share.

David Smith

 
What you are planning to do is one of the most challenging tasks one could undertake.
You intend to complete an advanced model ship; typically, it is recommended to build at least two simpler models before attempting the Cutty Sark.
Furthermore, the wood in this kit is likely not of the best quality—it is old and dried out.
To top it all off, Billing Boats is considered, to put it mildly, a mediocre manufacturer.

The only sensible advice is to purchase a new kit for a smaller vessel and learn the fundamental skills first.
Once you have built that, I believe you will realize just how extensive a project it is to complete your Cutty Sark, and you will then be able to decide whether or not it is a good idea to proceed.

I think this one might suit you. It’s still a significant challenge, but it’s from a good manufacturer, with high-quality materials in the kit and a good set of assembly instructions.

 
Hi to those above.

I have spent some considerable time sorting the the boxed contents and evaluating the task and now realise that it is considerable.

Thank you "Ubjs" for your comments above confirming my thinking. My intention now though, is to keep going with the hull, learn on the way, and will accept that it might be harder than it needs to be and the model will probably be less than perfect. Yes the Timber is hard and dry. The supplied downloaded Instructions are missing a lot of detail. The main deck forward and aft deck houses size did not match the deck layout sizes etc. The internet is a LOT better than 40 years ago so information now abounds, though that has its own challenges.

The teak veneer for the deck i had bought in 1986 is so dry it splinters and splits, and it will take me a year to cut all that i need. I have bought some precut 0.5 x 3 planking to replace the veneer. What's the best black caulking thread to buy?

The hull is planked to within 6 planks from the gunwales, and i seem to remember wanting to use thin Tufnol for the steel gunwales. I now realise that wont work as Tufnol will not bend to the hull shape at bow and stern. I have ordered some 1/32" thk maple ply to try. I hear a 50/50 mix of water and alcohol will assist with forming the ply..?

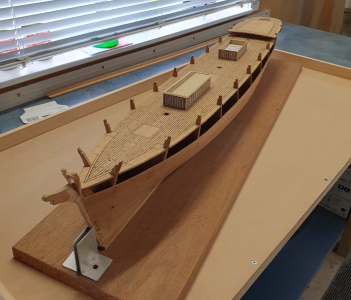
C S 001.png
Where I got to 1986.
Hull nails punched in awaiting filler. Decks and cabins not fixed yet.

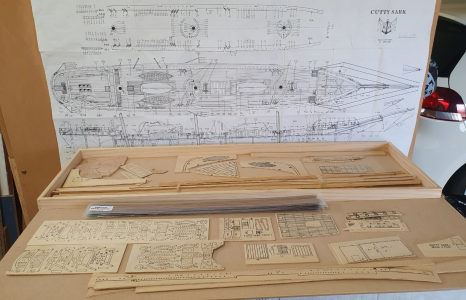
C S 002.png
Parts and Billings assembly drawing. Plenty profiles to hand cut yet.

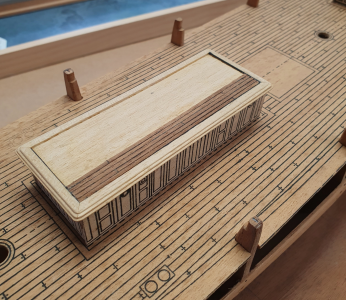
C S 003.pngForward Deck House started 1986. had based this on one of the G F Campbell drawing's.
Unsure ATM how to finish the cabin walls and was thinking some veneer simplified profiles to replicate the ship might be nice.
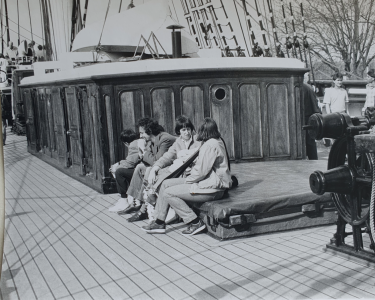
Anyone got some example photos of how this can be done? See 1986 Photo below I took.

C S P001.png
 
Last edited:
Back
Top