#5 Support: Ribs and "inner-keel"

Joined
Feb 18, 2019
Messages
685
Points
353

Here we will address:
All matters relating to the installation of the Ribs and inner "keel"

_DSC5251 ribs 2 copy copy.jpg
 
Last edited:
I never spend so much time on sanding the inside of the hull once the previous step has been completed and the station molds have been removed. After a couple of hours of hand sanding, the edges of the planks / strips have been smoothed out, most of the glue marks have been removed: as explained in the construction guide.
So now is the time to begin the next step: installation of the ribs.
I proceed exactly as per the guide so at this point no complementary explanations.
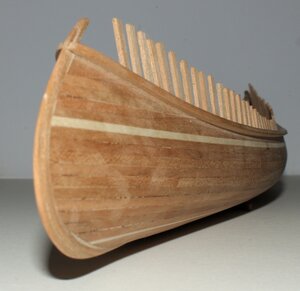
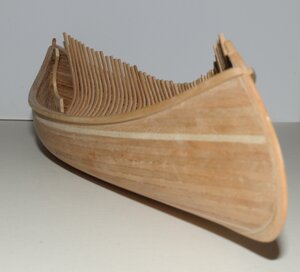
However, here are a couple photos since I am half way through...

_DSC1113 aa.jpg

_DSC1114 aa.jpg

G
 
Some canoes can be fitted with what is called "half ribs".
Their purpose is to strengthen / stiffen the canoe when the vessel is designed for heavy loads.
As most may have noticed, in the real world, many canoes (well really... most canoes) are not fitted with floor boards: and they may be used to strengthen the vessel as well.
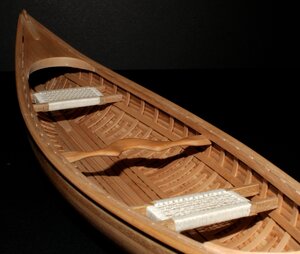
In the case of models built from the design presented within the scope of the project, these elements can also add an aesthetic element. Here, the addition of the "inner-keel" and floor boards is really to hide the fact that the ribs are installed in 2 parts: from the center of the vessel to the gunwales instead of one-piece ribs from gunwale to gunwale.
All these elements, ribs, half ribs, inner keel and floor boards, have the same purpose strengthen / stiffen the hull in different directions.

Here is the link to a wooden canoe builder where one can appreciate what a ribbed canoe (well, a work of art) complemented with half ribs look like. It is of course just one builder and as I am sure there are rules for their use as part of a canoe design, I believe that in the models we build, it becomes a purely "decorative" element: something different.

http://langfordcanoe.com/canoes/classic-wood/page/2/

As for the miniature canoes I have built in the past and continue to build today, Some have ended up in the hands of knowledgeable canoe builders or people who are well versed in designing and building such craft. Their comments can be summed-up as follows... "You include some interesting features", which can mean different things. I usually take it in agreement knowing that my models are "inspired" pieces where elements are shown cumulatively: in the real world some of these features would be included in one design but not in another and certainly not all together in the same model. Well, as I like to think, this is where the model builder's artistic licence comes in...

Anyway, half ribs can be as wide as the full ribs. There can also be narrower or wider, depends on the level of artistic license the builder is willing to apply (even in the real world) as long as it serves its purpose. As I said above, the features are not likely to be cumulative: it would make the canoe too stiff, too heavy, etc...

So as a "fantasy" model, this is not a feature that I include in my model often but here is one of my rendition of half ribs.


_DSC2640 aa.jpg

There are different way to space the ribs and include the half ribs although we would still installed a full rib at each station.
1) full ribs and half ribs of equal width
a) Full rib at each station, 1 full rib in the center of space, then 1 half rib installed between each full rib (as shown in the image above). This keeps the rib count the same as in the manual.
b) Full rib at each station, 2 equally space full ribs in between, then 1 half rib between each full rib. This will increase the total number of ribs, resulting in a tight fit.

2) The half ribs can also be narrower or wider. For narrower half ribs, the spacing can remain as above. For wider ribs, one would likely have to follow a): as b) would become very tight. But again "artistic license" can be everything.

The number of floor boards can also be decreased: just one strip on either sides of the rib joint's hiding strip (the inner keel).

There is probably more to say on this subject but we'll keep it at that for now.

G.
 
Some canoes can be fitted with what is called "half ribs".
Their purpose is to strengthen / stiffen the canoe when the vessel is designed for heavy loads.
As most may have noticed, in the real world, many canoes (well really... most canoes) are not fitted with floor boards: and they may be used to strengthen the vessel as well.
In the case of models built from the design presented within the scope of the project, these elements can also add an aesthetic element. Here, the addition of the "inner-keel" and floor boards is really to hide the fact that the ribs are installed in 2 parts: from the center of the vessel to the gunwales instead of one-piece ribs from gunwale to gunwale.
All these elements, ribs, half ribs, inner keel and floor boards, have the same purpose strengthen / stiffen the hull in different directions.

Here is the link to a wooden canoe builder where one can appreciate what a ribbed canoe (well, a work of art) complemented with half ribs look like. It is of course just one builder and as I am sure there are rules for their use as part of a canoe design, I believe that in the models we build, it becomes a purely "decorative" element: something different.

http://langfordcanoe.com/canoes/classic-wood/page/2/

As for the miniature canoes I have built in the past and continue to build today, Some have ended up in the hands of knowledgeable canoe builders or people who are well versed in designing and building such craft. Their comments can be summed-up as follows... "You include some interesting features", which can mean different things. I usually take it in agreement knowing that my models are "inspired" pieces where elements are shown cumulatively: in the real world some of these features would be included in one design but not in another and certainly not all together in the same model. Well, as I like to think, this is where the model builder's artistic licence comes in...

Anyway, half ribs can be as wide as the full ribs. There can also be narrower or wider, depends on the level of artistic license the builder is willing to apply (even in the real world) as long as it serves its purpose. As I said above, the features are not likely to be cumulative: it would make the canoe too stiff, too heavy, etc...

So as a "fantasy" model, this is not a feature that I include in my model often but here is one of my rendition of half ribs.


View attachment 180815

There are different way to space the ribs and include the half ribs although we would still installed a full rib at each station.
1) full ribs and half ribs of equal width
a) Full rib at each station, 1 full rib in the center of space, then 1 half rib installed between each full rib (as shown in the image above). This keeps the rib count the same as in the manual.
b) Full rib at each station, 2 equally space full ribs in between, then 1 half rib between each full rib. This will increase the total number of ribs, resulting in a tight fit.

2) The half ribs can also be narrower or wider. For narrower half ribs, the spacing can remain as above. For wider ribs, one would likely have to follow a): as b) would become very tight. But again "artistic license" can be everything.

The number of floor boards can also be decreased: just one strip on either sides of the rib joint's hiding strip (the inner keel).

There is probably more to say on this subject but we'll keep it at that for now.

G.
You have provided an excellent tutorial on half ribs and the added Langford site illustrates one builders concepts. THanks. PT-2
 
Back
Top