Alex R H.M.S. Enterprize Build Log

Joined
Oct 30, 2019
Messages
355
Points
278

Location
Houston, Texas, Park City, Utah
Friends,
Today I start the build.
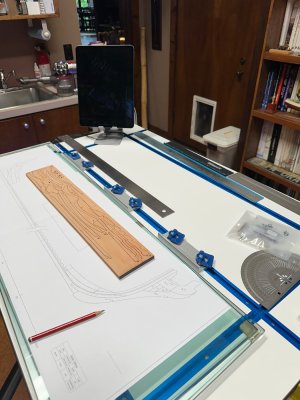
I had been thinking for a while that a building table with T-tracks would be very helpful for this big project.
I bought a pre-made Melamine T-track board 1" x 40" x 26" from Rockler with a few clamps and accessories to fit on the rails. Rockler has a multiple clamps and devices that slide on the rails.
First order of business was to secure the T-track board on my building table with double stick foam tape and organize the shop for the new build.
Next, I put the keel plan between glass panes to smooth it out. The keel structure will then be assembled followed by the building jig.
The sheets containing the parts forming the keel structure and the parts themselves are very clearly marked. The wood is top quality, and the laser cuts are perfect, cutting completely through the sheet. The plans are very good, with parts' numbers clearly marked; I have the instruction manual on my I-pad right in front of me.
Next I will remove the keel and apron parts from the sheets, and clean up the laser char.
Once detailed and dry-fitted, the keel parts will be glued with a glue stick to the plan and assembled using wood glue.
The keel structure will then be sandwiched between two glass panes. while the building jig is assembled
IMG_1530.jpeg
Here is my new building table with T tracks !

Alex R
 
Hey Alex ! Welcome to the group build !
I love the building board with the T-tracks. I had thought about doing that but just decided to use a sheet of high quality plywood to attach the building jig to. I'm following your build so I can see what others do differently. :)
 
Never thought of using T-tracking, but it sounds like a great idea. Thanks for the post about this and how you set it up.
Allan
 
Yesterday evening and today:
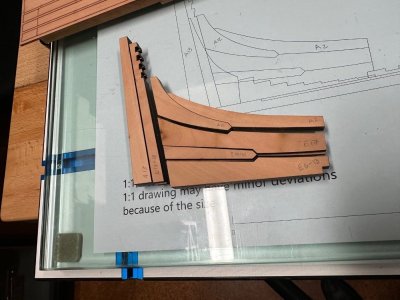
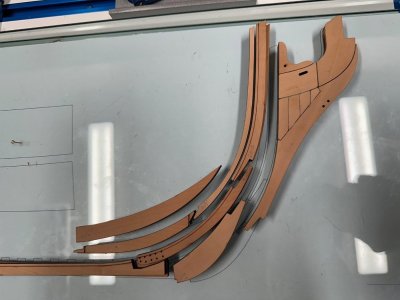
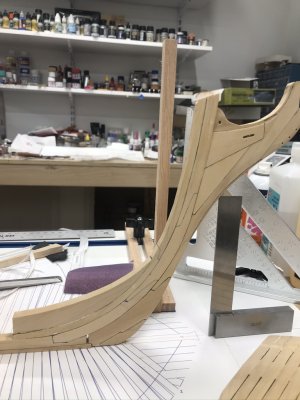
1) identified and cut out the pieces of the cutwater, apron, stem, front deadwood, after deadwood, inner post and stern post.
2) sanded, dry-fitted, and glued the cutwater pieces.
The wood quality is outstanding ! as well as the laser cuts. Everything is well labeled on the sheets.
A note of caution: some pieces are identical halves to be glued together. However, sometimes they have the same number and other times different numbers for each half. Easy to figure it out'once you figure it out.
The apron, stem, and front deadwood are complicated, like a puzzle, but will fit together nicely.
Tomorrow I will de-char, clean, dry fit and glue the after deadwood, inner post and stern post. Maybe start cleaning out the apron, stem and front deadwood.
.IMG_1534.jpegIMG_1533.jpeg
After deadwood and stern-post pieces Cutwater glued, apron, stem and front deadwood to clean and glue.

I am using Elmers wood glue, with some graphite powder mixed in.
I am sanding off most of the char, until it feels smooth, but not all the way down to the natural wood color. In the past, I have taken off too much and had to use filler.
I need to figure out the rabbet going up the stem. I know it is not a continuous groove, but stops where the wales butt in: right Allan ?

Thanks guys.

Alex R
 
Yesterday evening and today:
1) identified and cut out the pieces of the cutwater, apron, stem, front deadwood, after deadwood, inner post and stern post.
2) sanded, dry-fitted, and glued the cutwater pieces.
The wood quality is outstanding ! as well as the laser cuts. Everything is well labeled on the sheets.
A note of caution: some pieces are identical halves to be glued together. However, sometimes they have the same number and other times different numbers for each half. Easy to figure it out'once you figure it out.
The apron, stem, and front deadwood are complicated, like a puzzle, but will fit together nicely.
Tomorrow I will de-char, clean, dry fit and glue the after deadwood, inner post and stern post. Maybe start cleaning out the apron, stem and front deadwood.
.View attachment 511289View attachment 511290
After deadwood and stern-post pieces Cutwater glued, apron, stem and front deadwood to clean and glue.

I am using Elmers wood glue, with some graphite powder mixed in.
I am sanding off most of the char, until it feels smooth, but not all the way down to the natural wood color. In the past, I have taken off too much and had to use filler.
I need to figure out the rabbet going up the stem. I know it is not a continuous groove, but stops where the wales butt in: right Allan ?

Thanks guys.

Alex R
wow. I can't do that much at once. :) Especially with the complexity of the deadwood which I looked at the plans, but still working on the cutwater. Your's looks great ! :)
 
Yesterday evening and today:
1) identified and cut out the pieces of the cutwater, apron, stem, front deadwood, after deadwood, inner post and stern post.
2) sanded, dry-fitted, and glued the cutwater pieces.
The wood quality is outstanding ! as well as the laser cuts. Everything is well labeled on the sheets.
A note of caution: some pieces are identical halves to be glued together. However, sometimes they have the same number and other times different numbers for each half. Easy to figure it out'once you figure it out.
The apron, stem, and front deadwood are complicated, like a puzzle, but will fit together nicely.
Tomorrow I will de-char, clean, dry fit and glue the after deadwood, inner post and stern post. Maybe start cleaning out the apron, stem and front deadwood.
.View attachment 511289View attachment 511290
After deadwood and stern-post pieces Cutwater glued, apron, stem and front deadwood to clean and glue.

I am using Elmers wood glue, with some graphite powder mixed in.
I am sanding off most of the char, until it feels smooth, but not all the way down to the natural wood color. In the past, I have taken off too much and had to use filler.
I need to figure out the rabbet going up the stem. I know it is not a continuous groove, but stops where the wales butt in: right Allan ?

Thanks guys.

Alex R
Hi Alex R, just as information, all Axial Carpentry components should be garnished with tar cloths.Frank
 
I am using Elmers wood glue, with some graphite powder mixed in
Never thought of using graphite mixed in. My current favorite is a tiny drop of acrylic paint to match pine tar mixed into a puddle of PVA glue. With the graphite powder is it very black or just dark like pine tar which is more towards brown then black? Sounds like a good way to show the seams without the fuss of dark tissue paper or construction paper.
Thanks for the tip Alex
Allan
 
wow. I can't do that much at once. :) Especially with the complexity of the deadwood which I looked at the plans, but still working on the cutwater. Your's looks great ! :)
Thanks Jeff. I'm spending a lot of time in preparing the pieces-sanding and fitting, sanding and fitting.., then glueing, and clamping, on top of the glass over the plan. I'm a night owl, usually finish about 1 AM sometimes 2 AM. even the dog is asleep so no interruptions.
Allan, the graphite mixed-in is dark gray to black. I mix it in a small applicator bottle with a flat steel syringe tip. I'm pretty sure one can get PVA glue in black.

Alex
 
Never thought of using graphite mixed in. My current favorite is a tiny drop of acrylic paint to match pine tar mixed into a puddle of PVA glue. With the graphite powder is it very black or just dark like pine tar which is more towards brown then black? Sounds like a good way to show the seams without the fuss of dark tissue paper or construction paper.
Thanks for the tip Alex
Allan

I'm using Transtint dye to color my Oseberg. I've read where people have used it to dye PVA with no problems and it's available in a variety of colors. It's highly concentrated, so a little goes a long way.

With colored PVA, however, one must be very judicious in its application. You want just enough to give you a tiny bead of squeeze-out so that the glue line will be consistent, but not so much that cleanup is a mess. Cleanup timing is critical as well - wait until it's rubbery and scrape it off. Too soon and you risk wiping into the grain of the surrounding wood. Too late and ... well ... it's just a pain. :D
 
Last edited:
HELP!
Ok, Yesterday I glued the after deadwood and inner post, then I hit "builder's block"
The keel structure is complex. Some questions for the group:
1) The rabbet: How do I make it? Do I bevel the keel pieces individually before assembly using a router vs milling machine, or do I build the whole keel structure and cut out the rabbet by hand using gouges and chisel ? or ? suggestions..
2) The false keel. I'm not clear how it goes together, since the three pieces together are longer butt end to end than the keel - or do I scarp the false keel pieces to join them and then trim them to keel size. ? Also, the false keel was held together by stapling it to the keel with copper staples. Does anyone know the size of the staples and how many staples were used. I was thinking I could flatten some copper wire and bend the tips to make a staple.
3) Sanding the cutwater and the after deadwood - I think it will be easier to sand the deadwood assemblies before glueing them to the keel.
Today I plan to clean and join halves of apron and stem pieces, maybe keel parts.
Take deep breaths.
Alex R
IMG_1537.jpeg IMG_1538.jpeg
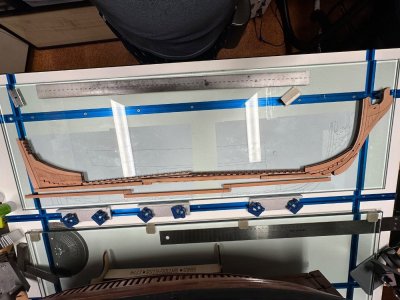
After deadwood and backbone laid out
 
HELP!
Ok, Yesterday I glued the after deadwood and inner post, then I hit "builder's block"
The keel structure is complex. Some questions for the group:
1) The rabbet: How do I make it? Do I bevel the keel pieces individually before assembly using a router vs milling machine, or do I build the whole keel structure and cut out the rabbet by hand using gouges and chisel ? or ? suggestions..
2) The false keel. I'm not clear how it goes together, since the three pieces together are longer butt end to end than the keel - or do I scarp the false keel pieces to join them and then trim them to keel size. ? Also, the false keel was held together by stapling it to the keel with copper staples. Does anyone know the size of the staples and how many staples were used. I was thinking I could flatten some copper wire and bend the tips to make a staple.
3) Sanding the cutwater and the after deadwood - I think it will be easier to sand the deadwood assemblies before glueing them to the keel.
Today I plan to clean and join halves of apron and stem pieces, maybe keel parts.
Take deep breaths.
Alex R
View attachment 511459 View attachment 511458
After deadwood and backbone laid out
Looking good !! If you look at the partss E1-11 & E1-12, as well as E2-26 and E2-27, there is a laser burn line on the inside edge. That is where the rabbet goes. It also follows along the keel as well. :) Personally, I think it would be easier to cut the rabbet prior to gluing. That is how I plan to tackle it.
 
Since it is just a bevel along the edge, I will just sand it. Then you glue additional pieces on to for the back edge of the rabbet slot. Unfortunately they don't explain in the instructions about the rabbet for the 1/48. I found the information in the YouTube videos they posted for the 1/96. :D
 
Here is a link to video #1.
Enterprise video #1
There are some diffferences between the 1/96 and the 1/48 (as you would expect).
They sand it in the video as well.
Jeff
Ok, Thank you so much. The video was very helpful. answered my rabbet and false keel questions. I subscribed to the site. I'll do it like in the video.
Illumination !
Thanks
AR
 
Great start, Alex. I, too, have looked at that same pre-fabbed T-track board, but wasn't sure about how effective it would be. I will eagerly follow your build and your review of the T-track board application.;)
 
Never thought of using graphite mixed in. My current favorite is a tiny drop of acrylic paint to match pine tar mixed into a puddle of PVA glue. With the graphite powder is it very black or just dark like pine tar which is more towards brown then black? Sounds like a good way to show the seams without the fuss of dark tissue paper or construction paper.
Thanks for the tip Alex
Allan
FWIW, I have always "suspected" the graphite powder may weaken the yellow titebond from test pieces I ran tests on. My end result is using a very porous black art paper between joints. when glued, it is quite thin, and yields a strong joint, IMHO, quite realistic. The big plus..... when hit with glue, both surfaces, just enough to fill any tiny void giving nice finish. When dry, very easy to simply chisel away from wood.4CC79DE8-CED9-4B1E-9E85-4DAED5FBFEAC_1_105_c.jpegD2FE4411-1CFE-4341-9203-B10C2EC02D19_1_105_c.jpeg
That said, for this project, I have finished keel, bow, transom using nothing and joinery seems realistic here as well/ all pieces here where cut scratch from stock.
That said, I have been a lurker here for some time.....great forum and looking forward to following everyones progress on this fine kit.

Tim
 
Back
Top