- Joined
- Aug 8, 2019
- Messages
- 5,481
- Points
- 738

For the Modelbouwer I wrote an article about carving and I wish to share it with you here. I hope this will an educational subject to get more people into carving or take away the fear on starting with it.
Sometimes you come across models of historic sailing ships that have beautiful ornaments made by the maker of that model. How do you do it to accomplish this on such a small scale. Sometimes they are made of polymer clay, famous brands for this are Premo Sculpey, Sculpey III, Cernit or Fimo. The most famous ship models you come across on the Internet whose ornaments are made of polymer clay are Doris Obručová's models. She builds her models from paper! and also makes frequent use of polymer clay. You can admire her models on her YouTube account.
YouTube
And also her construction reports are still visible on the Czech Model Forum. The other one I admire very much is Ramon Olivenza, his technique in both polymer clay and wood is outstanding.
This piece I want to devote not to polymer clay, but to making ornaments in wood. Although polymer clay can be helpful at times, especially if you are going to paint ornaments and you have made a mistake. On the Prince William I did cheat that way once. After painting it is no longer visible. My great example is Ivan Trtanj, you can find a lot on the Internet about his works of art.
Wikipedia
But his own museum in Kressbronn is also among the possibilities to admire his models.
KressbronnMuseum
Just Google his name. Ivan has been an inspiration for me to continue woodworking into an ornament. Especially the method he uses also proved to me the possibility of achieving it. He uses a lot of a hand router/dental drill to shape his models. A method that is quick to learn. I am going to name both methods here and mainly the one I use the most myself.
And I seen off course more artist like Janos, Maarten, Ptér, Willi, etc. To mentioning a few that come in my mind.
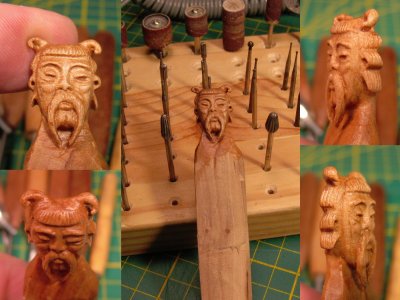
My first tool was a home-made chisel from a precision screwdriver. But soon I had slightly better chisels, until I replaced cutting by using a Dremel with flexible hose. Some examples from that time, as well as with my new machine that I explain later here.
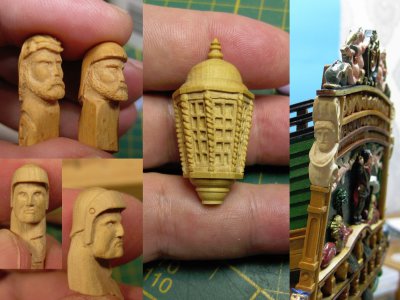
My intention in this story is to introduce everyone to making ornaments out of wood. Tell about my experience and also share what I’ve found in this forum and other forums what was usefull for me to learn it. And there I’ve come tot he point of my thoughts about it. My opinion is that this can be learned. And that you can achieve a satisfactory result for yourself. I'll also show that with a handy milling machine and the right end mills this is easier done than it seems. The starting capital is low, all you need is a lot of patience and the courage to start. With the advice start simple and as your talent and dexterity improves, you can start working with more complicated shapes. I don't see myself as a perfect maker of ornaments yet, far from it. I am still learning. But I am enjoying this so much that I want to share it with you right now and maybe I can persuade at least 1 person to try it too and more importantly just do it. Because in the beginning I also shied away, still from certain shapes I want to make. But I do try it and if at first it doesn't work out, I will try again until it is right in my eyes.
The first thing I do want to talk about is the material or in this case the wood you can use.
Of course, not every type of wood is suitable, especially if they are such small parts with a lot of detail. This requires hard wood with a fine grain that can also be worked on afterwards with a wood finishing agent.
You can also make an ornament with Ox bones, antlers, ivory, tagianuts or whatever can be used but I will limit myself here to wood and which ones I have already worked with
and I will also explain what the properties are.
The first wood I ever used to make anything with was beech wood. I can give a short answer to that: this is unsuitable and no, I will never use it again. It splinters, breaks and the grain and fibers are too coarse. Not suitable for our purpose. But I do advise you to try it to make a simple ornament with this. For me it turned out to be a very good teacher to use this. I managed to make a simple shape and with that I had immediately gained a lot of experience how this goes with the better suited woods.
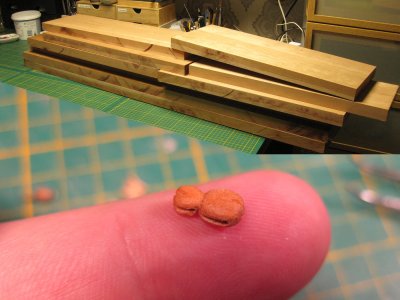
I have a good stock of cherry wood lying around, about two table tops made of cherry wood have now been labeled stock. I am now building a model of a Dutch two decker and basically using only this wood for it. Cherry wood is readily available, I look on eBay for discarded furniture made of solid cherry. This has been very popular for making furniture out of it. You come across plenty. And it's pretty good for making little ornaments out of that. But before you start cutting an ornament you have to test your piece of wood, sometimes it splinters quickly and sometimes you have a piece that is perfect to use. I understood from a fellow modeler @Ptèr that this comes from what part of the tree the piece of wood comes from. This will also be the case with other woods. I have European cherry and it also seems to be a bit denser in texture. Nice wood to work with. 1 board I have lying around is perfect to work with as far as wood carving is concerned while other pieces are more splintery.
Although I shouldn't use the word carving with cherry because it responds best to milling. With that you can point out details better. With knife/chisel it still sometimes wants to split and you can't make details. So these days I mainly use it to make blocks or parts. That goes very well.
In the picture below, you can see an overview of my stock of cherry wood and a hoist block I made out of cherry wood.
Boxwood. We know this mainly as a hedge in our gardens and from the news regarding the Boxwood moth. Grows very slowly and therefore you get the perfect wood to make small parts. It occurs as a bush/hedge, but sometimes as a tree form with a decent trunk. These are usually very old to get that thick trunk. I have collected a considerable lot by now.
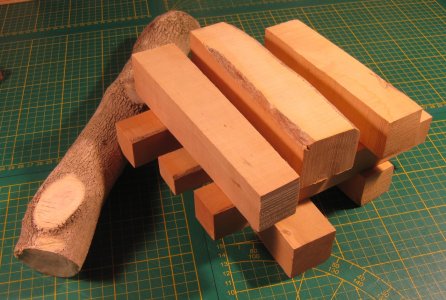
Search marketplace, Ebay or neighbors and gardens where there is an infested bush. There are YouTube videos on the Internet explaining how to dry and store it. Sometimes you are also lucky to have a modeler friend (thanks Maarten) with a large lot who can spare some.
The properties are as I said, hard and very finely grained. It is possible to turn boxwood in the lathe to 1 mm. thickness. This will not work with other woods. Perfect for miniature work. It cuts easily and milling is also fine.
However, it is becoming very rare these days and boxwood from our area comes at a high price tag in the trade. European boxwood is the number one to use for wood carving.
Castello. comes from South America and is called the alternative to Buxus.
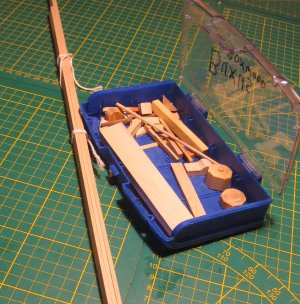
I have a small stock (few laths and a tray of small leftover pieces), It is available at modeling stores. Especially Jimbo in Germany has a good stock of planks and laths in all kinds of sizes.
It has about the same properties as boxwood. Lighter in color though, almost white. But it is also a little less with detail making. It still breaks sometimes, especially small pieces can break off. A nose in a face is fragile. I still use my stock mainly for blocks and parts on a ship. You can finish this very accurately and tightly.
Shroud cleats is 1 of them.
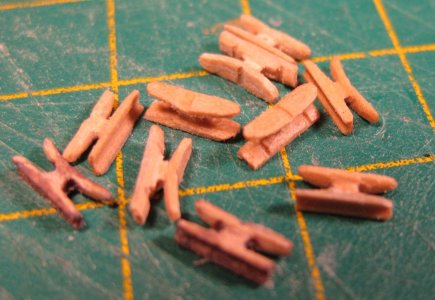
But I also made the lanterns on the Prins Willem out of this. I bought it from Aliexpress as boxwood. But I now know that they sell castello under the name buxus or it is boxwood from Turkey which is of lesser quality because it grows faster there. As I also mentioned before real boxwood is rare and very expensive. In contrast, castello is readily available and also not that pricey.
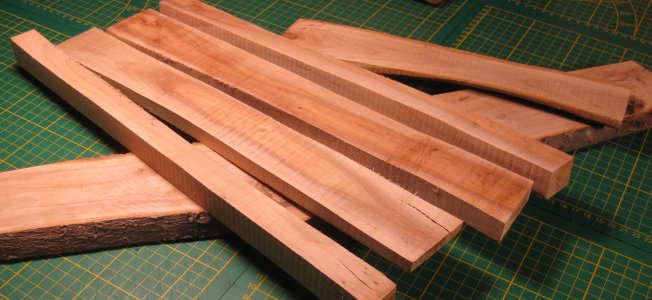
The next wood I use is apple wood. Gladly surprised by what I've accomplished with it. You can get to very fine details and it is strong. Nice color and I think I'm going to have a lot of fun making ornaments with it. It is not as easy to cut as boxwood, it is harder (probably because of the long drying time), milling is not easy either. But because of that, something can't go wrong easily either, because you don't take away too much material at once. And apple is readily available in the Netherlands.
The photos have become a little more red because of the lighting. Sorry about that.
Other types of wood include olive wood (you can still sometimes get it in the pet store as a dog bite toy but keep in mind that is not resistant to varnish well, it is slightly greasy by nature), the pit of an avocado, alder wood, pear wood, etc.......
Keep in mind that the wood to be used must have a few properties, not everything is suitable despite being able to shape it well. @janos gave some tips here on the forum what to look out for. If you want to see beautiful carvings, look for his work back here on the forum. He makes fantastic wood carvings and also uses a nail milling machine for this like I do. That tip came from him and that's why I started doing this too....
- It should not splinter
- it must be hardwood
- dense grain, the finer the better.
- So it should be workable with cutters and with knives
- and it must also be able to withstand finishes with various oils, varnishes. There are hardwoods that can be worked well but are very greasy. Final finishing is then not possible.
The equipment.
As I mentioned above, I had started with small chisels made from screwdrivers. I still use them sometimes, but they are not hardened correctly and therefore become blunt quickly.
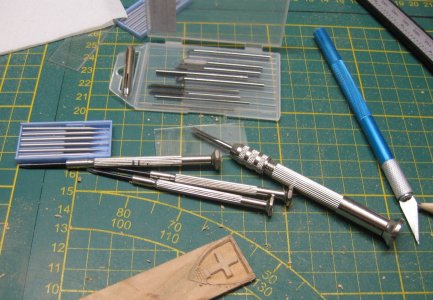
Chisels for fine work. In the picture below you can see my first 3 chisels I made from small screwdrivers. Next to it is a chisel from Aliexpress with a box above it with various little chisels you can put in it. An X-acto knife and the blue boxes with the cutters I use (more on that later).
There are sets available on the internet from Kirschen, Narex or Pfeil, professional stuff with a price tag of several hundred Euros. I also see fellow modelers who bought a set from Russia from a person, you often see these passing by some members here and this was the perfect set for this work. (Due to the war this is no longer available) This set is special because they were specially made for making ornaments for model ships. A very nice set see the picture below. There you see the last one delivered. On the model building day at the shipping museum in Amsterdam (2024), the happy owner had these with him. So quick snapshot.
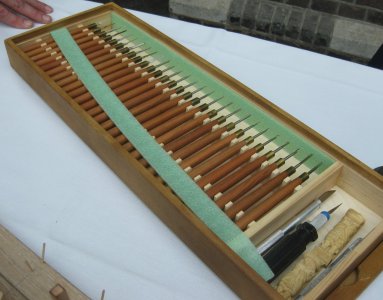
I don't use these more expensive sets, too high for my budget. But that doesn't mean there aren't options for lower budgets. What made me most happy is this set in the picture below.
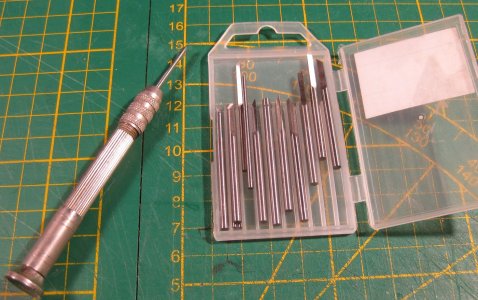
This set cost something like 8 euros with handle and without around 5 euros.
LINK
I use this set a lot because the chisels are sharpened at the right angle and are very sharp. You can already sharpen them with sandpaper wet grid 1000. I have this stuck on a small board and always at hand. I'll come back to that later. There are many different types of sets available on Aliexpress for very little money, but the one mentioned above is my favorite. Sharp and I could fit them with a wooden handle, so I always have the set to hand. With a diamond disk on the dremel, I was even able to customize a few to my needs. image below.
Search Olive carving on Aliexpress and you'll come across many varieties, including these.
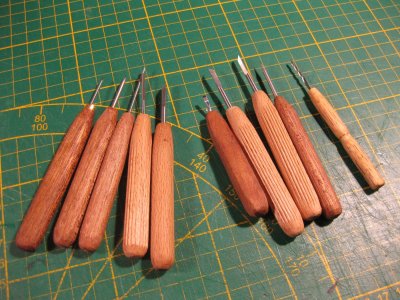
You can also use an X-acto knife for modeling, but beware, they break rather quickly. A small wood carving knife or whittling knife will serve better. And believe me a few for small work, are not a waste of money.

How do you keep your chisels sharp? I can talk a lot about that, but there are plenty of YouTube videos out there on how to do this.
You can also find websites that show this. A great site where I learned a lot is this Dutch site, but with Googling you will definitely find a good site in English or your native language as well.
LINK
I personally use 2 whetstones I ordered on Aliexpress and one has a grid 1000 and 6000 and the other is an agate stone (grid 12000). Great stones for the hobby, especially if you use those guides to keep the chisel at an angle during sharpening.
You can get your equipment sharp well with this, even the cheaper stuff looks like the professional ones after this. Still, I only use this the first time or for recovery.
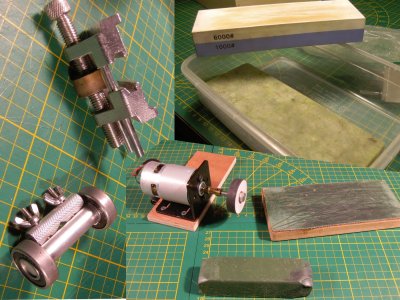
I keep my knives and chisels screen with a leather strop or a honey wheel. I have a standard strop with paste on a board, but the honey wheel is a godsend. You can already make this out of MDF, but I have one made of leather. By holding your knife over the spinning wheel for a moment, your chisel is so sharp that it glides like a knife through butter. Use of sharpening paste required, though. Leather alone is also possible, but with the paste the metal will shine like a mirror.
Search for 'honey wheel' on YouTube, leather or MDF is very suitable for this. The advantage is that your chisel is raised to a higher level. The cutting area shines like a mirror and after honing the chisel or knife cuts through the wood like a knife through butter.
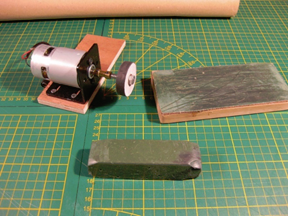
So much for the cutting equipment. I do use it, but when possible I mainly use the small milling machine and the Dremel.
Milling device from nail stylists' studio
Yes you read correctly, the ideal tool for our hobby comes from the nail studio. There you have (usually from the brand Marathon) small milling machines. Sometimes equipped with an extractor. But also just a separate device to which a handpiece can be connected. The hand tool is quite powerful but of course a Dremel is many times stronger. For the work we will do with it, not much power is needed, but high speed. I also use my Dremel when power is needed, for example, to sand away a big thick piece of wood. But I prefer the nail milling machine. It is almost noiseless, which in itself is a great advantage. So you can do your fine work nice and concentrated without slight hearing damage afterwards. And as I mentioned, I learn from others and the tip for the nail grinder was an advice from Janos Nemeth a well known modelmaker here who has several years of experience in making these small works of art in wood.
So known in the Netherlands under the name Marathon. They are for sale here with a starting price of about 150 Euro. A copy of this machine, which in my opinion is just as good costs on AliExpress around 16 Euro and that includes the shipping costs!!!
LINK
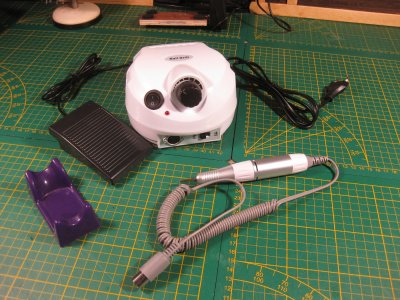
The handpiece is very light in the hand so it produces almost no noise. You can also see that you can reach the cutter with your fingers because the cutter is the only part that rotates.
I understand that low power consumption is desirable these days and this machine meets that requirement. Good for nature shall we say.
Are there any drawbacks? Yes of course, the handpieces are not as powerful as a Dremel and so are not suitable for everything where power is needed. But for making small details in wood or drilling small holes it is perfect.
Yes, I have a Dremel and I can use that too. True, but the Dremel is not as handy as the small handpieces of the nail stylist's router. The Dremel has quite a thick head where the cutter comes in and that is awkward with the fine work we are going to do. It is also heavy in the hand, as well as the noise it produces.
You can only use these handpieces for one type of bits. Standard thickness of the bits is 2.35 mm. But it is simple to expand by replacing the chuck (tube in the mouthpiece). There are 2 more sizes available, namely 3 mm. and 3.175 mm. (standard Dremel size)
LINK
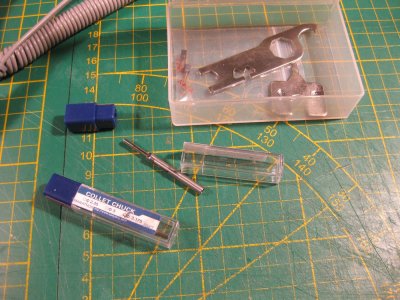
You also need the special wrench for this and is usually supplied by the same supplier. Please note that the type of hand drill is identified by the number 202. It requires a triangular wrench. Since exchanging is not convenient, I ordered an extra handpiece and mounted a different size in it. Exchanging handpieces is easier and faster than exchanging the chuck. A handpiece costs something like 10 euros and sometimes they are on sale for much less.
LINK
I have three of them lying around, each with its own size. The handpieces have a 5 pin connector but officially only 2 pins are used, so there are also connectors with 3 pins (2 are missing) This does not matter and they also fit in the machine.
This was the machine and of course you are not obliged to follow this, there are other options that will do just fine. Advice is if you buy this manicure machine to start with 1 handset and see if you get far with that. You can always upgrade if it turns out to be a success.
The cutters I use are more or less the cutters the dentist uses. If you can get those on the cheap to use, fine. Despite the little corner they usually have on the end (that's how they clamp into the drill head) they fit into the handpiece. Dental cutters are 2.35 mm in diameter. You can also buy the blue boxes offered on AliExpress for a bargain price. These cutters are made of tungsten steel (tungsten carbide) and are very wear-resistant. Provided you don't let them burn. You can even mill brass or aluminum with them just fine. But I only use them for wood or plastic.
LINK
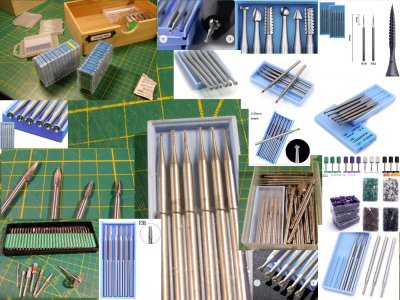
On the image above you can see an overview of what is available. The link above is a set of 6 different ones that you can get started with. The 1.0 mm and the 1.4 mm are perfect to start with. You can already make many details with these. There are other thicknesses available in these sets from 0.3 to 2.3 mm. The thick ones I own but don't use very often, the thinner ones than 0.9 don't come as a set as shown but usually as a set of 6 in one shape. So 6 spherical or 6 straight.
But as said, for 5 euros you are well on your way to get started. And it is not a waste of money if this part of the hobby is not a success for you, I use these cutters for other purposes as well.
Should you be able to get used dental cutters somewhere, purchase them. Even if they are blunt they prove useful. You will find that sometimes a blunt cutter is perfect for polishing.
On the other hand, if you can't get these, there are always the cheap diamond cutters from AliExpress that I believe have zero diamond in them. But are fine for smoothing something. For the price you don't have to miss out. By the way, the manicure machine comes with a few of these, which are actually enough to start with.
I also always keep a few bags of silica gel with the cutters. Prevents corrosion. Pretty handy. In fact, I have those in almost every drawer of my equipment. This prevents rust on your metal workpieces.
Sanding, there is a lot available there. Your manicure machine comes with some sanding spinning tops, but they are also available separately. the standard Dremel also suffice just fine. You also have round sandpapers for mounting on a rod and I sometimes use those as single papers but also with a thin board behind them. Works fine. You can also use a round rod that you glue a broken bit into as a shaft as a sanding tool just fine. You glue the sandpaper to the wood and that sometimes works even better. Just make sure it's centred, though.
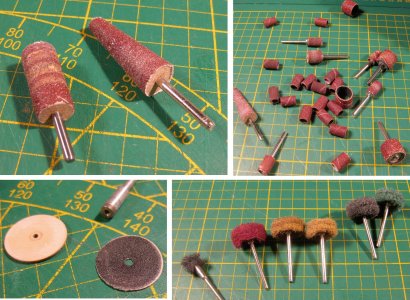
Then you have the sanding tops with sanding sponge. Available standard or just make your own by screwing a piece of 3M sanding sponge into the rod (my preference). With this I always bring my end result to a nice shine. All minuscule scratches and blemishes then disappear.
Still, I want to advertise a little bit about 1 supplier on AliExpress that I have good experience with. This store has the vast majority for sale for pretty good service and price
LINK
I leave it to you to figure out when and which cutter you need to make your part. I use almost all of them and have learned when I need which one. In which I may say the drop and spherical shape are my most used. If you go to work with these cutters you will find that sometimes a little force is needed but most of the time it is no more than stroking the wood. You don't remove more than 0.1 or rather 0.05 mm. away from the wood. You have to learn what the cutter does. It can catch and thereby shoot across your workpiece with all the nasty consequences. Adjust your speed until you notice this is going well. It takes practice and don't expect too much of yourself in the beginning. Start simple with simple shapes to get the feeling. I couldn't make a face on day one either. I was already happy with a simple ornament or shield.
I discovered a lot about the wood to use, what were the limits of possibilities. Which cutters for what, which blades or chisels. The feel and most important, avoiding cutting your fingers. Because that's part of it too, especially in the beginning.
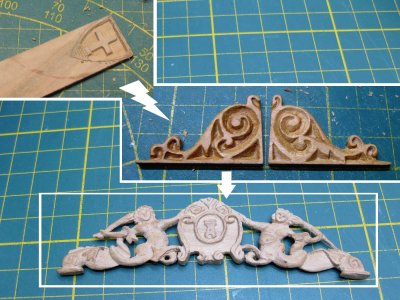
In the image above, I show my progress over time. A simple cross on a board to a curling element for the side gallery to the upper heck board of the Prins Willem. All three in cherry wood. With patience and also failure, I brought it to a result to my feeling that was good. And the latter is important. If you are comfortable with it, the result was successful. Don't stare blindly at the masters I quoted in the beginning of this piece, there are years of practice behind them. Maybe one day you will reach this level or maybe never. As long as you enjoy what you accomplish and create.
On my YouTube account I have two videos to show you how I work.
These videos also show how much time goes into this. It is a time-consuming job that requires patience. You can clearly see that I rub the router over the wood when applying details. If you press too hard, the cutter can catch on and rattle all over your work. That brings damage to previously made details. You have to be careful of that.
Preparation.
I take apple wood for my example. I have this lying around and I want to show that you don't always have to make it with boxwood. This is of course much better to work with, but other types of wood are not inferior. Especially if you use the milling method.
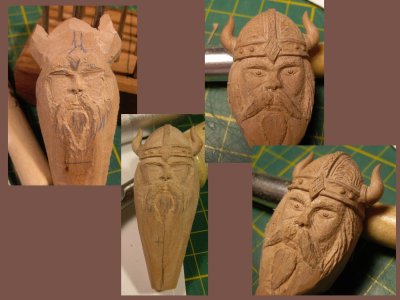
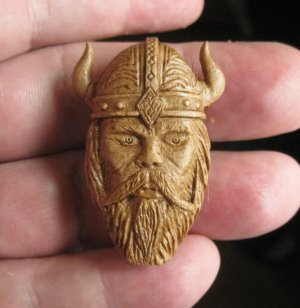
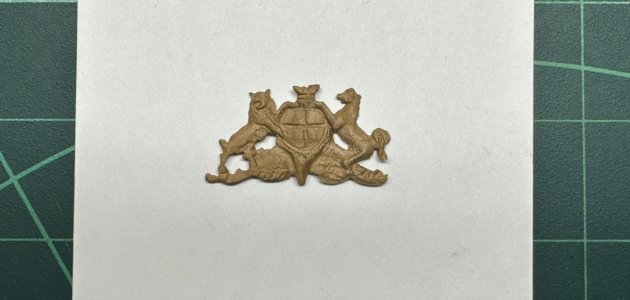
First, you have an example that you want to recreate. In my case an ornament like the one on the side of a ship, I took the branch with leaves like the one on the Kolderstok pleasure yacht. There is a brass profile included in the kit and I am going to show you that this can also be recreated “easily” in wood. The other example is a fictional face of a Viking, just picked from the internet. A little larger than I normally make. This is to make the details more visible. It depends on the scale, how much detail is possible. I myself am beginning to notice that more and more is possible on a smaller scale. That is the learning process. The viking will not be a whole head, only the face in relief.

The easiest way is to print out the drawing and transfer it to the wood with carbon paper. There are many other options, such as using terpentine oil to transfer the ink on your paper to the wood , or working with Modge podge. My choice is carbon paper and that works well for me. Also because I don't want to make an ornament 100% identical, I want to be able to see my hand in it and will always deviate more or less from the original. That too is everyone's own choice. Sometimes it has to be exact, but with human or animal forms I choose myself.
Of course, you first bring the piece of wood to size, I do that with a planer if it is a leftover piece of wood and otherwise cut directly to size if it comes from a large piece. The image below shows these steps.
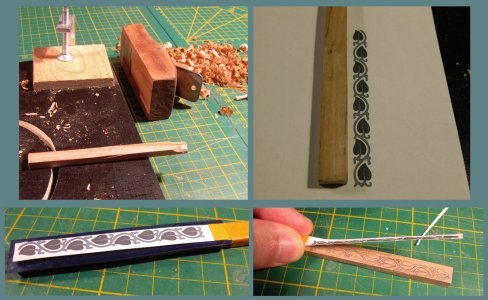
Once the image is transferred to the wood, I cut or carve the outside lines out of the wood. Sometimes I leave the piece of wood a little longer to, in the case of the twigs, still have something to hold it while cutting/milling. Both image below show this.
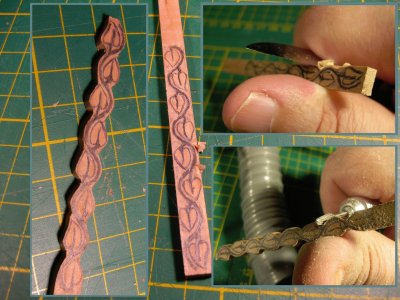
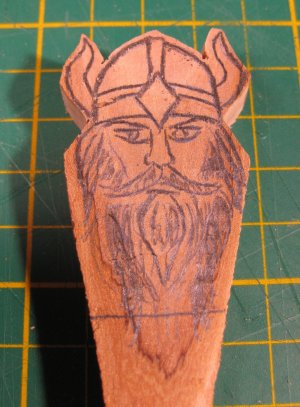
You see I do it with a knife, but a saw is safer. I've done it a few times before and it works a little easier for me that way. Make sure you stay a little bit out of line, the last bit we do with a router, file or sanding rod.
And then I'm going to shape with the router and I use 3 types of cutters for this. Actually 2 are good. From the 6 piece set, I use only the drop shape and the spherical shape. Figure 22 shows these steps well. In case of a figure like this branch with leaves, I work from top to bottom and delay making the branch narrower until I get to the next leaf. The twig is handsome one and a half mm in diameter after machining and that can easily break.
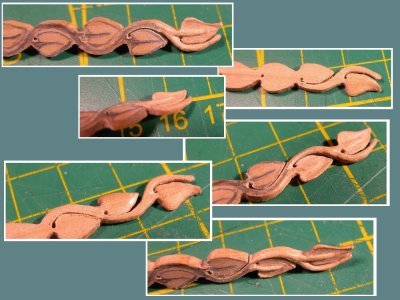
A mini chisel would not make this possible, you have to apply force too often and that will lead to disappointment. But a mini router as I use them does not exert any force on the whole it only removes a mini layer, over and over again.
By the way do not be afraid of the cutters, the small sizes 0.9 mm but also the 1.6 mm. will not easily damage your fingers. Well if you apply pressure of course. It is quite safe. At the end of the first video, you can also see that I press the cutter against my finger without injury.
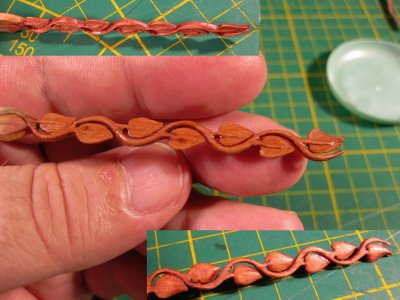
And after 4 days, the leaf twig is done. It is difficult for me to go on for a long time in a row, but this also ensures that when you do a section. This cannot go wrong due to being tired. Final finish is Mahogany stain from Kolderstok (red) and tung oil. It is very fragile and I dare not rub the oil off too hard. So I took most of it off and by tomorrow the sheen will be gone. But for the pictures it is manageable.
The branch is 1.5 mm in diameter in places nevertheless it feels solid. This proves once again that apple wood is also suitable for small ornaments. see below.
Sometimes you come across models of historic sailing ships that have beautiful ornaments made by the maker of that model. How do you do it to accomplish this on such a small scale. Sometimes they are made of polymer clay, famous brands for this are Premo Sculpey, Sculpey III, Cernit or Fimo. The most famous ship models you come across on the Internet whose ornaments are made of polymer clay are Doris Obručová's models. She builds her models from paper! and also makes frequent use of polymer clay. You can admire her models on her YouTube account.
YouTube
And also her construction reports are still visible on the Czech Model Forum. The other one I admire very much is Ramon Olivenza, his technique in both polymer clay and wood is outstanding.
This piece I want to devote not to polymer clay, but to making ornaments in wood. Although polymer clay can be helpful at times, especially if you are going to paint ornaments and you have made a mistake. On the Prince William I did cheat that way once. After painting it is no longer visible. My great example is Ivan Trtanj, you can find a lot on the Internet about his works of art.
Wikipedia
But his own museum in Kressbronn is also among the possibilities to admire his models.
KressbronnMuseum
Just Google his name. Ivan has been an inspiration for me to continue woodworking into an ornament. Especially the method he uses also proved to me the possibility of achieving it. He uses a lot of a hand router/dental drill to shape his models. A method that is quick to learn. I am going to name both methods here and mainly the one I use the most myself.
And I seen off course more artist like Janos, Maarten, Ptér, Willi, etc. To mentioning a few that come in my mind.
My first tool was a home-made chisel from a precision screwdriver. But soon I had slightly better chisels, until I replaced cutting by using a Dremel with flexible hose. Some examples from that time, as well as with my new machine that I explain later here.

My intention in this story is to introduce everyone to making ornaments out of wood. Tell about my experience and also share what I’ve found in this forum and other forums what was usefull for me to learn it. And there I’ve come tot he point of my thoughts about it. My opinion is that this can be learned. And that you can achieve a satisfactory result for yourself. I'll also show that with a handy milling machine and the right end mills this is easier done than it seems. The starting capital is low, all you need is a lot of patience and the courage to start. With the advice start simple and as your talent and dexterity improves, you can start working with more complicated shapes. I don't see myself as a perfect maker of ornaments yet, far from it. I am still learning. But I am enjoying this so much that I want to share it with you right now and maybe I can persuade at least 1 person to try it too and more importantly just do it. Because in the beginning I also shied away, still from certain shapes I want to make. But I do try it and if at first it doesn't work out, I will try again until it is right in my eyes.
The first thing I do want to talk about is the material or in this case the wood you can use.
Of course, not every type of wood is suitable, especially if they are such small parts with a lot of detail. This requires hard wood with a fine grain that can also be worked on afterwards with a wood finishing agent.
You can also make an ornament with Ox bones, antlers, ivory, tagianuts or whatever can be used but I will limit myself here to wood and which ones I have already worked with
and I will also explain what the properties are.
The first wood I ever used to make anything with was beech wood. I can give a short answer to that: this is unsuitable and no, I will never use it again. It splinters, breaks and the grain and fibers are too coarse. Not suitable for our purpose. But I do advise you to try it to make a simple ornament with this. For me it turned out to be a very good teacher to use this. I managed to make a simple shape and with that I had immediately gained a lot of experience how this goes with the better suited woods.
I have a good stock of cherry wood lying around, about two table tops made of cherry wood have now been labeled stock. I am now building a model of a Dutch two decker and basically using only this wood for it. Cherry wood is readily available, I look on eBay for discarded furniture made of solid cherry. This has been very popular for making furniture out of it. You come across plenty. And it's pretty good for making little ornaments out of that. But before you start cutting an ornament you have to test your piece of wood, sometimes it splinters quickly and sometimes you have a piece that is perfect to use. I understood from a fellow modeler @Ptèr that this comes from what part of the tree the piece of wood comes from. This will also be the case with other woods. I have European cherry and it also seems to be a bit denser in texture. Nice wood to work with. 1 board I have lying around is perfect to work with as far as wood carving is concerned while other pieces are more splintery.
Although I shouldn't use the word carving with cherry because it responds best to milling. With that you can point out details better. With knife/chisel it still sometimes wants to split and you can't make details. So these days I mainly use it to make blocks or parts. That goes very well.
In the picture below, you can see an overview of my stock of cherry wood and a hoist block I made out of cherry wood.

Boxwood. We know this mainly as a hedge in our gardens and from the news regarding the Boxwood moth. Grows very slowly and therefore you get the perfect wood to make small parts. It occurs as a bush/hedge, but sometimes as a tree form with a decent trunk. These are usually very old to get that thick trunk. I have collected a considerable lot by now.

Search marketplace, Ebay or neighbors and gardens where there is an infested bush. There are YouTube videos on the Internet explaining how to dry and store it. Sometimes you are also lucky to have a modeler friend (thanks Maarten) with a large lot who can spare some.
The properties are as I said, hard and very finely grained. It is possible to turn boxwood in the lathe to 1 mm. thickness. This will not work with other woods. Perfect for miniature work. It cuts easily and milling is also fine.
However, it is becoming very rare these days and boxwood from our area comes at a high price tag in the trade. European boxwood is the number one to use for wood carving.
Castello. comes from South America and is called the alternative to Buxus.

I have a small stock (few laths and a tray of small leftover pieces), It is available at modeling stores. Especially Jimbo in Germany has a good stock of planks and laths in all kinds of sizes.
It has about the same properties as boxwood. Lighter in color though, almost white. But it is also a little less with detail making. It still breaks sometimes, especially small pieces can break off. A nose in a face is fragile. I still use my stock mainly for blocks and parts on a ship. You can finish this very accurately and tightly.
Shroud cleats is 1 of them.

But I also made the lanterns on the Prins Willem out of this. I bought it from Aliexpress as boxwood. But I now know that they sell castello under the name buxus or it is boxwood from Turkey which is of lesser quality because it grows faster there. As I also mentioned before real boxwood is rare and very expensive. In contrast, castello is readily available and also not that pricey.

The next wood I use is apple wood. Gladly surprised by what I've accomplished with it. You can get to very fine details and it is strong. Nice color and I think I'm going to have a lot of fun making ornaments with it. It is not as easy to cut as boxwood, it is harder (probably because of the long drying time), milling is not easy either. But because of that, something can't go wrong easily either, because you don't take away too much material at once. And apple is readily available in the Netherlands.
The photos have become a little more red because of the lighting. Sorry about that.
Other types of wood include olive wood (you can still sometimes get it in the pet store as a dog bite toy but keep in mind that is not resistant to varnish well, it is slightly greasy by nature), the pit of an avocado, alder wood, pear wood, etc.......
Keep in mind that the wood to be used must have a few properties, not everything is suitable despite being able to shape it well. @janos gave some tips here on the forum what to look out for. If you want to see beautiful carvings, look for his work back here on the forum. He makes fantastic wood carvings and also uses a nail milling machine for this like I do. That tip came from him and that's why I started doing this too....
- It should not splinter
- it must be hardwood
- dense grain, the finer the better.
- So it should be workable with cutters and with knives
- and it must also be able to withstand finishes with various oils, varnishes. There are hardwoods that can be worked well but are very greasy. Final finishing is then not possible.
The equipment.
As I mentioned above, I had started with small chisels made from screwdrivers. I still use them sometimes, but they are not hardened correctly and therefore become blunt quickly.
Chisels for fine work. In the picture below you can see my first 3 chisels I made from small screwdrivers. Next to it is a chisel from Aliexpress with a box above it with various little chisels you can put in it. An X-acto knife and the blue boxes with the cutters I use (more on that later).

There are sets available on the internet from Kirschen, Narex or Pfeil, professional stuff with a price tag of several hundred Euros. I also see fellow modelers who bought a set from Russia from a person, you often see these passing by some members here and this was the perfect set for this work. (Due to the war this is no longer available) This set is special because they were specially made for making ornaments for model ships. A very nice set see the picture below. There you see the last one delivered. On the model building day at the shipping museum in Amsterdam (2024), the happy owner had these with him. So quick snapshot.

I don't use these more expensive sets, too high for my budget. But that doesn't mean there aren't options for lower budgets. What made me most happy is this set in the picture below.

This set cost something like 8 euros with handle and without around 5 euros.
LINK
I use this set a lot because the chisels are sharpened at the right angle and are very sharp. You can already sharpen them with sandpaper wet grid 1000. I have this stuck on a small board and always at hand. I'll come back to that later. There are many different types of sets available on Aliexpress for very little money, but the one mentioned above is my favorite. Sharp and I could fit them with a wooden handle, so I always have the set to hand. With a diamond disk on the dremel, I was even able to customize a few to my needs. image below.
Search Olive carving on Aliexpress and you'll come across many varieties, including these.

You can also use an X-acto knife for modeling, but beware, they break rather quickly. A small wood carving knife or whittling knife will serve better. And believe me a few for small work, are not a waste of money.

How do you keep your chisels sharp? I can talk a lot about that, but there are plenty of YouTube videos out there on how to do this.
You can also find websites that show this. A great site where I learned a lot is this Dutch site, but with Googling you will definitely find a good site in English or your native language as well.
LINK
I personally use 2 whetstones I ordered on Aliexpress and one has a grid 1000 and 6000 and the other is an agate stone (grid 12000). Great stones for the hobby, especially if you use those guides to keep the chisel at an angle during sharpening.
You can get your equipment sharp well with this, even the cheaper stuff looks like the professional ones after this. Still, I only use this the first time or for recovery.

I keep my knives and chisels screen with a leather strop or a honey wheel. I have a standard strop with paste on a board, but the honey wheel is a godsend. You can already make this out of MDF, but I have one made of leather. By holding your knife over the spinning wheel for a moment, your chisel is so sharp that it glides like a knife through butter. Use of sharpening paste required, though. Leather alone is also possible, but with the paste the metal will shine like a mirror.
Search for 'honey wheel' on YouTube, leather or MDF is very suitable for this. The advantage is that your chisel is raised to a higher level. The cutting area shines like a mirror and after honing the chisel or knife cuts through the wood like a knife through butter.

So much for the cutting equipment. I do use it, but when possible I mainly use the small milling machine and the Dremel.
Milling device from nail stylists' studio
Yes you read correctly, the ideal tool for our hobby comes from the nail studio. There you have (usually from the brand Marathon) small milling machines. Sometimes equipped with an extractor. But also just a separate device to which a handpiece can be connected. The hand tool is quite powerful but of course a Dremel is many times stronger. For the work we will do with it, not much power is needed, but high speed. I also use my Dremel when power is needed, for example, to sand away a big thick piece of wood. But I prefer the nail milling machine. It is almost noiseless, which in itself is a great advantage. So you can do your fine work nice and concentrated without slight hearing damage afterwards. And as I mentioned, I learn from others and the tip for the nail grinder was an advice from Janos Nemeth a well known modelmaker here who has several years of experience in making these small works of art in wood.
So known in the Netherlands under the name Marathon. They are for sale here with a starting price of about 150 Euro. A copy of this machine, which in my opinion is just as good costs on AliExpress around 16 Euro and that includes the shipping costs!!!
LINK

The handpiece is very light in the hand so it produces almost no noise. You can also see that you can reach the cutter with your fingers because the cutter is the only part that rotates.
I understand that low power consumption is desirable these days and this machine meets that requirement. Good for nature shall we say.
Are there any drawbacks? Yes of course, the handpieces are not as powerful as a Dremel and so are not suitable for everything where power is needed. But for making small details in wood or drilling small holes it is perfect.
Yes, I have a Dremel and I can use that too. True, but the Dremel is not as handy as the small handpieces of the nail stylist's router. The Dremel has quite a thick head where the cutter comes in and that is awkward with the fine work we are going to do. It is also heavy in the hand, as well as the noise it produces.
You can only use these handpieces for one type of bits. Standard thickness of the bits is 2.35 mm. But it is simple to expand by replacing the chuck (tube in the mouthpiece). There are 2 more sizes available, namely 3 mm. and 3.175 mm. (standard Dremel size)
LINK

You also need the special wrench for this and is usually supplied by the same supplier. Please note that the type of hand drill is identified by the number 202. It requires a triangular wrench. Since exchanging is not convenient, I ordered an extra handpiece and mounted a different size in it. Exchanging handpieces is easier and faster than exchanging the chuck. A handpiece costs something like 10 euros and sometimes they are on sale for much less.
LINK
I have three of them lying around, each with its own size. The handpieces have a 5 pin connector but officially only 2 pins are used, so there are also connectors with 3 pins (2 are missing) This does not matter and they also fit in the machine.
This was the machine and of course you are not obliged to follow this, there are other options that will do just fine. Advice is if you buy this manicure machine to start with 1 handset and see if you get far with that. You can always upgrade if it turns out to be a success.
The cutters I use are more or less the cutters the dentist uses. If you can get those on the cheap to use, fine. Despite the little corner they usually have on the end (that's how they clamp into the drill head) they fit into the handpiece. Dental cutters are 2.35 mm in diameter. You can also buy the blue boxes offered on AliExpress for a bargain price. These cutters are made of tungsten steel (tungsten carbide) and are very wear-resistant. Provided you don't let them burn. You can even mill brass or aluminum with them just fine. But I only use them for wood or plastic.
LINK

On the image above you can see an overview of what is available. The link above is a set of 6 different ones that you can get started with. The 1.0 mm and the 1.4 mm are perfect to start with. You can already make many details with these. There are other thicknesses available in these sets from 0.3 to 2.3 mm. The thick ones I own but don't use very often, the thinner ones than 0.9 don't come as a set as shown but usually as a set of 6 in one shape. So 6 spherical or 6 straight.
But as said, for 5 euros you are well on your way to get started. And it is not a waste of money if this part of the hobby is not a success for you, I use these cutters for other purposes as well.
Should you be able to get used dental cutters somewhere, purchase them. Even if they are blunt they prove useful. You will find that sometimes a blunt cutter is perfect for polishing.
On the other hand, if you can't get these, there are always the cheap diamond cutters from AliExpress that I believe have zero diamond in them. But are fine for smoothing something. For the price you don't have to miss out. By the way, the manicure machine comes with a few of these, which are actually enough to start with.
I also always keep a few bags of silica gel with the cutters. Prevents corrosion. Pretty handy. In fact, I have those in almost every drawer of my equipment. This prevents rust on your metal workpieces.
Sanding, there is a lot available there. Your manicure machine comes with some sanding spinning tops, but they are also available separately. the standard Dremel also suffice just fine. You also have round sandpapers for mounting on a rod and I sometimes use those as single papers but also with a thin board behind them. Works fine. You can also use a round rod that you glue a broken bit into as a shaft as a sanding tool just fine. You glue the sandpaper to the wood and that sometimes works even better. Just make sure it's centred, though.

Then you have the sanding tops with sanding sponge. Available standard or just make your own by screwing a piece of 3M sanding sponge into the rod (my preference). With this I always bring my end result to a nice shine. All minuscule scratches and blemishes then disappear.
Still, I want to advertise a little bit about 1 supplier on AliExpress that I have good experience with. This store has the vast majority for sale for pretty good service and price
LINK
I leave it to you to figure out when and which cutter you need to make your part. I use almost all of them and have learned when I need which one. In which I may say the drop and spherical shape are my most used. If you go to work with these cutters you will find that sometimes a little force is needed but most of the time it is no more than stroking the wood. You don't remove more than 0.1 or rather 0.05 mm. away from the wood. You have to learn what the cutter does. It can catch and thereby shoot across your workpiece with all the nasty consequences. Adjust your speed until you notice this is going well. It takes practice and don't expect too much of yourself in the beginning. Start simple with simple shapes to get the feeling. I couldn't make a face on day one either. I was already happy with a simple ornament or shield.
I discovered a lot about the wood to use, what were the limits of possibilities. Which cutters for what, which blades or chisels. The feel and most important, avoiding cutting your fingers. Because that's part of it too, especially in the beginning.

In the image above, I show my progress over time. A simple cross on a board to a curling element for the side gallery to the upper heck board of the Prins Willem. All three in cherry wood. With patience and also failure, I brought it to a result to my feeling that was good. And the latter is important. If you are comfortable with it, the result was successful. Don't stare blindly at the masters I quoted in the beginning of this piece, there are years of practice behind them. Maybe one day you will reach this level or maybe never. As long as you enjoy what you accomplish and create.
On my YouTube account I have two videos to show you how I work.
These videos also show how much time goes into this. It is a time-consuming job that requires patience. You can clearly see that I rub the router over the wood when applying details. If you press too hard, the cutter can catch on and rattle all over your work. That brings damage to previously made details. You have to be careful of that.
Preparation.
I take apple wood for my example. I have this lying around and I want to show that you don't always have to make it with boxwood. This is of course much better to work with, but other types of wood are not inferior. Especially if you use the milling method.
First, you have an example that you want to recreate. In my case an ornament like the one on the side of a ship, I took the branch with leaves like the one on the Kolderstok pleasure yacht. There is a brass profile included in the kit and I am going to show you that this can also be recreated “easily” in wood. The other example is a fictional face of a Viking, just picked from the internet. A little larger than I normally make. This is to make the details more visible. It depends on the scale, how much detail is possible. I myself am beginning to notice that more and more is possible on a smaller scale. That is the learning process. The viking will not be a whole head, only the face in relief.

The easiest way is to print out the drawing and transfer it to the wood with carbon paper. There are many other options, such as using terpentine oil to transfer the ink on your paper to the wood , or working with Modge podge. My choice is carbon paper and that works well for me. Also because I don't want to make an ornament 100% identical, I want to be able to see my hand in it and will always deviate more or less from the original. That too is everyone's own choice. Sometimes it has to be exact, but with human or animal forms I choose myself.
Of course, you first bring the piece of wood to size, I do that with a planer if it is a leftover piece of wood and otherwise cut directly to size if it comes from a large piece. The image below shows these steps.

Once the image is transferred to the wood, I cut or carve the outside lines out of the wood. Sometimes I leave the piece of wood a little longer to, in the case of the twigs, still have something to hold it while cutting/milling. Both image below show this.


You see I do it with a knife, but a saw is safer. I've done it a few times before and it works a little easier for me that way. Make sure you stay a little bit out of line, the last bit we do with a router, file or sanding rod.
And then I'm going to shape with the router and I use 3 types of cutters for this. Actually 2 are good. From the 6 piece set, I use only the drop shape and the spherical shape. Figure 22 shows these steps well. In case of a figure like this branch with leaves, I work from top to bottom and delay making the branch narrower until I get to the next leaf. The twig is handsome one and a half mm in diameter after machining and that can easily break.

A mini chisel would not make this possible, you have to apply force too often and that will lead to disappointment. But a mini router as I use them does not exert any force on the whole it only removes a mini layer, over and over again.
By the way do not be afraid of the cutters, the small sizes 0.9 mm but also the 1.6 mm. will not easily damage your fingers. Well if you apply pressure of course. It is quite safe. At the end of the first video, you can also see that I press the cutter against my finger without injury.
And after 4 days, the leaf twig is done. It is difficult for me to go on for a long time in a row, but this also ensures that when you do a section. This cannot go wrong due to being tired. Final finish is Mahogany stain from Kolderstok (red) and tung oil. It is very fragile and I dare not rub the oil off too hard. So I took most of it off and by tomorrow the sheen will be gone. But for the pictures it is manageable.
The branch is 1.5 mm in diameter in places nevertheless it feels solid. This proves once again that apple wood is also suitable for small ornaments. see below.

Last edited:


