
wonderful kit Don and so detailed, and from your work ....... one word wonderful

-

SUBSCRIBE TO SHIPS IN SCALE TODAY!
The beloved Ships in Scale Magazine is back and charting a new course for 2026!
Discover new skills, new techniques, and new inspirations in every issue.
NOTE THAT OUR NEXT ISSUE WILL BE July/August 2026 -

Win a Free Custom Engraved Brass Coin!!!
As a way to introduce our brass coins to the community, we will raffle off a free coin during the month of August. Follow link ABOVE for instructions for entering.
You are using an out of date browser. It may not display this or other websites correctly.
You should upgrade or use an alternative browser.
You should upgrade or use an alternative browser.
Barque Stefano a MarisStella kit - by Don Robinson
- Thread starter DonRobinson
- Start date
- Watchers 12

Hallo Don @DonRobinson ,
are there any news from your shipyard?
are there any news from your shipyard?

Hallo Don @DonRobinson ,
are there any news from your shipyard?
Good question Uwe!! I been wondering the same thing myself.
")

No news yet, I have been busy with other builds lately. Stefano is on the list for next week, hopefully some updates then

I’m waiting too!
Hallo Don @DonRobinson ,No news yet, I have been busy with other builds lately. Stefano is on the list for next week, hopefully some updates then
We are curious to see the next working steps on your barque...... hope you have the chance for an update
Thanks Lawrence, I finally have an update for you and anyone else who is watching. It has been a busy summer and I finally got Stefano back on the bench this past week.

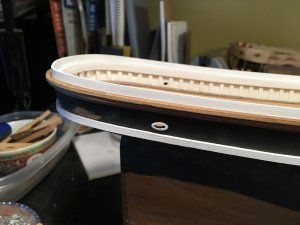
My goal this week was to install pieces 40(side stringer), 41(top gallant bulwark), 42(top gallant rail) and 43(pin rails)

First up was bending pieces 40 and 41 to shape. The side stringer(40) is made from 1.5 x 4 mm walnut strips and the top gallant bulwark is made from 1.5 x 5 mm walnut. The little indents you see on the strip are from the iron and are easily sanded out.

Clamping the side stringer into place, pva glue was used

Side stringers installed and sanded. Note here is that there should have been a slight overhang, but for some reason I sanded flush


Here the top gallant has been installed and both pieces given several coats of thinned acrylic paint.


It should be noted the top gallant bulwark was painted before being installed

Masking off the top gallant bulwark and painting the rail


Job completed and masking tape removed


Here is how it looks as of this morning. I failed in my goal by not getting the pin rails in, they are up next.
Thanks for stopping by and Take Care.
Don
My goal this week was to install pieces 40(side stringer), 41(top gallant bulwark), 42(top gallant rail) and 43(pin rails)
First up was bending pieces 40 and 41 to shape. The side stringer(40) is made from 1.5 x 4 mm walnut strips and the top gallant bulwark is made from 1.5 x 5 mm walnut. The little indents you see on the strip are from the iron and are easily sanded out.
Clamping the side stringer into place, pva glue was used
Side stringers installed and sanded. Note here is that there should have been a slight overhang, but for some reason I sanded flush
Here the top gallant has been installed and both pieces given several coats of thinned acrylic paint.
It should be noted the top gallant bulwark was painted before being installed
Masking off the top gallant bulwark and painting the rail
Job completed and masking tape removed
Here is how it looks as of this morning. I failed in my goal by not getting the pin rails in, they are up next.
Thanks for stopping by and Take Care.
Don
Attachments
Hallo Don,Thanks Lawrence, I finally have an update for you and anyone else who is watching. It has been a busy summer and I finally got Stefano back on the bench this past week.
View attachment 50676
My goal this week was to install pieces 40(side stringer), 41(top gallant bulwark), 42(top gallant rail) and 43(pin rails)
View attachment 50677
First up was bending pieces 40 and 41 to shape. The side stringer(40) is made from 1.5 x 4 mm walnut strips and the top gallant bulwark is made from 1.5 x 5 mm walnut. The little indents you see on the strip are from the iron and are easily sanded out.
View attachment 50678
Clamping the side stringer into place, pva glue was used
View attachment 50679
Side stringers installed and sanded. Note here is that there should have been a slight overhang, but for some reason I sanded flush
View attachment 50680
View attachment 50681View attachment 50682
Here the top gallant has been installed and both pieces given several coats of thinned acrylic paint.
View attachment 50683
View attachment 50684
It should be noted the top gallant bulwark was painted before being installed
View attachment 50686
Masking off the top gallant bulwark and painting the rail
View attachment 50687View attachment 50688
Job completed and masking tape removed
View attachment 50689View attachment 50690
Here is how it looks as of this morning. I failed in my goal by not getting the pin rails in, they are up next.
Thanks for stopping by and Take Care.
Don
Great that you restarted the work on the Stefano....she is looking great.....
Last edited:
Thanks Uwe, and a big Thanks for your help
Very nice, Don!
Thanks Dave
Thanks to all for stopping in and for your likes and comments. I have a little progress to report, I was hoping to have more completed by now but I thought it was time for an update so here we go;

First up was drilling out the holes on the pin rails. They were already pre-drilled but were just a little too snug for my liking, so I thought drilling off the model would be easier and safer. I am using the Sherline mill will the sensitive drilling attachment for this task.

The pin rails installed, I took the easy way out and used ca glue. Very hard to do any clamping here.

Beginning to strop the deadeyes, the lines will be trimmed later. When doing rigging like this I always put a towel on the bench so things don't bounce when dropped. The floor never got any deadeyes this time!!!

Measuring and drilling hole for the deadeyes. All measurements are taken directly from the plans

Cutting the chain plates from the photo etch sheet

I was going to blacken them but in the end I painted as I did not trust my blackening skills and did not want to ruin them. I did wash them in Lacquer thinner followed by a wash in muriatic acid then rinsed in water and repeated this process once more. After drying they were primed with metal primer then painted with matte acrylic paint. The primer was from a spray can which I sprayed a little into a container then brushed on, the acrylic paint was also brushed on.
The finish is quite durable and as there are no sharp bends in the chain plates I don't see any problems with the paint cracking or falling off.

Using the method described above using muriatic acid and lacquer thinner, I tried blackening some eyebolts and they seemed to work out well. At least it is the best results I have ever had with blackening, next is to get the courage to try it on photo etch!!!

I need to make a hole at the stern for the rudder so thought it would be a good time to make the rudder

And the finished rudder, still needs to have some char removed in the grooves

Pin rails and deadeyes installed, at the stern is the rudder opening

I should have turned the model around for this picture to give a better aspect of the deadeyes arrangements. In the picture I am showing the fore mast and main mast while the plans are showing the mizzen and main mast.
Thanks again for dropping in and I hope you enjoyed
First up was drilling out the holes on the pin rails. They were already pre-drilled but were just a little too snug for my liking, so I thought drilling off the model would be easier and safer. I am using the Sherline mill will the sensitive drilling attachment for this task.
The pin rails installed, I took the easy way out and used ca glue. Very hard to do any clamping here.
Beginning to strop the deadeyes, the lines will be trimmed later. When doing rigging like this I always put a towel on the bench so things don't bounce when dropped. The floor never got any deadeyes this time!!!
Measuring and drilling hole for the deadeyes. All measurements are taken directly from the plans
Cutting the chain plates from the photo etch sheet
I was going to blacken them but in the end I painted as I did not trust my blackening skills and did not want to ruin them. I did wash them in Lacquer thinner followed by a wash in muriatic acid then rinsed in water and repeated this process once more. After drying they were primed with metal primer then painted with matte acrylic paint. The primer was from a spray can which I sprayed a little into a container then brushed on, the acrylic paint was also brushed on.
The finish is quite durable and as there are no sharp bends in the chain plates I don't see any problems with the paint cracking or falling off.
Using the method described above using muriatic acid and lacquer thinner, I tried blackening some eyebolts and they seemed to work out well. At least it is the best results I have ever had with blackening, next is to get the courage to try it on photo etch!!!
I need to make a hole at the stern for the rudder so thought it would be a good time to make the rudder
And the finished rudder, still needs to have some char removed in the grooves
Pin rails and deadeyes installed, at the stern is the rudder opening
I should have turned the model around for this picture to give a better aspect of the deadeyes arrangements. In the picture I am showing the fore mast and main mast while the plans are showing the mizzen and main mast.
Thanks again for dropping in and I hope you enjoyed
Canoe21
Lawrence
Hello Don
First of all, I and the little guys wish you a Very Happy an Belated Birthday. I tend to get so tied up in my own little Old Ship Yard that I fail to look around the great SOS Form build logs, yours included. I do hope that you had a great day and that you did get the biggest piece of cake, Also that you did get all of the new toys that you had hoped for and just maybe a few more.
Nice to see that you are back building again in your Old Ship Yard, That Barque Stefano kit sure does have a lot of very fine details that I am very impressed with. Just maybe I should look into achieving one of these kits they sure would be a very enjoyable and relaxing build, ENJOY.
Regards Lawrence
Getting close to the present day.
I wanted to show this part and explain a little. I'm not sure if any of you have watched Donnie's video on how to make stanchions, I did and I found it to be extremely good in helping to make these almost perfect stanchions. Thanks Donnie for the help!!
View attachment 38592View attachment 38593View attachment 38594View attachment 38595View attachment 38596View attachment 38597View attachment 38598
Don, do you have a link?
It was here on this forum Dave. I will have to look for it
Thanks for searching - seems that in this topic the film link is not working, so I post here a new working one:
Thanks Uwe
Great build, can't wait to see more.
Canoe21
Lawrence
Hi Don, Still looking for another of your great updates.
Regards Lawrence
Regards Lawrence