
It's a challenge to attach a rope to a pin. Therefore is it recommended to glue the pin and insert in the pin rack before attaching any rope to it?

You are using an out of date browser. It may not display this or other websites correctly.
You should upgrade or use an alternative browser.
You should upgrade or use an alternative browser.

What do you mean with "pin"?
If you mean a belaying pin on a rack like this one:
 (1).jpg")
than there is no other way, due to the fact, that you have to bend the rope it either on top and also under the rack
the only way to cheat would be to glue only the end and cover the rack and the necessary knot with a rope coil

If you mean a belaying pin on a rack like this one:
than there is no other way, due to the fact, that you have to bend the rope it either on top and also under the rack
the only way to cheat would be to glue only the end and cover the rack and the necessary knot with a rope coil

A line belayed to a pin in a rack would have substantial rope “left over” up to the bitter end. This would be looped on the pin as Uwe has shown. The quickest and easiest way to simulate this is to simply tie the line to the pin, put a drop of CA on the knot and trim it short. Make a rope coil and just glue it over the belaying pin, hiding the knot you made.

Yes it is a challenge. You can take a shortcut like the fellows above described. I chose to tie the line onto the pin in the proper fashion as Uwe illustrated above, and place a hank of rope on top as well. Using that method, I would NOT glue the pin in place. There are several reasons why. Typically, I do not use the thick, out of scale belaying pins found in all kits. That includes the brass belaying pins, unless you are looking for a ship in the style that appears as a piece of maritime art as opposed to the style of realism, such as a movie model as an extreme example. I use the virtually microscopic wooden pins made by Falkonet in Russia because they are as small as you can possibly get with wood and are shaped to perfection, thus getting as close to accuracy in scale as possible.It's a challenge to attach a rope to a pin. Therefore is it recommended to glue the pin and insert in the pin rack before attaching any rope to it?
The problem is, even though they are made out of hardwood, Falkonet pins are easily broken. So, if you glue them in the racks, you can not easily drill them out and replace them without wrecking your belaying pin rack. If you use precisely drilled holes, the pins will slide in with a slight interference fit such that they won't wiggle or change angle. They will perform EXACTLY like real belaying pins. If you snap one off, you push the remaining pin down and out of the hole with a drill bit, or use tiny needle nosed pliers to pull the remnant of the broke pin up and out, and replace it easily.
When installing running rigging, it is best to tie the end of line to the belaying point first. Then, route the line up through blocks, tops, and to the tie-off point on the yardarm or stay up above the deck. It is risky to do the opposite, and try maintaining line tension while tying a routed line to a belaying pin. That often results in a slack line or a broken pin. On my last ship, I broke about 30 belaying pins during rigging or just by bumping or snagging them while doing other work, so expect to buy many extra ones. The delicacy of the pins was far worth the trouble, because they look VERY realistic.
It all depends on how much work you want to put into it. Looping the end of the line around the bottom of the pin and gluing it in place, cutting the excess off, then covering the top with a prepared rope hank can look indistinguishable from the method I use, and save you lots of time. As long as the glue holds up, the rope should not pull free of the pin, and require the line to be re-rigged.
9mm Falkonet belaying pins on La Couronne, scale 1:100

Last edited:

I do not add any belaying pins to the pin rails until it is time to belay a specific line to that pin. What I do is run the rigging line through the hole in the pin rail, hold taught, then push the belaying pin through the hole wedging the line, and the pin, in place. If the line is heavy a slight enlargement of the hole in the pin rail may be necessary but be cautious...you want the belay pin to wedge into the hole holding the line in place. Once the line is secure through the hole with the belay pin you can use your tweezers to wrap the line around the top and bottom of the belay pin...a drop of ca gel seals the deal..
Last edited:
Do I have to make the hole in the pin rail a bit larger to hold both line and pin ?
I have come across these belaying pins, manufactured by RB model boat fittings, from Cornwall Model boat site. I am using them on my HMS Revenge model. Yes, the out of scale railings, gratings etc. are there, what can I do?, it's my 2nd model, so I forgive that. These pins are only 1mm thick, which is far more realistic.
I am trying my 2nd build, however, I like researching ships, am learning as I go, so I have to let go of inaccuracies from manufacturers, scale wise. This hobby is all about learning, discovering and trying to do your best, passing on information to others. Cheers.

I am trying my 2nd build, however, I like researching ships, am learning as I go, so I have to let go of inaccuracies from manufacturers, scale wise. This hobby is all about learning, discovering and trying to do your best, passing on information to others. Cheers.


Are they the right diameter... calculate cost and shipping....? Sounds awful expensive to me... but I live on a fixed income
They are very close to the right diameter, most kits the pins are ridiculously out of scale, it looks like around 100 pins would be around US$10,, I believe postage is not that much, it's whether you want to pay for a more scaled belaying pin.
Hi Pwh!
Curved tweezers are essential for proper attachment to the pin. This allows you to pass the rope underneath behind the pin. A steady pulse helps even if it only works the third time. It is a worth a try.
with best regards
Thomas
Curved tweezers are essential for proper attachment to the pin. This allows you to pass the rope underneath behind the pin. A steady pulse
helps even if it only works the third time. It is a worth a try.with best regards
Thomas
The secret to working with belaying pins is to: 1. use pins that are longer than on a real ship. You can use very thin straight dowels for pins, no one wiill know the difference. The longer pins allow you to more easily wrap the line around the underside of the rack, 2. get some long tweezers whose ends are shaped at about 22.5 degrees and another at 45 degrees, learn how to use the tweezers to wrap the line, not your fingers (you can't), 4. Learn how lines were actually wrapped around real pins on real ships. Wrap your lines the same way. You do not need to learn fake methods and you do not need glue. This is one area that you can accomplish the job at hand just as it was done 3oo yeara sgo, 4. no ship had flemished lines lying on the deck. This idea is only for 20th century yachts in port.
My experience is no...most holes in pin rails are a bit large anyway. I have yet to actually need to enlarge a hole. Test the size rigging line with a belay pin and pin rail for your model...then go from that...Do I have to make the hole in the pin rail a bit larger to hold both line and pin ?
- Joined
- May 26, 2020
- Messages
- 171
- Points
- 113

Brilliant idea!I do not add any belaying pins to the pin rails until it is time to belay a specific line to that pin. What I do is run the rigging line through the hole in the pin rail, hold taught, then push the belaying pin through the hole wedging the line, and the pin, in place. If the line is heavy a slight enlargement of the hole in the pin rail may be necessary but be cautious...you want the belay pin to wedge into the hole holding the line in place. Once the line is secure through the hole with the belay pin you can use your tweezers to wrap the line around the top and bottom of the belay pin...
Great tip.
Hi Pwh!
Curved tweezers are essential for proper attachment to the pin. This allows you to pass the rope underneath behind the pin. A steady pulse
with best regard
Kurt Konrath
Kurt Konrath
A bit off topic, but when a Captain yelled "belay that order" was he telling crew to secure adjustments he had order to be done with the sails and yards.

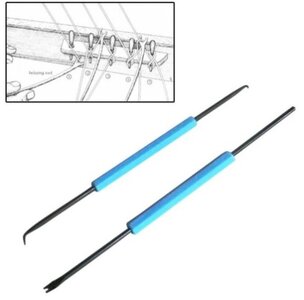
To get an idea how to grab a rope and carry it to hidden angles. The left tweezers is bent itself. The two on the right are tweezers bought that way.
Best regards
Thomas
“Belay that order!” It is what the admiral would say when spying the big order you just created from your favorite on-line ship fittings web site...just saying...
Being a cheapskate, I made tools like that from an old wire coathanger. Works a treat.I'll try the two techniques mentioned in this thread. I picked up rigging tools on ebay which made it easier to wrap the line but prone to having the pin pop out.
thanks