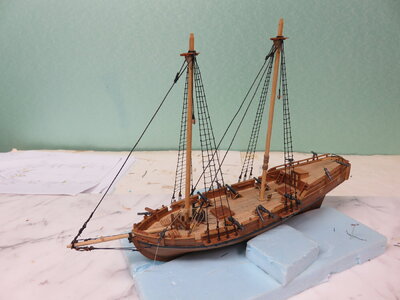
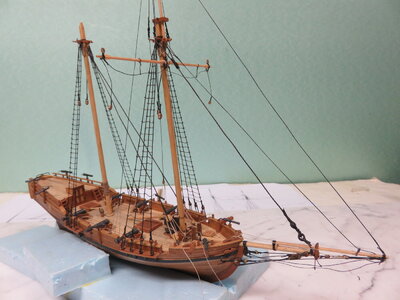
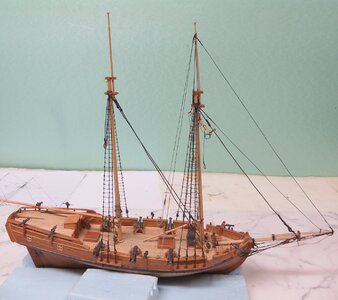
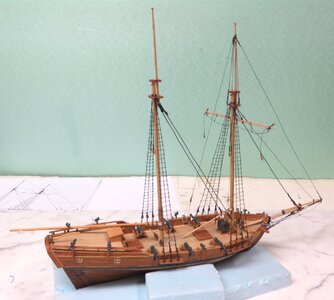
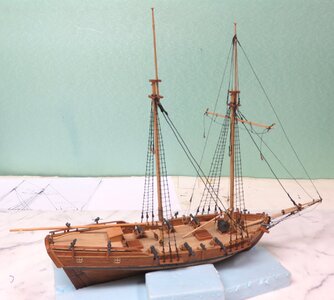
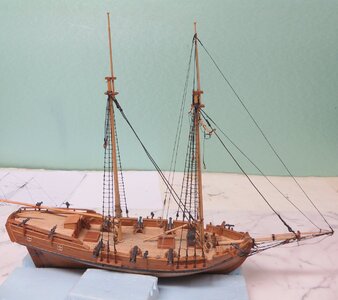
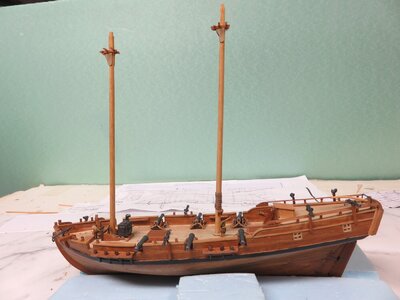
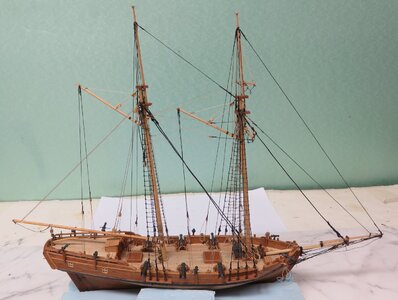
Berbice, a 1780 Schooner in 1/85 Scale [COMPLETED BUILD]

Joined
Mar 9, 2020
Messages
331
Points
238

Location
Washington Crossing, PA
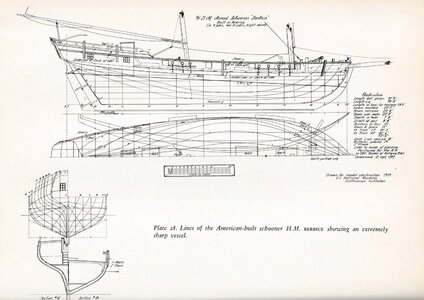
One of the disadvantages of making ship models for about 40 years is running out of space to house them. To keep on with the hobby I have started to build smaller vessels and give them to friends and family. In looking to start a new modeling project, I went to my favorite source for plans, Howard Chapelle's, “The Search for Speed Under Sail”. Almost all of the vessels he discusses are lovely to my eye and I have made at least 5 models from plans in this book. Berbice, an American built schooner dating from about 1780 with an overall length of 78'8”, met my size criteria. The lines plans are shown below and a rigging plan is also provided in the book:
f1 berbice plan (1).jpg


By enlarging the drawings to 1/85 scale, the plan would fit on a single sheet of 8.5” x 11.5” paper and could be reproduced on my home copier.

In previous logs in this forum I have discussed in detail my plank on bulkhead building methods so this log for Berbice will be abbreviated and just point out a few of the building details for this particular vessel.

Skeleton Construction

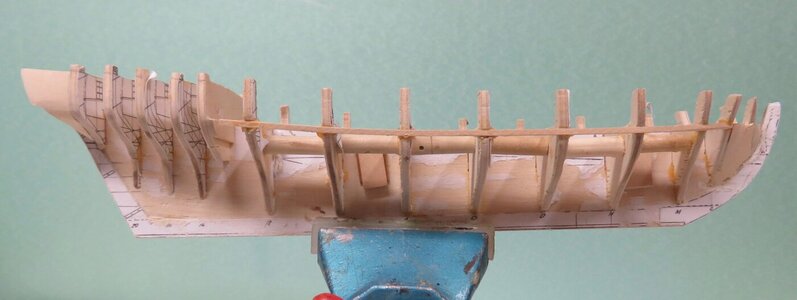
The keel piece and bulkheads were made from 1/8” plywood. After the bulkheads were inserted into the keel piece, sections of 1/4” dowel were glued between the bulkheads to stiffen the skeleton and prevent warping. Filler blocks were also added at the bow and stern.
f2 skeleton.jpg

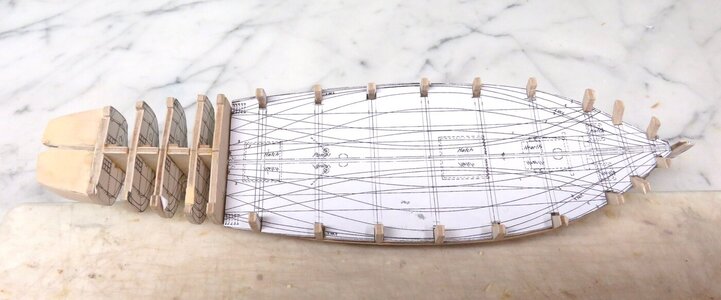
Next was to add the decks. A cardstock template was cut for the main deck and slots were added to fit around the bulkhead extensions.
f3 deck template.jpg

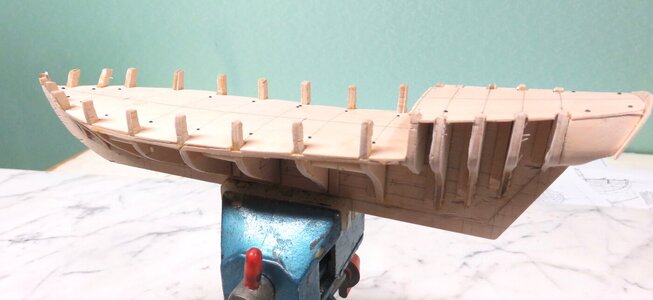
A similar template was made for the quarter deck. These were then used as patterns for the 1/32” plywood sub-decks which were glued and nailed in place.
f4 deck.jpg

For the transom, two pieces of 1/32” plywood were overlaid and cut to the shape. The first piece was glued and nailed to the stern.
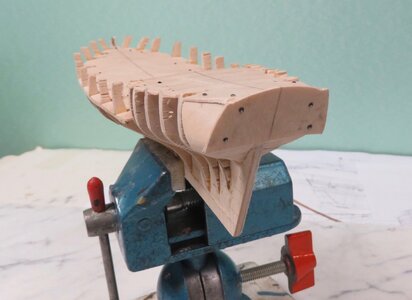
f5 transom.jpg

Lights and moldings will be added to the second piece, and it will later be attached to the first piece on the model.

First Planking

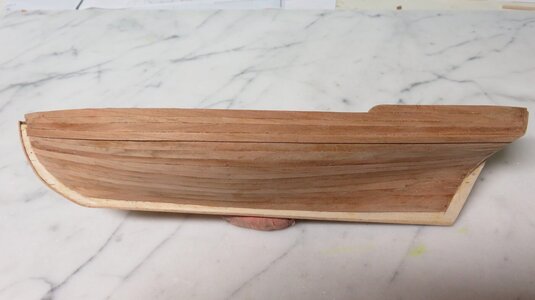
With the framing complete, battens were used to lay out a planking pattern. In view of the small size of this model I used leftover 1/32” hardwood for the first planking instead of the usual 1/16” basswood. It was a bit more difficult to work with but presented no real problems. Plank width in scale was 4mm. The model with first planking complete is shown below:
f6 first plank.jpg
Note the planks at the stern in the deadwood area do not extend to the rabbet line cut 1/32" deep into the keel piece. This was done so that the second planking will give a flush fit when added.
 
Oh - interesting project
I will follow your log with big interest
 
One of the disadvantages of making ship models for about 40 years is running out of space to house them. To keep on with the hobby I have started to build smaller vessels and give them to friends and family. In looking to start a new modeling project, I went to my favorite source for plans, Howard Chapelle's, “The Search for Speed Under Sail”. Almost all of the vessels he discusses are lovely to my eye and I have made at least 5 models from plans in this book. Berbice, an American built schooner dating from about 1780 with an overall length of 78'8”, met my size criteria. The lines plans are shown below and a rigging plan is also provided in the book:


By enlarging the drawings to 1/85 scale, the plan would fit on a single sheet of 8.5” x 11.5” paper and could be reproduced on my home copier.

In previous logs in this forum I have discussed in detail my plank on bulkhead building methods so this log for Berbice will be abbreviated and just point out a few of the building details for this particular vessel.

Skeleton Construction

The keel piece and bulkheads were made from 1/8” plywood. After the bulkheads were inserted into the keel piece, sections of 1/4” dowel were glued between the bulkheads to stiffen the skeleton and prevent warping. Filler blocks were also added at the bow and stern.
Next was to add the decks. A cardstock template was cut for the main deck and slots were added to fit around the bulkhead extensions.

A similar template was made for the quarter deck. These were then used as patterns for the 1/32” plywood sub-decks which were glued and nailed in place.
For the transom, two pieces of 1/32” plywood were overlaid and cut to the shape. The first piece was glued and nailed to the stern.
Lights and moldings will be added to the second piece, and it will later be attached to the first piece on the model.
First Planking
With the framing complete, battens were used to lay out a planking pattern. In view of the small size of this model I used leftover 1/32” hardwood for the first planking instead of the usual 1/16” basswood. It was a bit more difficult to work with but presented no real problems. Plank width in scale was 4mm. The model with first planking complete is shown below:

Note the planks at the stern in the deadwood area do not extend to the rabbet line cut 1/32" deep into the keel piece. This was done so that the second planking will give a flush fit when added.
Hallo @polydoc
we wish you all the BEST and a HAPPY BIRTHDAY
Birthday-Cake
 
Thanks to all of you who wished me a happy birthday for my 83rd. Here is the progress report on the Berbice.

Hull Planking Completion

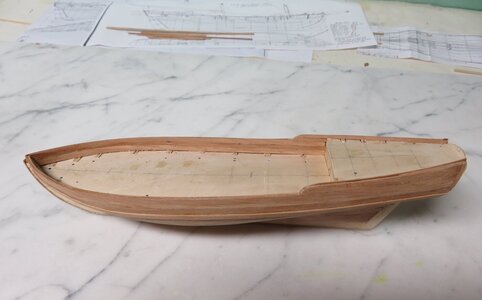
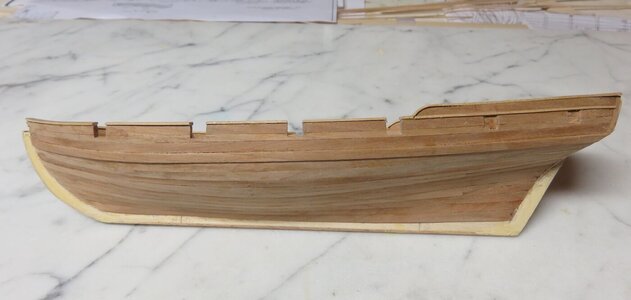
As with the first planking, battens were again used to lay out planking bands on the hull, each containing 4-5 4mm planks, for the second planking of 1/32” cherry wood. Plank ends were rabbeted into the stem and stern. I do not use thick planks for the wales. It is much easier to install additional 1/32” planks over the previous layer at the wale position. After the exterior planks were added, the bulkhead extensions above deck were removed and a third layer of planking was added inside the bulwarks to give a total thickness of 3/32”. The model at this point is shown in the below two figures:
f7 2nd plank.jpegf8 2ndplank bulwarks.jpeg

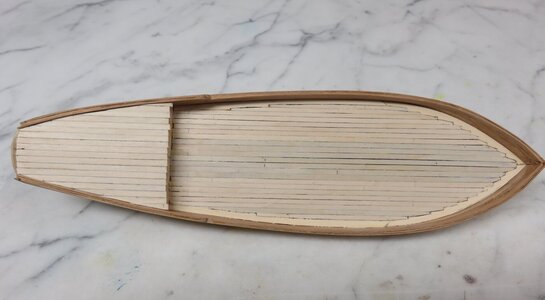
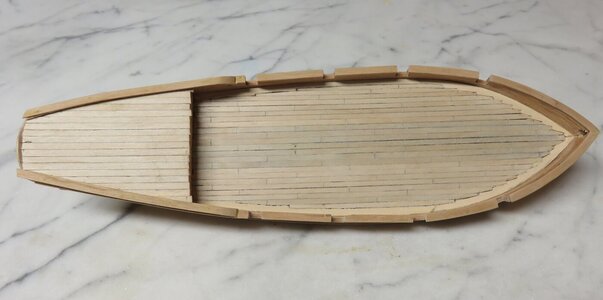
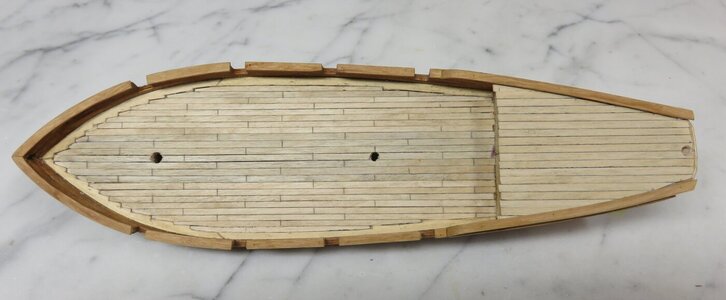
Waterways, made from 1/16” basswood, were next added on deck along the bulwarks. Then the deck planks, cut from a sheet of 1/32” birch plywood, were installed on the main deck starting at the center and working towards the sides. The forward ends of the planks were nibbed into the waterways. A planking pattern was used with a seam repeat every fourth plank, and the seams were scribed into the planks with a number 11 blade. To simulate caulking, one plank edge was darkened with a black permanent laundry marker (this ink is not affected by oil based paints or stains). When the main deck was complete, decking was added to the quarter deck in the same way:

f9 deck plnk.jpeg

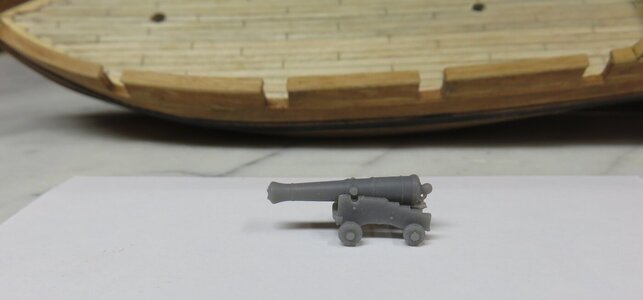
To complete the bulwarks, gun ports and a rail have to be added. Before cutting out the ports, I like to have a gun on a carriage on hand to insure they are the right dimensions. According to Chappelle's plan, Berbice mounted 6 4pound guns and 2 12 pound guns. My bible for the size of cannon and carriages is a five part series entitled British Naval Ordinance 1700-1815 by Michael S. Horner that appeared in Ships in Scale magazine starting in the January/February issue of 2003 and concluding in the November/December issue. According to Horner, cannon barrels of the same calibre came in a variety of lengths. For instance a 6 pounder could be either 6, 6.5, or 7' long while a 4 pounder came in lengths of 5.5 and 6'. At my scale of 1/85, a 6' barrel corresponds to 0.85” and a 5.5' barrel to 0.776”.

I was unable to find a supplier who had model cannon that closely matched either of these sizes. The nearest I was able to find were 3-D printed resin cannon made by Model Monkey in length of 0.94” which would be 6.6' at full scale. I purchased these along with the corresponding carriages. They were very well made as shown in the below photo. This will be my first experience with resin cast parts and I will write more about them when they are prepared for installation on deck:
f10 cannon.jpeg

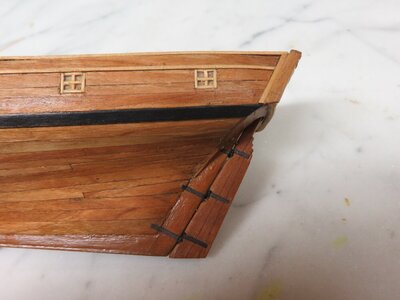
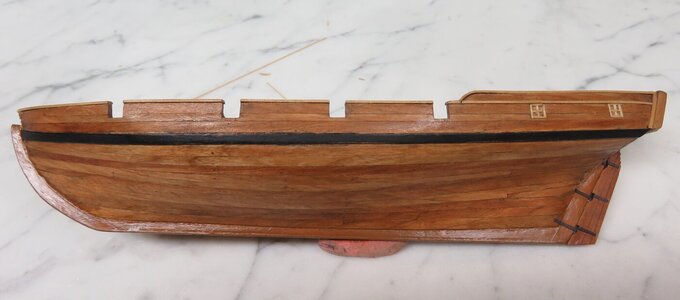
However, as a result of the out of scale length, the top of the cannon on the carriage hit the bottom of the rail. As a fix, rather than have a continuous rail, I left the ports open at the top as shown in the below figures:
f11 rails amnd portsMG_1920.jpegf12 railsMG_1921.jpeg

In view of the port size problem I plan to omit the 12 pounders which would appear above the rail.

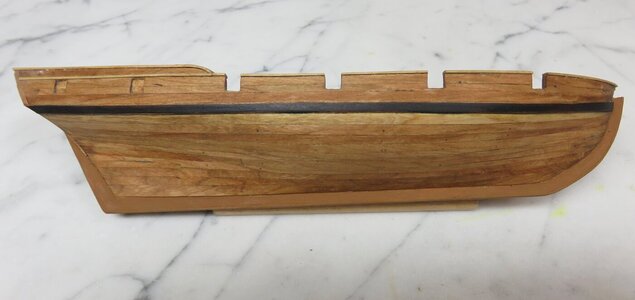
At this point the hull and deck were given a coat of Minwax natural stain and the wale and the exposed edges of the keel piece were painted:
f13stained deck.jpegf14stainedhull.jpeg

The hull and deck will be varnished after the transom is added.
 
Transom and Rudder

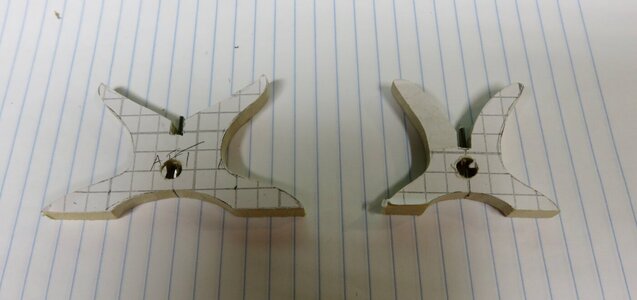
Before starting on completing the transom, mounting cradle parts were built while the hull could still be turned upside down and the cradle fitted. Two holes had previously been drilled through the keel at the location of a fore and aft bulkhead where the cradle will be attached with pins epoxied into the hull and cradle. The cradle was made from 1/4” poplar, and I find it useful to paste ruler paper on the piece before sawing the profile so that it can easily be checked for symmetry later on. The body plan was used as a guide for sawing the shape to fit around the hull, and this was later refined by filing to improve the fit. The completed cradle parts, which will be sanded and stained later, are shown below:
Ifig 14 cradleMG_1930.jpeg


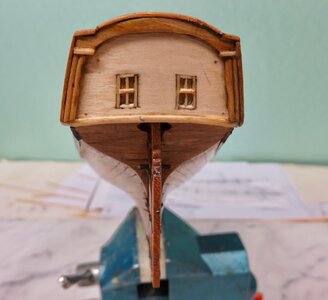
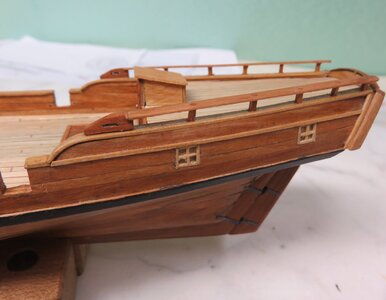
As mentioned earlier, two identical pieces of 1/32” plywood were cut to the transom shape, and the first piece was glued to the hull early on prior to the start of planking. After cutting out the windows, second piece was glued over the first to complete the transom structure. The plans for the stern do not show any details of decorative elements so I added some moldings to increase the visual interest in this area :
Fig 15 transomIMG_1928.jpeg

When this work was complete the entire hull was given a coat of polyurethane satin varnish. After it dried, steel wool was used to give a final matte finish.
The rudder was cut from 3/32” cherry, and lines were scribed to simulate a built-up rudder. At this scale, I find it difficult to make the gudgeons and pintles from metal and have started to use paper from 3x5 cards instead. Blackened paper strips were wrapped around a pin (#75 drill diameter) and glued at the throat to form an opening. A gudgeon and pintle pair were then positioned 180 degrees apart and a pin was glued into the holes with cyano to attach them together. Paper hinges cannot support the rudder on the hull, so three holes were drilled through the rear edge of the rudder and into the keel piece for insertion of pins (#71 drill diameter). The pintles were then glued to the rudder, and the rudder was mounted by coating the #71 pins with epoxy and pushing them through the rear of the rudder and into the keel piece. With the rudder in place, the gudgeons were lined up and glued to the hull. More detail on this procedure can be found in this forum on my building log of the Galliot. The appearance of the rudder and the model at this point is shown in the below two photos:
Fig 16 rudder IMG_1926.jpegFig 17 hull IMG_1925.jpeg
 
Deck Furniture and Fittings
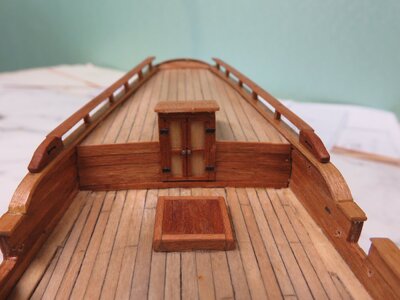
The next item of construction was to add the rails on the poop deck. Stanchions were made from 1/16” square stock with the ends rounded in a draw plate. The upper rail was laid over the lower rail and holes were drilled along the length through both pieces. The stanchions were inserted in the lower rail and glued in place. The upper rail was then glued on over the stanchion ends to complete the railing.

fig 18 railIMG_1942.jpeg

Deck furniture started with the companionway, and this was followed by the main hatches. These were made by conventional techniques:

Fig 19 companionway.jpegfig 20 main hatchesIMG_1941.jpeg

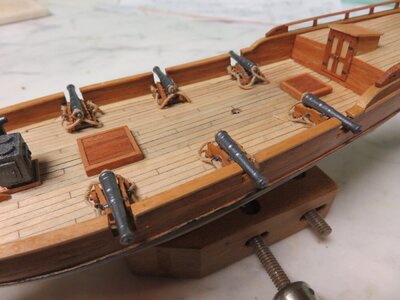
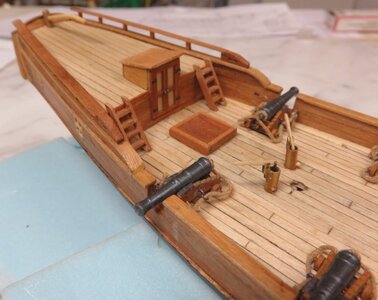
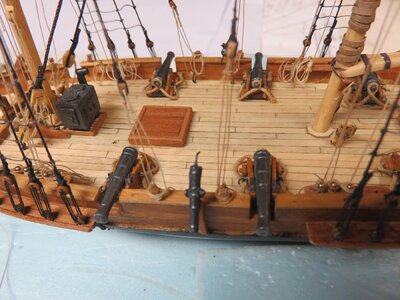
Cannons were added next. As mentioned earlier, I had trouble locating guns in scale and settled on the smallest I could find, 3-D printed guns and carriages from Model Monkey. The cannon were painted metallic black and the carriages with a wood tone. The grey resin accepted acrylic paint quite well without the need for any kind of primer. At his scale, the only piece of gun rigging I will add is the breeching rope. Holes for the eyes were drilled in the carriages and bulwarks, and eyes were made from twisted annealed steel wire. After the cannon were attached to the carriages with cyano glue, the breeching rope was run through the rings on the eyes on the carriages and attached to the second pair of eyes off the model. The guns were then glued to the deck with dabs of cyano on the bottom of the wheels. After the glue dried, the eyes were inserted into the bulwarks to attach the breeching rope. The completed installation is shown below. In this photo the cap square over the trunnion has not yet been added.
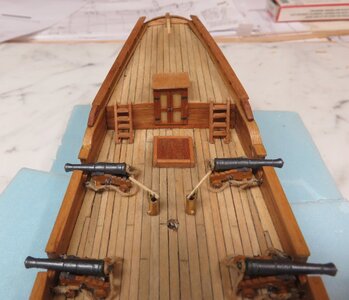
Fig 21 guns.jpeg

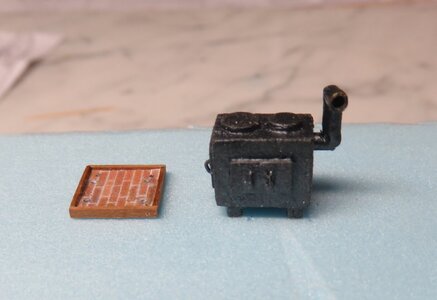
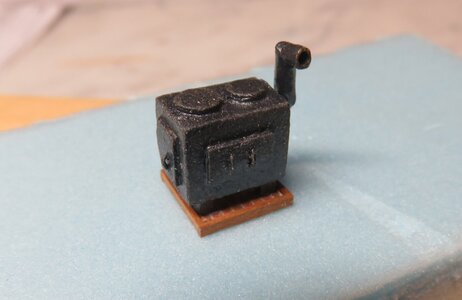
The plans show a ship's stove on deck rather than below deck. The dimensions are given on the plan but design details are lacking. On this site, CaptainsCabin posted the design for a ship's stove on the HMS Fly, which is of similar size and time period to Berbice. I used elements of this design combined with the dimensions given by Chapelle, to come up with a hearth to fit the available space. A piece of basswood was cut to the plan stove dimensions of 1/2” wide, 3/8” long and 5/16” high and various doors and openings were glued on as well as four feet. It was then painted metallic black. The vent pipe was made by soldering together sections of 1/16” ID brass tubing.

The hearth would have rested on a brick platform. I found a brick pattern on line, printed it to the correct scale, and glued it to piece of 1/32” plywood to serve this function. The hearth and platform before and after assembly are shown below (the paint surface is much smoother then it appears in the photos):

fig 22 hearh1IMG_1944.jpegIfig 23 hearth2MG_1946.jpeg

After I finished the hearth I ran across another stove plan that would have been appropriate for Berbice in the AOS book for the cutter Alert, which I mention here for future reference.

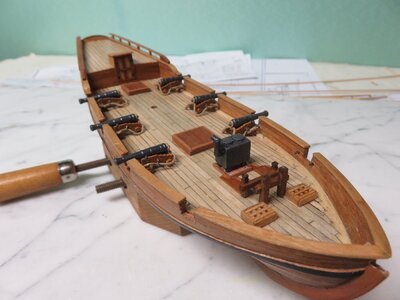
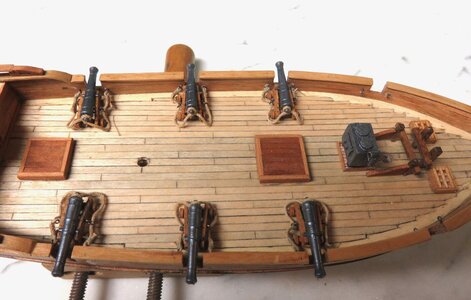
The final items of deck furniture forward were two sets of bitts and hatches. After they were added the state of the model on deck is shown in the below two photos:
fig24 deck1IMG_1947.jpegfig25 deck2IMG_1949.jpeg
 
Deck and Hull Completion

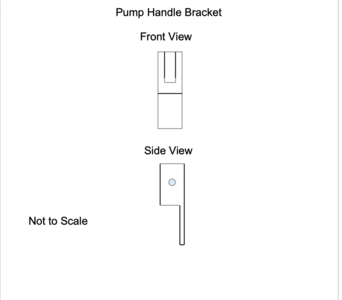
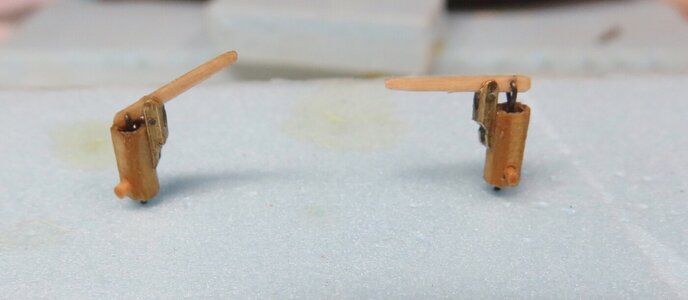
Continuing on with deck furniture, pumps and ladders were the next items installed. The pump barrels were made from 3/32” square stock filed to an octagonal shape. That was the easy part. At this scale a wooden pump handle bracket would be very prone to breakage. I instead used a piece of 1/16” square brass tubing as a starting material. A notch 1/32”wide was filed in the upper half for the pump handle and a hole was drilled for a pin to hold it in place. Three of the sides were filed away in the lower half to leave a flange for gluing to the pump body. The sketch below hopefully gives an indication of the appearance:
fig 26 pump bracket.png

Assembly of the parts produced the completed pump, which is 1/4” high:

Fig 27 pumps.jpeg


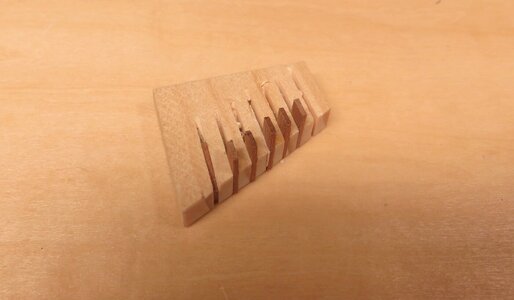
For building ladders, I use a simple jig made from wood with a thickness slightly less than the ladder tread length. One edge is cut to the angle the ladder makes with the deck and then slots are cut into the edge with the desired tread spacing. The treads are placed in these slots (see below) and the first rail glued on with its edge lined up with the edge of the jig:
fig 28  ladder jig IMG_1959.jpeg
After the glue dries, the rail is pushed to the jig surface, the jig is turned over, and the second rail is glued on to the treads to complete the job.

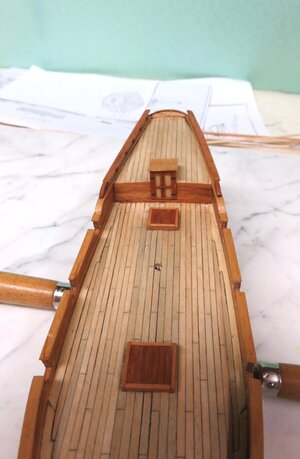
The next two photos show the aft end of the deck with the pumps, ladders and tiller in place.

fig 29 aft deckMG_1960.jpeg
fig 30 aft deckIMG_1961.jpeg

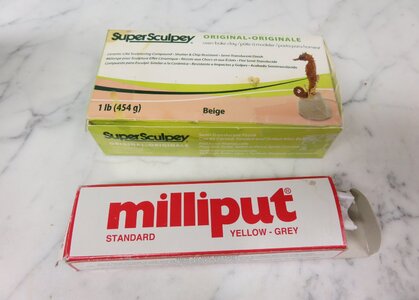
As with the deck cannon, I had trouble finding a supplier of gun barrels small enough to use as swivels. However, in my box of left over parts I luckily found one remaining barrel from a long ago kit that was close to the right size. I decided to replicate this barrel by making a mold from it and casting additional barrels. I had some positive prior experience using Sculpey clay for a one part mold and Milliput epoxy resin as the casting material:
fig 31 mold makingIMG_1968.jpeg

However for a round shape, a two part mold is needed. Sculpey, soft and easily worked out of the box, is cured in a kitchen oven to give a hard material. It was rolled out flat and two sections of similar size were cut. One was laid on top of the other and round tooth picks were inserted through the corners of both pieces for alignment. The cannon barrel was laid between the pieces and they were pressed together to get an impression. After curing per instructions, the hardened mold was filled with Milliput and left standing overnight. Two molds were made so I could make two barrels at a time. The results were acceptable since the swivels are very small features of the model and high detail is not needed.
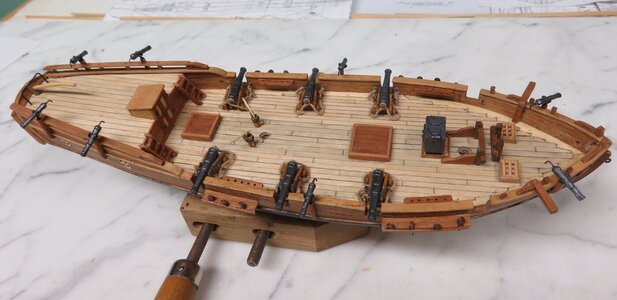
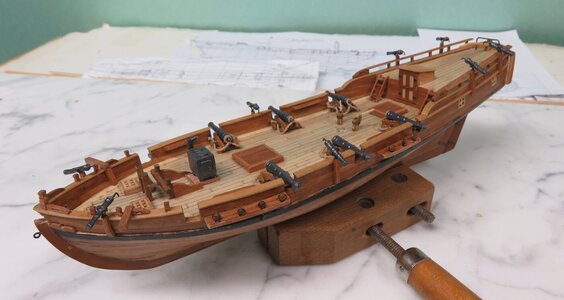
The barrels were painted black and attached to the pedestals with a swivel mounting made from twisted brass wire.

The last item to complete the hull was the channels for the dead eyes. Once the shrouds are added the channels are under stress so I always supplement the glue joint with pins into the hull. After the channels were shaped and notched for the deadeyes, three holes for #74 pins were drilled spaced along the back edge, and pins were glued in with CN with the points outward. They were then pressed into the hull to mark the pin locations and matching holes were drilled in the hull. The channels and pins were then coated with CN glue and attached to the hull.
The hull and deck at this point are shown in the below two photos:
fig 32  hullIMG_1963.jpegIfig 33 deckMG_1965.jpeg


Now I will take some time off from carpentry to devise an appropriate rigging plan, size the rigging, and assess where belaying points are needed on decks.
 
Mast and Rigging Preliminaries

With the addition of pin-rails, channels, dead eyes and chain plates, and a few other details, as shown below, Berbice is now ready for masting and rigging.
fig 35 completed hullMG_1971 (1).jpeg

Fig 34 completed hullIMG_1970.jpeg

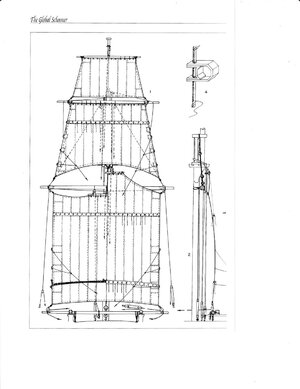
As I will mention shortly, I bought a book by K.H. Marquardt, “The Global Schooner”, to get more information on rigging schemes. To my surprise, he devoted a number of pages to Berbice since her one sheet plan in the National Maritime Museum collection is the oldest surviving for an American schooner. Chapelle mentions two versions of this plan, the one in the NMM and another in a private collection which also included partial spar dimensions. His reconstruction is based on melding the two versions. Marquardt presents a redrawn plan from the NMM version which represents the ship at the time she was taken in the Royal Navy in 1789. It adds appreciable detail for the modeler and differs from Chapelle's in two regards. There is an elongated head at the stem and a winch on the deck where Chapelle indicates a stove. Of course my Berbice has the stove. I assume neither a stove nor a winch is shown on the original deck plan, and it was a matter of choice which one to put below deck. Marquardt also provides drawings of the masts and spars, standing rigging, running rigging, and sail plan plus two photos of a model built to his plans. The rigging plans are in general agreement with Chapelle, but again, provide some added detail. My one criticism of this book is that in my copy the line plans are faint and difficult to read.


One of the chores of a scratch builder is to determine the details of rigging schemes since they are usually absent from the original plans. This involves placement and belaying of lines and types of tackles needed. In plans from Chapelle's books, mast and yard sizes are given if on the source material, and a hypothetical, rudimentary rigging plan is provided based on these measurements and what is known about rigging on a particular type of vessel in the period of interest. Rigging sizes and belaying schemes are absent. For Berbice mast and yard lengths are provided but not the diameters. However, in his book, “The History of American Sailing Ships” Chapelle discusses Chaleur, a schooner from 1764 with the same tonnage (120) and similar mast/yard lengths to Berbice. Mast/yard diameters were available for this vessel, and I used these numbers for Berbice in view of their similarity.


To flesh out the simplified rigging scheme in the Chapelle plans, I starting researching period schooner rigging in various references and came across a posting on the Model Ship World website ( modelshipworld.com/topic/25679-topsail-schooner-sail-plans-and-rigging) in which the author surveyed available information for this class of vessel. It was a detailed and inclusive study which ran to 29 pages when printed out, and I highly recommend it for anyone having to rig a schooner. This work included easy to use spread sheets for calculating spar and rigging sizes based on formulas proposed by various authors, and a valuable list of references. I purchased a copy of the Marquardt book discussed above based on the recommendation in this article.


Harold Hahn's book, “The Colonial Schooner” describes building a model of the Halifax, again similar in size to Berbice. Interestingly, of the 41 pages devoted to this model, only 6 deal with rigging, and although a rigging plan is shown there are no drawings for the masts and yards and rigging sizes are not mentioned. In part, I think this was because of uncertainty in the rigging for this particular ship and the variability in rig for other schooners like her. Also, because Hahn was much less interested in this subject than on the construction of the hull. Hahn says he would love to have an expert figure out the rigging with confidence, but this is rarely possible so it is up to the modeler to do the best he can. My sentiments exactly. Hahn also uses the mast and spar dimensions for Chaleur as a starting point. His rigging plan is similar to Chapelle's but adds a bit of detail.

Most of the rigging Chapelle shows for Berbice is typical for a top sail schooner, but he indicates the use of a spreader on the fore mast and a boom at its foot. These two yards are used for hoisting a square sail on the fore mast to take advantage of favorable winds. According to Marquardt, contemporary evidence indicates a wide variety of mounting for a square sail:

A) set flying on the fore yard

B) attached to the fore yard and a boom

C) as in B) but attached to a spreader at the head of the sail

The below drawing from Marquardt shows this sail according to rig C):
Fig. 36square sail.jpg

Marquardt's rigging plan shows a spreader about the size of the fore yard suspended below it while Chapelle gives a spreader length 1/3 the fore yard length. In view of the uncertainly regarding the spreader, I decided to omit it on the model and just include the boom at the bottom of the mast.

In summary , the rigging schemes provided by Chapelle as expanded by Marquardt will be used for Berbice. With this information, belaying points were determined for all of the rigging so a sufficient number of eyes, pins, and timber heads could be installed in appropriate locations. Rigging sizes were obtained from the tables for a 120 ton schooner in Biddlecomb's book “The Art of Rigging”. Where values were absent, the formula's provided by Lees in “Masting and Rigging English Ship of War” were used.
 
Masting and Rigging Part 1

Suitable dowels were selected for the masts and yards, cut to length, and then tapered to shape by rotating in a drill press and sanding. This is a very quick procedure and has always worked flawlessly for me. To make the jaws of the boom and gaffs, holes equal to the mast diameter were drilled in a piece of sheet wood. The jaw pattern was then laid out around the hole, the jaw cut out, and finally split along the length to produce two equal halves for gluing on either side of the boom/gaff. With this method, it is very easy to get a good fit around the mast. Final work on these parts was to add cleats and eyes and simulated iron hoops made from blackened paper on the jaws . The yards were completed by adding stop cleats in the center and cleats at the yard arms. The information in Lee's book on rigging was used to determine sizes and proportions
Again with Lee's as a reference, I filed the upper end of the lower masts square for the length of the head and cut a tenon into the end for the mast cap. A stool was added to the main mast to support the boom, and cleats were attached to the fore mast for belaying lines. The only work needed on the top masts was to square the lower end with a file and add the decorative disc at the top. To make these, I used a punch to produce 3/32”diameter discs and then drilled them to fit over the top end of the masts. They were then glued in place. The only addition to the bowsprit was a stool for the jibboom.
While the masts were on the workbench I made the mast caps and trestletree/crosstrees so they could be fitted to the masts off the model. The latter work was a bit tricky since the material was only 1/32” thick and not easy to assemble square and without breakage. Hats off to the real miniaturists who work at even smaller scales. The model with the lower masts in place is shown below:
Fig 37IMG_2069.jpeg
The mast hoops in the photo were made from brown paper, bent around the mast and ends glued together.
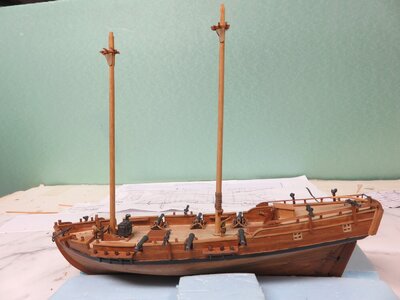
Most building logs do not devote many words to rigging since there is not a whole lot that can be said about the process once the rigging plan has been established. I use the conventional rigging sequence of forward to aft, lower masts to upper masts, starboard to port, standing rigging then running rigging. The mast tackle pendants and shrouds were rigged first. Adding the ratlines was the usual tedious pain in the rear for me, but the agony was minimized by the small number of shrouds on this vessel. I use simple overhand knots to attach these lines to the shrouds since the clove hitch used in actual practice and by many modelers produce too bulky a knot to my taste and are more difficult to tie. Next, the bowsprit was installed, shrouds and bobstay added, and the fore mast stay was attached. For schooners the main stay location impacts how the gaff on the fore mast is moved from side to side. The stay can either be led to the deck through blocks at the top of the fore mast, in which case the gaff can move freely, or set up with tackles on deck near the fore bitts which can be slacked off to allow the gaff to swing. I opted for this latter method, as indicated in Chapelle's plan, and installed a main and preventer stay for the main mast. The appearance of the model at this point is shown in the below two pictures:
Fig 38IMG_2072.JPG
Fig 39IMG_2073.JPG

Next in the rigging sequence was addition of the bowsprit cap and jibboom which was rigged with guys and a jib stay. The stay passed through a traveller, a sheave in the end of the jibboom, and was set up with a tackle. Horses were also installed. This completed the standing rigging for the lower masts and bowsprit/jibboom. Before more rigging added to congestion, the yard was hung on the fore mast with a sling and truss and the fore gaff was attached with a parrel:
Fig 40IMG_2076.JPG

With the lower masts complete, mast caps and top masts were installed on the fore and main, and the fore top mast was rigged with a stay and two back stays set up with tackles. After the boom was put on the main mast the model appears as shown below:

Fig 41IMG_2081.jpeg
Fig 42IMG_2082.jpeg
And that is progress to date.
 

Attachments

  • Fig 42IMG_2082.jpeg
    Fig 42IMG_2082.jpeg
    230 KB · Views: 0
  • Fig 41IMG_2081.jpeg
    Fig 41IMG_2081.jpeg
    212.3 KB · Views: 0
  • Fig 37IMG_2069.jpeg
    Fig 37IMG_2069.jpeg
    166.7 KB · Views: 0
Masting and Rigging Part 2

Rigging on the fore top mast continued with the hanging the top yard with a truss and halyard. Next, the running rigging for the fore mast gaff, consisting of peak and throat halyards and vang tackles, was installed . Finally braces and lifts were added to complete the running rigging of the yards. I do the braces last since they obstruct access to the interior of the deck and make belaying more difficult.
Now on to the main mast which did not contain any yards so was rigged quickly. Standing rigging, a stay and back stays, was added to the main top mast and the gaff was hung with a parrel. Running rigging was then added to the gaff in the same fashion as the fore gaff and the main boom was rigged with a topping lift, boom sheets and a horse.
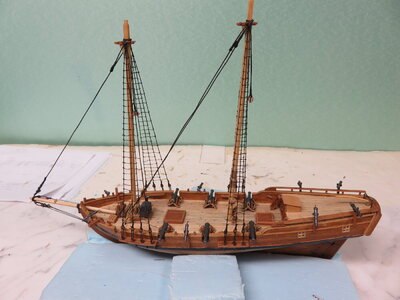
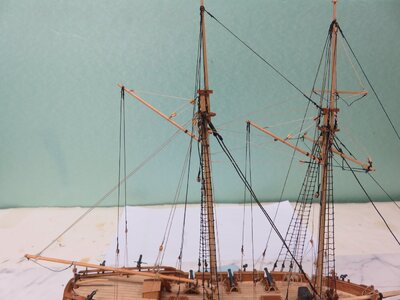
The completed rigging on the model, and closeups photos of the rigging and belaying are shown in the below three figures:
Fig 43 rigged modelMG_2083.jpegfig 44 rigging close upIMG_2086.jpegfig 45 belayingIMG_2089.jpeg


Ground Tackle

Anchor design was based on the plan for the cutter Alert, a vessel of about the same size as Berbice. Blanks were cut from 1/16” plywood, as shown below:
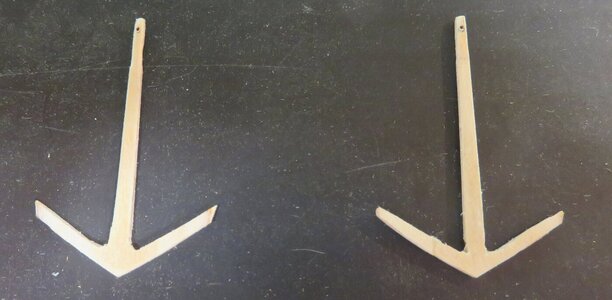
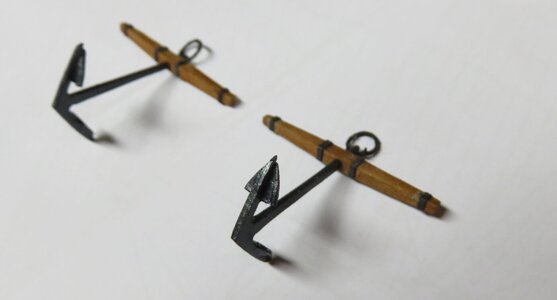
Fig 46 anchor blanksMG_2087.jpeg
They were then sanded to the final shape, and palms cut from 1/32” plywood were glued on. After painting with pearl noir colored paint to give a mettalic iron finish, the stocks and the anchor rings, wrapped with thread, were put on to give the appearance in the below photo:
fig 47 annchorsIMG_2088.jpeg

Double blocks, wire stropped with a hook the end, were rigged to the cat heads and then the anchors were installed:
Fig 48 ground tackleMG_2093.jpeg

This completed work on the model which I began building in April 2021. All that is left is to mount it on a pedestal and to construct the base for it to sit on.
 
Congratulations for finishing this interesting project - very well done (and also very fast)
 
Thanks to all for the nice comments about the Berbice. It is very satisfying to be complimented by fellow modelers. I'm currently working on building a base and getting the model mounted and will post a few more photos when I get it completed.
 
Mounting the Model

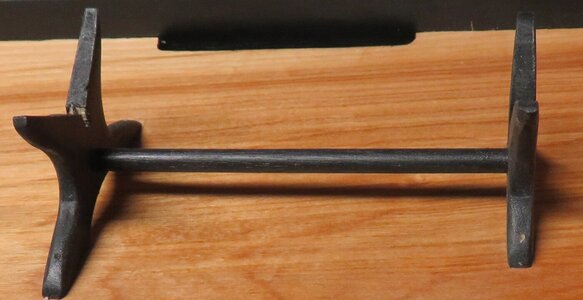
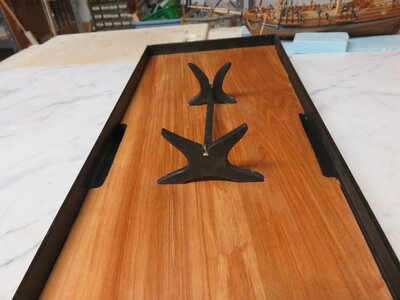
Not many build logs discuss how the model is mounted so I will describe my technique should it prove useful for anyone. For my last several models I have switched from using pedestals to using stands for attaching the model to the base. I think this provides more secure mounting, especially if the model is to be shipped somewhere. The front and rear sections of the stand, whose construction was pictured earlier in the build log section entitled Transom and Rudder, were sanded to final shape then a 1/4” dowel was inserted to connect the two pieces. After the stand was was positioned to line up with the holes drilled in the keel for pins, the dowel was glued in place and the excess ends cut off. Holes were then drilled in the stand slots for the pins which will extend up into the keel. After sanding and painting the appearance of the stand is shown below:
Fig 49standIMG_2097.jpeg

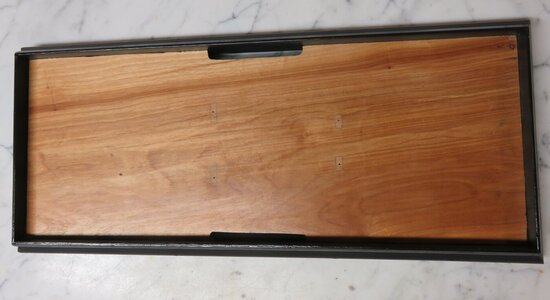
The combination of the model and its base a model affects the appearance in the same way as a frame for a picture. It can add to or subtract from eye appeal. My only woodworking tools are a circular saw and a power miter saw so I have to keep my homemade bases simple. There is little doubt that with more equipment and woodworking skills a more elaborate base could be produced. I start with a piece of 3/4” hardwood plywood, in this instance cherry, which is cut to the desired length and width. I have found that cased models give off vapors from glue and finishes that fog the inside of a case over time. This can be eliminated by providing for venting of the case with openings cut along the two sides of the base. For the Berbice base ,which is 18” long and 7” wide, slots 3” long and 5/16” deep were cut. Next, the stand was positioned on the base so the model would be centered, the location marked, and holes drilled through the feet of the stand into the base for small nails which along with glue will attach the stand to the base. Finally, the base was given a coat of natural Minwax finish followed by urethane varnish.
Molding 1 3/8” high was purchased from the home supply store and cut to length to fit around the base. The moldings extend 5/8” above the base to provide a pocket for holding a plexiglas case in place. After painting the molding black it was nailed and glued around the base and then varnished giving the below appearance:
Fig 50 base.jpeg

After the stand was also glued and nailed to the base:
Fig 51 baseIMG_2096.jpeg

epoxy glue was put into the holes in the bottom of the keel and the model was attached to the pins extending up from the slots in the stand to complete the project.

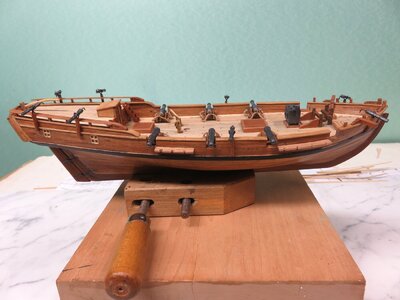
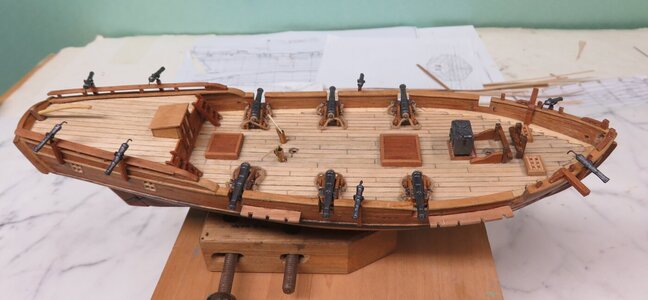
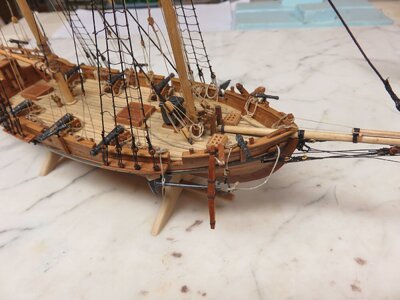
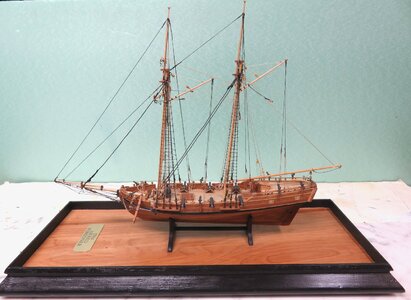
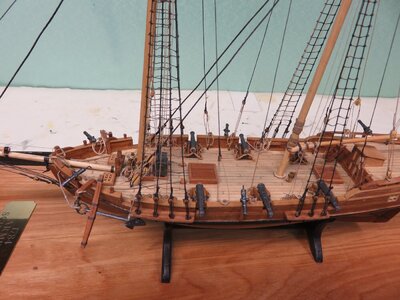
Here is the final result:
Fig 52 profileIMG_2098.jpeg
Fig 53deck.jpeg

This was a fun build in many respects. The hull had an easily planked shape, the rigging, my least favorite task in modeling, was relatively simple, and it could be finished in a short time. The scale I chose was a bit small for my fat fingers and more working space on deck would have been nice, but that is my only complaint. Best of all I am happy with the appearance, and I think it will look nice on a good friend's mantle piece which is Berbice's next home port.
 
Back
Top