Black Pearl 1:50 (ZHL, All-Sealed Version)

Joined
Jul 23, 2021
Messages
7
Points
43

"It's not just a keel and a hull and a deck and sails, that's what a ship needs. But what a ship is - what the Black Pearl really is - is freedom" Captain Jack Sparrow.

And I'd like to add it is also a lot of fun! I fell in love with that ship ever since I saw it on the big screen for the first time. Over the years I have enjoyed the movies, built Lego & cardboard versions of the Pearl, sailed her on PC and so I think it is time for a "proper" version that will sail the living room.
Why choose the ZHL All-Sealed version over the All-Scenario version, if I'm going to spend so many hours building? I just really like the smooth aesthetics of hulls, simple as that.

I already read in other build logs that ZHL's quality is supposed to be quite good. I have no comparison, but I am some kind of a perfectionist when it comes to models and I was very pleased with all the parts that greeted me. Order process was super easy, customer service very good (despite the language barrier) and shipment fast.


So without further ado, I invite everyone to join me on the journey of building the Black Pearl! And of course, any input is welcome :)
IMG_2759.jpeg
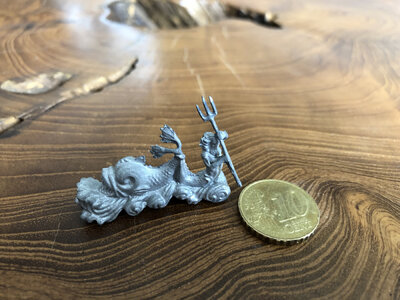
Image 1: Very pleased with the (3D printed?) figures and ornaments. Not exactly Citadel Finecast quality, but we're building a ship here, after all.

From what I can tell the parts list is complete, time to start!
IMG_2762.jpeg

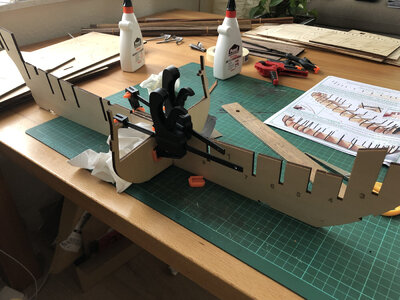
Image 2: Adding the first bulkheads already gives a good idea about the size. As always, no imagination (assisted by a ruler) beforehand compares to the real thing ;) I would really soon ditch the "instant" wood glue for some fast drying wood glue - the smell was just aweful.
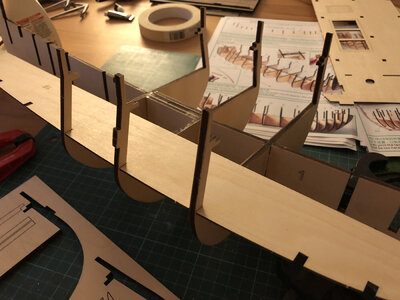
IMG_2767.jpeg
Image 3: Getting the lasercut parts out proved to work quite well with a scalpel so far. Not much sanding needed afterwards. Using the smaller of the two lower deck parts ensured that the frames would be in 90 degree to the middle part of the ship.

What are the decks called on the Pearl? Main deck and lower gun deck? Spar deck and gun deck? I'll stick with main deck and lower deck (as there is only one in this kit) until I know more about it. Speaking of lower decks ...
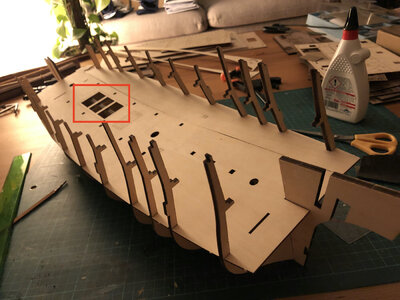
IMG_2769.jpeg
Image 4: The first test fit of the two-parted lower deck made me sweat quite a lot, as there was so much tension I constantly feared sth. would break. I think this was due to (non existant) tolerances in the parts and not because i worked sloppy. Anyway, nothing that some sanding can't fix. Now, I know, I didn't choose the all-scenario version. But I'd still like to be able to open all the cargo hatches (no idea what the nautical term is) right down to the lowest deck. After all, how else could the crew heave up all the rum barrels to blow up the kraken? Unfortunately, there is no "lowest deck" in this kit, but a solid frame.
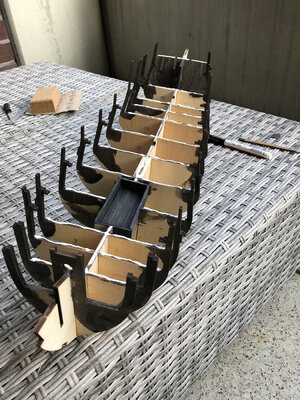
IMG_2780.jpeg
Image 5: Only one way around this: insert a pseudo deck. Yes, it is way to small regarding height. And yes, it barely reaches to to ends of the cargo opening. But it will do the job just fine, when you look down from two decks above. Is it worth the effort, if you can barely see it? It is there, I can open up the cargo openings and look down, it makes me happy. So yes, worth it :)
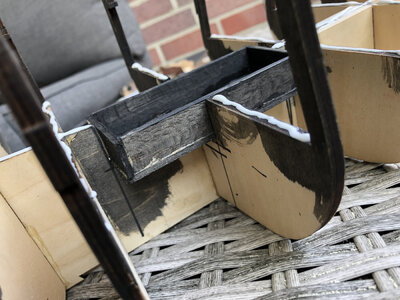
IMG_2782.jpeg
Image 6: Designing the pseudo deck any deeper would have had serious impact on the structural integrity, wider would have interfered with the support beams carrying the main deck.
IMG_2783.jpeg
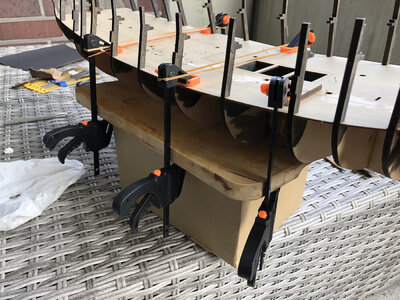
Image 7: Time to attach the "real" lower deck. No onions on the chopping board today, but the skeleton of a ship in the making. And to be honest, I feel much more comfortable with that.
IMG_2788.jpeg
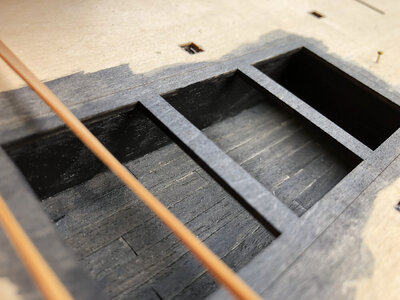
Image 8: Another view of the pseudo deck. I am pleased with how it turned out :)
IMG_2789.jpeg
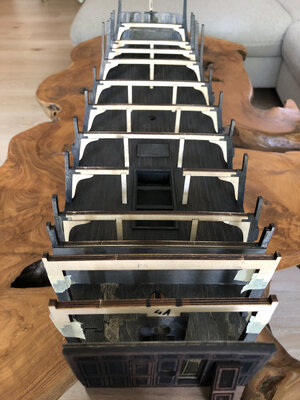
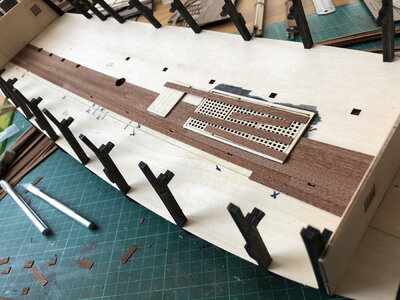
Image 9: Having already put some effort into a little black box at the bottom of the ship, that will likely never really be seen, it is only logical to add some more extras you'll also hardly ever notice once the Pearl is finished: Planks on the lower deck. But, knowing myself, I will enjoy a peek through the gunports or the cargo opening to see a decent deck. Or to be more honest: it would annoy me beyond reasoning to not see planks on that deck ^^
IMG_2795.jpeg
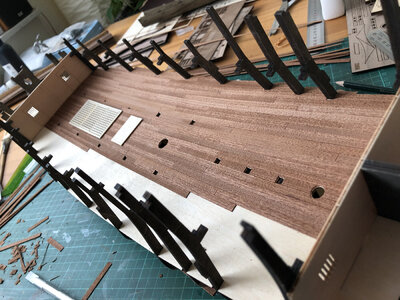
Image 10: As I never finished an H.M.S. Bounty kit many years ago, I have a lot of spare parts to use. The wood color is just beautiful and it makes me almost sad to paint everything black, eventually. But alas, it's the Black Pearl not the Teak Pearl. The dark wood in the ZHL kit is walnut I believe, and its color is way more suited for the black paint. It has more of a grey tone when sanded, unlike the red planks here on the lower deck. After all the goal is not to just spray paint everything tar black, but keep a little of the original wood shimmering through. Anyway, the lower deck won't be lit much.

Apart from the fact that the Black Pearl is a purely fictional ship with some features seen only on much later ships, it originally sailed as the "Wicked Wench" for the East India Company roughly around 1720. So it was probably built in British ship yard. Therefore I decided to use a pattern of four alternating planks (seen in Image 9 on the cargo opening) as this was commonly used during that time. I made a minor mistake along the way, so I'm glad I could "train" on the lower deck before planking the main deck later on.
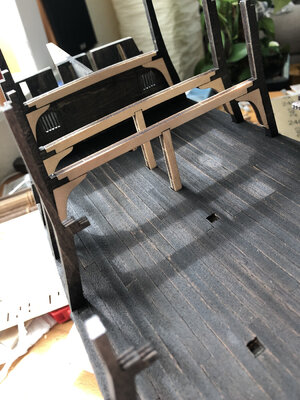
IMG_2847.jpeg
Image 11: The black color on the deck came out way better then expected, the photos don't really do it justice. Sanding the areas where sailors would walk frequently gives it a nice used look, that I aim to achieve on the whole ship. Watching POTC you'll notice the Black Pearl actually isn't that black everywhere on closer inspection. For paint I used acrylic black with a little white (so it's technically a very dark grey, not sure if Batman would approve) and I thinned the color substantially with water. The deck was too wet, so in many instances the smooth sanded planks curled up at the edges a little bit. Nothing major, but something to keep in mind for the main deck. Painting wood glue with thinned down acrylic is nearly impossible. Technically, I knew that beforehand, but decided not to pay too much attention during glueing anyway. Won't do that mistake again ^^


Next up I have to decide on a lighting solution. The control unit in the kit reacts to clapping and lights up the stern lanterns, the captain's cabin and two small lanterns outside the doors. I'm not a big fan of the clapping idea (I'd much rather have radio controlled lights) and as I'm doing changes anyway, I'd like to light up the lower deck as well. Additionally having the batteries separate in either the captain's cabin or the little pseudo deck in the bottom would allow for easy maintenance in the years to come.
Any input regarding this is welcome, I have never dealt with electrics before :)
 
Last edited:
Nice model she is going to be! :)
Regarding lights - just don't make them as modern cruisers flood lights!:)))
as we could often see on the model of period sailing vessels, when builder decided to light them :)))
Make them as very dimmed , and color of candle lights and flickering as natural fire does...

All the Best!
Kirill
 
Always good to see another Pearl being built looks like your off to a good start. I am currently working on the golden version. I used yellow flickering LEDs and am pleased with the results.
 
Thanks for the tips regarding lights :) I would have gone with warm white LEDs, but of course you guys are right: yellow does look a lot more like candle light. Eventually I decided against flickering lights (although I was quite hooked by your video, Tony) due to the simple reason that static light will probably be easier on the eye. Sacrificing a little realism here ;)

IMG_2862.jpeg
Image 12: Placing the support beams for the main deck was so much fun and felt really rewarding. Even though hardly any of this will be visible later on, it feels like the first step of bringing the actual ship to life.

IMG_2859.jpeg
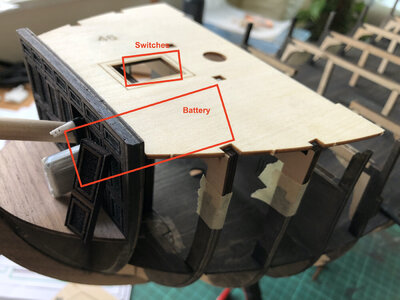
Image 13: Considerably less fun was the process of deciding how to do the electronics. From battery boxes in the pseudo lowest deck, to radio controlled switches in the captain's cabin there were a number of ideas floating through my head. The main focus was on invisibility and not having any cables leaving the ship to an external power source.
Eventually I remembered a small quadrocopter I own and it's rechargeable battery packs. 3.7V and 650mAh should be enough juice for 9 LEDs being light for about 3-4h. Two of those should be able to power two separate circuits - one for the lower deck, one for the captains cabin and stern lanterns. Luckily you can't really look into the forecastle, but it still offers enough space to house the batteries and switches. What's more there are already two openings in the front "doors" for the crew to use. Perfect fit for the batteries, still reachable once all the rigging is done. the switches will be covered by the grating. So much for the theory, tomorrow the last parts should arrive.

IMG_2868.jpeg
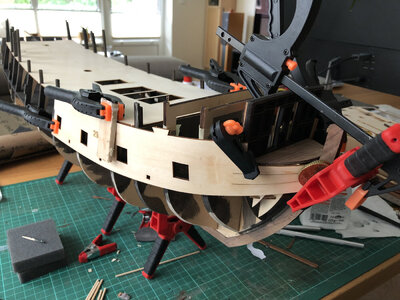
Image 14: When it comes to the whole project, the one thing, where I am uncertain of my craftsmanship skills, is bending wood. The thin planks in particular, but basically all steps requiring bent wood. Naturally I was really happy when the first two hull parts dried pretty well into shape on the first try. Maybe it's not that bad after all :D

IMG_2863.jpeg
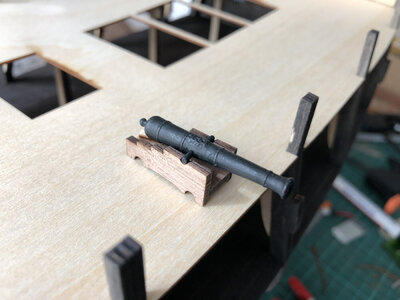
Image 15: Rather early on I have to decide on how to handle the guns. The color used for the barrel is one of Citadel's new contrast paints (Black Templar). The idea of this kind of paint is that the heavy pigments are darker, creating a natural wash effect when drying. I've had some amazing results on tabletop minis, the effect on the gun barrel is .. okay. I used no primer, maybe that's why the effect isn't as strong as expected. On the other hand the metal shines trough, only very subtle. Overall I like the look.

But when and how to place the guns on the gun deck?! From all I can tell, the lafette is placed on the deck, without the barrel. The barrel is then added much later trough the gunport. This makes sense, as you can handle all the sanding and work on the hull pretty easy without having guns sticking out. Now, I do not want to go too crazy with completely accurate rigging on the guns. But at least the big rope, securing the recoil would be nice to add. So unless there is a clever way of doing this, that I have not stumbled upon yet, I will most likely deviate considerably from the instructions when it comes to placing the main deck and planking the hull. Having the hull finished first and adding the main deck afterwards, will allow me to place the guns before, with all the nice to have details.

If anyone has a good take on the gun issue, I would really appreciate that!
 
This is the first log I have seen for this version your doing an excellent job. The guns look really good, I can't tell from the photo but be careful (my instructions where wrong) the carriage should be tapered narrow at the front, wide at the back.
 
Thanks for the tips regarding lights :) I would have gone with warm white LEDs, but of course you guys are right: yellow does look a lot more like candle light. Eventually I decided against flickering lights (although I was quite hooked by your video, Tony) due to the simple reason that static light will probably be easier on the eye. Sacrificing a little realism here ;)

View attachment 246999
Image 12: Placing the support beams for the main deck was so much fun and felt really rewarding. Even though hardly any of this will be visible later on, it feels like the first step of bringing the actual ship to life.

View attachment 247000
Image 13: Considerably less fun was the process of deciding how to do the electronics. From battery boxes in the pseudo lowest deck, to radio controlled switches in the captain's cabin there were a number of ideas floating through my head. The main focus was on invisibility and not having any cables leaving the ship to an external power source.
Eventually I remembered a small quadrocopter I own and it's rechargeable battery packs. 3.7V and 650mAh should be enough juice for 9 LEDs being light for about 3-4h. Two of those should be able to power two separate circuits - one for the lower deck, one for the captains cabin and stern lanterns. Luckily you can't really look into the forecastle, but it still offers enough space to house the batteries and switches. What's more there are already two openings in the front "doors" for the crew to use. Perfect fit for the batteries, still reachable once all the rigging is done. the switches will be covered by the grating. So much for the theory, tomorrow the last parts should arrive.

View attachment 247003
Image 14: When it comes to the whole project, the one thing, where I am uncertain of my craftsmanship skills, is bending wood. The thin planks in particular, but basically all steps requiring bent wood. Naturally I was really happy when the first two hull parts dried pretty well into shape on the first try. Maybe it's not that bad after all :D

View attachment 247004
Image 15: Rather early on I have to decide on how to handle the guns. The color used for the barrel is one of Citadel's new contrast paints (Black Templar). The idea of this kind of paint is that the heavy pigments are darker, creating a natural wash effect when drying. I've had some amazing results on tabletop minis, the effect on the gun barrel is .. okay. I used no primer, maybe that's why the effect isn't as strong as expected. On the other hand the metal shines trough, only very subtle. Overall I like the look.

But when and how to place the guns on the gun deck?! From all I can tell, the lafette is placed on the deck, without the barrel. The barrel is then added much later trough the gunport. This makes sense, as you can handle all the sanding and work on the hull pretty easy without having guns sticking out. Now, I do not want to go too crazy with completely accurate rigging on the guns. But at least the big rope, securing the recoil would be nice to add. So unless there is a clever way of doing this, that I have not stumbled upon yet, I will most likely deviate considerably from the instructions when it comes to placing the main deck and planking the hull. Having the hull finished first and adding the main deck afterwards, will allow me to place the guns before, with all the nice to have details.

If anyone has a good take on the gun issue, I would really appreciate that!
Great start! You can see my guns if you click on the Pearl in my signature block. I don’t pretend to have done a great job, but rigging them helped to keep them from moving. Glue didn’t do the job.
 
This is the first log I have seen for this version your doing an excellent job. The guns look really good, I can't tell from the photo but be careful (my instructions where wrong) the carriage should be tapered narrow at the front, wide at the back.
You have a sharp eye, the instructions are correct, this was an user error ;)

Great start! You can see my guns if you click on the Pearl in my signature block. I don’t pretend to have done a great job, but rigging them helped to keep them from moving. Glue didn’t do the job.
I think you did a really fine job on your Pearl's cannons, especially with the hooks. Guess I'll go for something very similar.
 
IMG_2882.jpeg
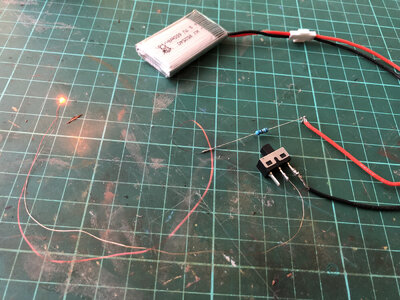
Image 16: It's the little things in life, like in this case a tiny glowing SMD LED. I knew they'd be small, but really - "tiny" still is an understatement ^^ This is the test circuit, with a 3.7 Volts Battery, a 68 Ohm resistance, a switch and ofc the LED (2.8 V, 15 mA). Seems to work :D

IMG_2891.jpeg
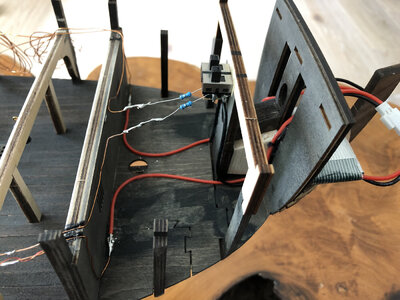
Image 17: Installing the two circuits was pretty straight forward. On starboard runs the lower deck circuit and on port run the cables for the captain's cabin and stern lanterns.

IMG_2887.jpeg
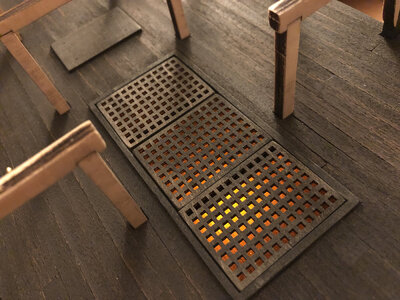
Image 18: Lighting up the the pseudo lowest deck proved to be a real hassle. First of all, placing a 1mm LED the right way up under on of the beams, all while not seeing anything was hard. But really frustrating was the part, where everything was soldered and no lights came up. Took me the better part of an hour to finally determine the error in the whole setup: The translucent isolation coating on the copper wire. It's supposed to come off with heat. Like with a lighter or the soldering iron. Tried both, both failed. In the end I had to redo all contacts, sanding off the copper wire. For the LEDs wires it was the opposite way: removing the coat with a lighter also melted the wire. At least the remainder could be soldered properly ;)

IMG_2895.jpeg
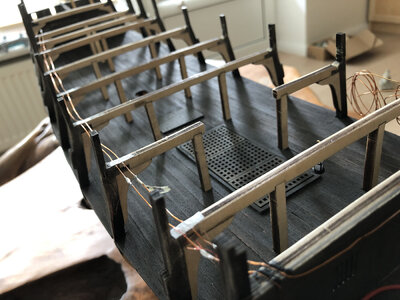
Image 19: Here is a look on the starbord circuit. The beams have little notches, so the main deck will fit evenly.

IMG_2893.jpeg
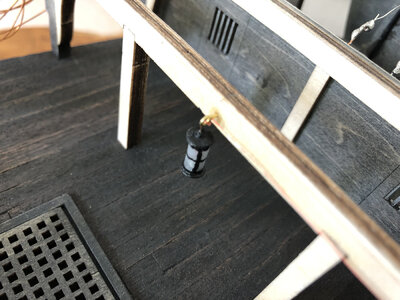
Image 20: The All-Sealed BP does not come with any lights for the lower deck and, therefore, also without any lanterns. I couldn't find any 1:50 scale ones, so it was time for a DIY solution. I made a roll out of transparent wrap from an old booklet and attached the round waste parts you get from a perforator on top and bottom. The rest is black acrylic paint. Perfect scale.

IMG_2889.jpeg
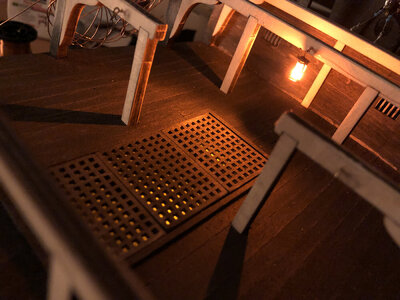
Image 21: I'm really happy with the small SMDs, as due to their size they actually resemble a candle flame insight the lantern (Hard to see in this picture). The brightness also seems just right - eight more to go!
 
Last edited:
View attachment 247327
Image 16: It's the little things in life, like in this case a tiny glowing SMD LED. I knew they'd be small, but really - "tiny" still is an understatement ^^ This is the test circuit, with a 3.7 Volts Battery, a 68 Ohm resistance, a switch and ofc the LED (2.8 V, 15 mA). Seems to work :D

View attachment 247328
Image 17: Installing the two circuits was pretty straight forward. On starboard runs the lower deck circuit and on port run the cables for the captain's cabin and stern lanterns.

View attachment 247329
Image 18: Lighting up the the pseudo lowest deck proved to be a real hassle. First of all, placing a 1mm LED the right way up under on of the beams, all while not seeing anything was hard. But really frustrating was the part, where everything was soldered and no lights came up. Took me the better part of an hour to finally determine the error in the whole setup: The translucent isolation coating on the copper wire. It's supposed to come off with heat. Like with a lighter or the soldering iron. Tried both, both failed. In the end I had to redo all contacts, sanding off the copper wire. For the LEDs wires it was the opposite way: removing the coat with a lighter also melted the wire. At least the remainder could be soldered properly ;)

View attachment 247330
Image 19: Here is a look on the starbord circuit. The beams have little notches, so the main deck will fit evenly.

View attachment 247331
Image 20: The All-Sealed BP does not come with any lights for the lower deck and, therefore, also without any lanterns. I couldn't find any 1:50 scale ones, so it was time for a DIY solution. I made a roll out of transparent wrap from an old booklet and attached the round waste parts you get from a perforator on top and bottom. The rest is black acrylic paint. Perfect scale.

View attachment 247332
Image 21: I'm really happy with the small SMDs, as due to their size they actually resemble a candle flame insight the lantern (Hard to see in this picture). The brightness also seems just right - eight more to go!
You won’t see these directly anyway.
 
"It's not just a keel and a hull and a deck and sails, that's what a ship needs. But what a ship is - what the Black Pearl really is - is freedom" Captain Jack Sparrow.

And I'd like to add it is also a lot of fun! I fell in love with that ship ever since I saw it on the big screen for the first time. Over the years I have enjoyed the movies, built Lego & cardboard versions of the Pearl, sailed her on PC and so I think it is time for a "proper" version that will sail the living room.
Why choose the ZHL All-Sealed version over the All-Scenario version, if I'm going to spend so many hours building? I just really like the smooth aesthetics of hulls, simple as that.

I already read in other build logs that ZHL's quality is supposed to be quite good. I have no comparison, but I am some kind of a perfectionist when it comes to models and I was very pleased with all the parts that greeted me. Order process was super easy, customer service very good (despite the language barrier) and shipment fast.


So without further ado, I invite everyone to join me on the journey of building the Black Pearl! And of course, any input is welcome :)

View attachment 246297
Image 1: Very pleased with the (3D printed?) figures and ornaments. Not exactly Citadel Finecast quality, but we're building a ship here, after all.

From what I can tell the parts list is complete, time to start!

View attachment 246298

Image 2: Adding the first bulkheads already gives a good idea about the size. As always, no imagination (assisted by a ruler) beforehand compares to the real thing ;) I would really soon ditch the "instant" wood glue for some fast drying wood glue - the smell was just aweful.

View attachment 246299
Image 3: Getting the lasercut parts out proved to work quite well with a scalpel so far. Not much sanding needed afterwards. Using the smaller of the two lower deck parts ensured that the frames would be in 90 degree to the middle part of the ship.

What are the decks called on the Pearl? Main deck and lower gun deck? Spar deck and gun deck? I'll stick with main deck and lower deck (as there is only one in this kit) until I know more about it. Speaking of lower decks ...

View attachment 246300
Image 4: The first test fit of the two-parted lower deck made me sweat quite a lot, as there was so much tension I constantly feared sth. would break. I think this was due to (non existant) tolerances in the parts and not because i worked sloppy. Anyway, nothing that some sanding can't fix. Now, I know, I didn't choose the all-scenario version. But I'd still like to be able to open all the cargo hatches (no idea what the nautical term is) right down to the lowest deck. After all, how else could the crew heave up all the rum barrels to blow up the kraken? Unfortunately, there is no "lowest deck" in this kit, but a solid frame.

View attachment 246301
Image 5: Only one way around this: insert a pseudo deck. Yes, it is way to small regarding height. And yes, it barely reaches to to ends of the cargo opening. But it will do the job just fine, when you look down from two decks above. Is it worth the effort, if you can barely see it? It is there, I can open up the cargo openings and look down, it makes me happy. So yes, worth it :)

View attachment 246302
Image 6: Designing the pseudo deck any deeper would have had serious impact on the structural integrity, wider would have interfered with the support beams carrying the main deck.

View attachment 246307
Image 7: Time to attach the "real" lower deck. No onions on the chopping board today, but the skeleton of a ship in the making. And to be honest, I feel much more comfortable with that.

View attachment 246309
Image 8: Another view of the pseudo deck. I am pleased with how it turned out :)

View attachment 246310
Image 9: Having already put some effort into a little black box at the bottom of the ship, that will likely never really be seen, it is only logical to add some more extras you'll also hardly ever notice once the Pearl is finished: Planks on the lower deck. But, knowing myself, I will enjoy a peek through the gunports or the cargo opening to see a decent deck. Or to be more honest: it would annoy me beyond reasoning to not see planks on that deck ^^

View attachment 246312
Image 10: As I never finished an H.M.S. Bounty kit many years ago, I have a lot of spare parts to use. The wood color is just beautiful and it makes me almost sad to paint everything black, eventually. But alas, it's the Black Pearl not the Teak Pearl. The dark wood in the ZHL kit is walnut I believe, and its color is way more suited for the black paint. It has more of a grey tone when sanded, unlike the red planks here on the lower deck. After all the goal is not to just spray paint everything tar black, but keep a little of the original wood shimmering through. Anyway, the lower deck won't be lit much.

Apart from the fact that the Black Pearl is a purely fictional ship with some features seen only on much later ships, it originally sailed as the "Wicked Wench" for the East India Company roughly around 1720. So it was probably built in British ship yard. Therefore I decided to use a pattern of four alternating planks (seen in Image 9 on the cargo opening) as this was commonly used during that time. I made a minor mistake along the way, so I'm glad I could "train" on the lower deck before planking the main deck later on.

View attachment 246313
Image 11: The black color on the deck came out way better then expected, the photos don't really do it justice. Sanding the areas where sailors would walk frequently gives it a nice used look, that I aim to achieve on the whole ship. Watching POTC you'll notice the Black Pearl actually isn't that black everywhere on closer inspection. For paint I used acrylic black with a little white (so it's technically a very dark grey, not sure if Batman would approve) and I thinned the color substantially with water. The deck was too wet, so in many instances the smooth sanded planks curled up at the edges a little bit. Nothing major, but something to keep in mind for the main deck. Painting wood glue with thinned down acrylic is nearly impossible. Technically, I knew that beforehand, but decided not to pay too much attention during glueing anyway. Won't do that mistake again ^^


Next up I have to decide on a lighting solution. The control unit in the kit reacts to clapping and lights up the stern lanterns, the captain's cabin and two small lanterns outside the doors. I'm not a big fan of the clapping idea (I'd much rather have radio controlled lights) and as I'm doing changes anyway, I'd like to light up the lower deck as well. Additionally having the batteries separate in either the captain's cabin or the little pseudo deck in the bottom would allow for easy maintenance in the years to come.
Any input regarding this is welcome, I have never dealt with electrics before :)
Hallo @Captain Lizard
we wish you all the BEST and a HAPPY BIRTHDAY
Birthday-Cake
How is your work on the Black pearl going? Any update possible?
 
Back
Top