Hi Rich as I recall they included a couple of extra dory sides (one piece veneers) in the kit. I think I cut them into strips to make the dory's so that should work.I too was going to not use the single cut side dory and was considering cutting it into three planks or as a template to lay those out. Now I have to figure out how to print your sheets. Thanks. RIch (PT-2)
-

Win a Free Custom Engraved Brass Coin!!!
As a way to introduce our brass coins to the community, we will raffle off a free coin during the month of August. Follow link ABOVE for instructions for entering.
You are using an out of date browser. It may not display this or other websites correctly.
You should upgrade or use an alternative browser.
You should upgrade or use an alternative browser.
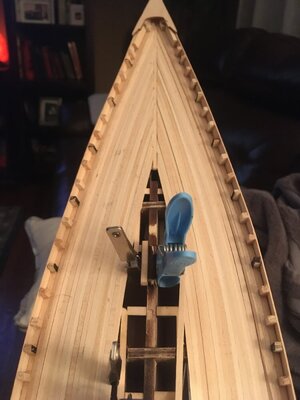
I planked the hull then the deck but I did plank the 3 thicker boards on the fore deck and on the aft deck before planking the upper hull. I also planked from the outside in, though I’ve seen most go inside out and do that technique of cutting notches in the outside plank. I preferred to taper my center planks and like that look of them all joining together along the center of the deck. I like the V look that matches the hull lines.Out of curiosity. . . did you plank the deck before the hull? and which would you recommend? Rich (PT-2)

- Joined
- May 26, 2020
- Messages
- 199
- Points
- 143

Saved the pdf of the Dory for future use. Thanks.
I have been concerned about dislodging the faux stanchions so will install the main rail before doing any planking other than the waterways which were placed three wide foreships and just one between/under the after stanchions. Otherwise the problem that I know is coming is where my scupper holes in the raised afterdeck section cut through where the coved accent stripe is. I will probably fill in my coved accent, sand it smooth, and later mask and paint the stripe higher than where the details/elevations show it placed. Continuous width for that masking may be a chore if I don't use a center guide masking tape to be removed after placing the masking above and below. . . or if I recall you painted the general area yellow and masked that over to then paint the black sides. Is that correct? Thanks for your experiences. Rich (PT-2)I planked the hull then the deck but I did plank the 3 thicker boards on the fore deck and on the aft deck before planking the upper hull. I also planked from the outside in, though I’ve seen most go inside out and do that technique of cutting notches in the outside plank. I preferred to taper my center planks and like that look of them all joining together along the center of the deck. I like the V look that matches the hull lines.View attachment 194461
Yes, that’s what I tried but ended up having to go over it by hand. Not perfect but acceptable for my 1st attempt at a build. If I was doing again I would use yellow pinstripe material for car detailing.I have been concerned about dislodging the faux stanchions so will install the main rail before doing any planking other than the waterways which were placed three wide foreships and just one between/under the after stanchions. Otherwise the problem that I know is coming is where my scupper holes in the raised afterdeck section cut through where the coved accent stripe is. I will probably fill in my coved accent, sand it smooth, and later mask and paint the stripe higher than where the details/elevations show it placed. Continuous width for that masking may be a chore if I don't use a center guide masking tape to be removed after placing the masking above and below. . . or if I recall you painted the general area yellow and masked that over to then paint the black sides. Is that correct? Thanks for your experiences. Rich (PT-2)
Last edited:
Something interesting here, I wonder if we are both building the MS2130 1/64th 32"=1ft schooners. . . My plans and build have three faux stancheons between each laser cut bulkhead with char visible on those of yours which have only two of those stumpy critters. Did you decide to take three down to two or is that how your plans are drawn???? Two sure simplify the installation and also cutting the scuppers on each side of the stancheons.I planked the hull then the deck but I did plank the 3 thicker boards on the fore deck and on the aft deck before planking the upper hull. I also planked from the outside in, though I’ve seen most go inside out and do that technique of cutting notches in the outside plank. I preferred to taper my center planks and like that look of them all joining together along the center of the deck. I like the V look that matches the hull lines.View attachment 194461
I have spent some time working out a pattern of deck plank lengths for the butt joints on the decking beams in an even staggered pattern but finally got it solved. I'll use long strips and score and use small pencil point dots for the end and intermediate nailing with a pencil darkened edge on the decking planks for caulking. I'll stick with the nibbing strakes at the waterlines and we'll see how that works out. Can't be much worse than my scupper/accent cove situation.
Maybe a photo or so after I get the main railings installed tomorrow with luck.
Rich (PT-2)
Yes I am building MS2130. I didn’t realize there are supposed to be 3 fake stancheons between the bulkheads. What I was following, can’t remember, did this as well. Might have just misread something though. I also had not yet seen anything about scoring the side of planks with a pencil or putting fake nail marks until I had already sanded and sealed the deck. I did see a technique I will try on HMS Fly, using a pin to make a nail hole then dip in ink or stain to color it. Will experiment on a piece of wood when I get to that build. I seem to remember laying down the waterlines before putting in the scupper plank and finishing the upper hull planking then dropping in the stancheons. Didn’t put the main rail on until I finished my deck planking. Didn’t want to slip or something and damage it.Something interesting here, I wonder if we are both building the MS2130 1/64th 32"=1ft schooners. . . My plans and build have three faux stancheons between each laser cut bulkhead with char visible on those of yours which have only two of those stumpy critters. Did you decide to take three down to two or is that how your plans are drawn???? Two sure simplify the installation and also cutting the scuppers on each side of the stancheons.
I have spent some time working out a pattern of deck plank lengths for the butt joints on the decking beams in an even staggered pattern but finally got it solved. I'll use long strips and score and use small pencil point dots for the end and intermediate nailing with a pencil darkened edge on the decking planks for caulking. I'll stick with the nibbing strakes at the waterlines and we'll see how that works out. Can't be much worse than my scupper/accent cove situation.
Maybe a photo or so after I get the main railings installed tomorrow with luck.
Rich (PT-2)
Can you send me a link or file through email ? I can’t seem to be able to select or save this image. I figured it out.I found this dory plan quite helpful when doing my Bluenose. I will post it here in case it is of help to you two also. You can blow it up to the size you need.
View attachment 194288View attachment 194289
Here is couple pics of what I made using it. It is my first build so you can probably do even better.
View attachment 194290View attachment 194291
Cheers. hope this helps!

Last edited:
One thing that I noticed from the dory drawings and the accompanying Bluenose II yellow dories photos is that they both seem to be for tourists use than actual fishing dories based upon what I have found elsewhere, and the Captains Courageous movie, where the dory was rigged for a simple sail, room needed in the bow and stern (no thwarts/seats) for barrels and fishing gear, a roller on one gunn'l for paying out and retrieving the up to mile-long string of bated hooks on 3-ft lines about 6 or 10 feet apart, and a float with staff and flag for retrieval. The basic plan for the clinker hull is a good one I think with some scaling and adaptation for a fishing dory. I think the typical crew was two but maybe three are mentioned but I don't recall where.Can you send me a link or file through email ? I can’t seem to be able to select or save this image. I figured it out.
One other finishing item: the kit provides light grey for deck finishing which would be consistent with almost any aging weathered wood but as builders we seem to see the preference for a natural stained wood deck. As for faux plank butted ends, scribed and secured with nails created by the simple indentation of a very small soft lead drafting pencil and the deck plank rubbed with a pencil on one edge for the dark faux caulking. That idea is not my own but picked up by having been used by other SoS builders. Rich (PT-2)
I do not agree Rich. Those dory's I believe are actual representations of what the bluenose would have carried on board when heading to the Grand Banks. I would like to see where you have found evidence to the contrary. Check the 2:50 mark of this video and see what you think.One thing that I noticed from the dory drawings and the accompanying Bluenose II yellow dories photos is that they both seem to be for tourists use than actual fishing dories based upon what I have found elsewhere, and the Captains Courageous movie
Regards, Robin ~
I will pull the pieces out of Novastorm's plans into my laser cutting program and size for the 1/64 MS kit. Will repost when I have done this possibly with another sheet so I can have multiple oars together, etc... I will place enough pieces to build 2 dories, or that's the theory. Thanks for posting that video, quite the roller coaster ride launching...
I too have seen the Canadians video. I was just recalling some other dory stuff that I have seen otherwise but how they are done is in your hands and will be in constant harmony with the schooner. Rich (PT-2)I do not agree Rich. Those dory's I believe are actual representations of what the bluenose would have carried on board when heading to the Grand Banks. I would like to see where you have found evidence to the contrary. Check the 2:50 mark of this video and see what you think.
Regards, Robin ~
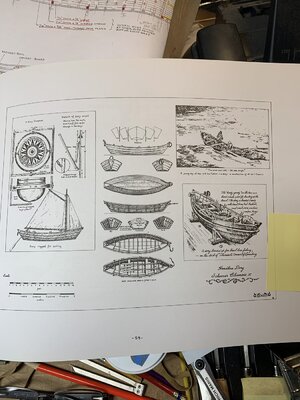
Some views later around 4;29 and shortly after that show some dories with the barrels etc and from my combined views I see probably only two maybe three seats not four as there is a lot of gear and the crew standing in the bow and stern areas. I'll send some drawings from the book Bluenose II Saga of the Great Fishing Schooners, Nimbus Publishing, which shows the one thward with a hole for the mast forward and two seats on page 59. It is an excellent book with a lot of details (Bluenose II) and the references to build I (II)I do not agree Rich. Those dory's I believe are actual representations of what the bluenose would have carried on board when heading to the Grand Banks. I would like to see where you have found evidence to the contrary. Check the 2:50 mark of this video and see what you think.
Regards, Robin ~
 from Bluenose.
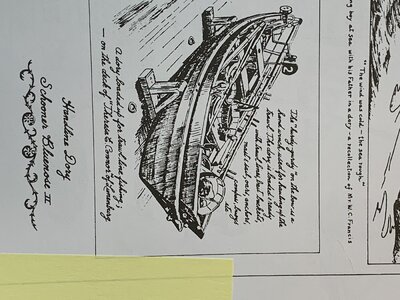
Next more specific drawing of the gear and narrative

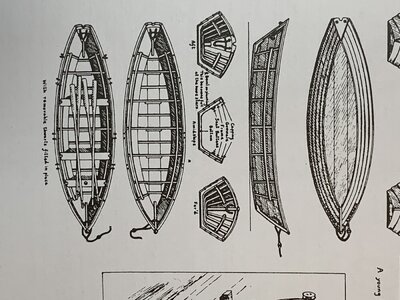
Next the more specific plan, elevation, sections, details of that fishing dory

Similar but with differences that you can use or not. The main problem that I have with the book which is all drawn and hand written text is that the writing is so small it is almost illegible for me to read even with a magnifying glass. Rich (PT-2)
I do like the detail here and may add sail detail to my dories, will decide when I build them.


