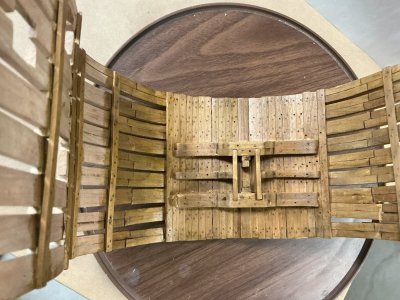
Bonhomme Richard Cross Section Interior Upgrade

Joined
Apr 19, 2025
Messages
7
Points
3

This is my first posting as I just joined SoS. Before i start, a little about myself. My name is Henry and I'm 74 years old. I built my first wooden ship kit around 1985, Mamoli's USS Constitution Cross Section, that was a gift from my then fiancée, now my wife of nearly 40 years. I next started on The Combat/Gun Station by Mantua and Artesania Latina's King of the Mississippi. Shortly after starting them, I moved and started a new job, so they went into storage and remained there until 4 years ago when I retired and finished them. Since then, I have built Occre's Titanic and San Francisco Cable Car and Mantua's Command Station. I spent the last 21 months building a 1980 version of Mamoli's USS Constitution, complete with sails. I also retrofitted my first kit with sails. Last month I started on ZHL/Unicorn Models Bonhomme Richard Cross Section kit.

Although just a member I have been following the postings of the six members who have built the Bonhomme Richard Cross Section and hopefully one of you might be able to answer my questions. Unlike most of you that seemed to have purchased the kit that contained both the base cross section plus the interior upgrade, I purchased them separately. Two years ago, I bought the cherry version of BHR from Model Expo and then six months later, bought the Interior Upgrade directly from ZHL via their eBay store.

I am now ready to build the pump well structure from the Interior Upgrade, which has led me to some questions. I am hoping someone from SoS can answer them.
  1. Are there any English instructions for the upgrade other than the 8 letter-sized sheets? If so, could you scan them and email them to me?
  2. I see the structures, 19 (pump well), 20 (cabin) and 21 (bread oven) have templates which will not be part of the finished model, but as a pattern for gluing together wood strips along their long edges, that will become these structures. Are the strips for these structures, the ones in the upgrade kit? Or do you use left over wood strips from the original kit? Assuming the former, can you tell me to which structure do the following laser cut sheets of wood go:
    1. 7 sheets labeled for Section13, with each sheet having 13 1 mm x 4 mm x 160 mm strips
    2. 1 sheet labeled for Section 9, with the sheet having 25 2 mm x 2 mm x 80 mm strips
    3. 1 sheet labeled for Section14, with the sheet having 7 1 mm x 4 mm x 160 mm strips and 11 1 mm x 2 mm x 160 mm strips
    4. 3 sheets labeled for Section10, with each sheet having 13 2 mm x 4 mm x 130 mm strips
  3. I see that structure 23 (fence) is made from 1 mm x 2 mm and 1 mm x 4 mm strips. Are these from the sheet labeled Section14? Or is the fence made from left wood strips from the original kit?
Thanks!

Henry
1. These four sheets of A4 paper are the drawing of the internal structure, it is with English, if you feel that the printing is not clear, you can leave an email, I will send the PDF drawing to you;
2. All the templates (plywood plates) cannot be installed into the model(You can trial install them to make sure they fit your cross-section), they are only used as a reference for the shape of the bulkheads, the real bulkheads will be assembled of the wooden strips in the upgrade package, the wooden strips are all in the laser-cut boards, they all have a number or size identification, you can combine various wooden strips into the corresponding bulkhead according to the instructions of the drawing;
 
Thanks for the welcome to SoS and thanks to Unicorn Models for their response. It's your last sentence that puzzles me as I do not see any board section numbers or wood strip sizes for the structures listed in the drawings. I just see the template numbers listed such as 19D1 and 20A and not what board section or wood strip sizes to use for those structures; but perhaps my old eyes are missing them (I do have cataracts in both of my eyes which will be removed this summer). I do see that the corner support beams for the structures do list the strip sizes such as 2 x 2 for Part 20U. So, my original question stands as to what structures (19 through 23) use which laser cut board sections (9, 10, 13 and 14). I would have thought that the board section number would be the same as the interior buildings' numbers, such as board 19 would be for structure 19; but none of the board section numbers are the same as the structure (pump well, cabins, hatchway and fence) numbers. Hence my being still confused.

Yes, please send me the PDF files. My email address is ***************** Much thanks!

Looking forward to your response.

Henry

*Admin edit: Personal information such as email, address, or bank account is not recommended in public forums. Please use PM (Personal Message) instead. Also, I suggest that you move all negotiations (if any) to PM as well
 
Henry,
WELCOME !!!
We ought to form the Shipwrights over 70 Guild.
You'll find a lot of really talented, nice and helpful people here.
BTW, Unicorn models has a superb build, with lots of pictures of the Bonhomme Richard, here in SOS. Worth a look.
Alex R
 
Henry,
WELCOME !!!
We ought to form the Shipwrights over 70 Guild.
You'll find a lot of really talented, nice and helpful people here.
BTW, Unicorn models has a superb build, with lots of pictures of the Bonhomme Richard, here in SOS. Worth a look.
Alex R

Henty has an older version of the Bonhomme cross section ,this is not the one was just recently released by Unicorn
 
Yes, I have been following the various builds of this kit and yes, it is the older and shorter version. Hopefully some of you who have done the build can answer my questions. Thanks!
 
Thanks for the welcome to SoS and thanks to Unicorn Models for their response. It's your last sentence that puzzles me as I do not see any board section numbers or wood strip sizes for the structures listed in the drawings. I just see the template numbers listed such as 19D1 and 20A and not what board section or wood strip sizes to use for those structures; but perhaps my old eyes are missing them (I do have cataracts in both of my eyes which will be removed this summer). I do see that the corner support beams for the structures do list the strip sizes such as 2 x 2 for Part 20U. So, my original question stands as to what structures (19 through 23) use which laser cut board sections (9, 10, 13 and 14). I would have thought that the board section number would be the same as the interior buildings' numbers, such as board 19 would be for structure 19; but none of the board section numbers are the same as the structure (pump well, cabins, hatchway and fence) numbers. Hence my being still confused.

Yes, please send me the PDF files. My email address is ***************** Much thanks!

Looking forward to your response.

Henry

*Admin edit: Personal information such as email, address, or bank account is not recommended in public forums. Please use PM (Personal Message) instead. Also, I suggest that you move all negotiations (if any) to PM as well
Okay, I must admit that the drawings of this internal structure are not very friendly to the eye, and let me explain some of the problems in the drawings:
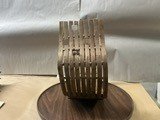
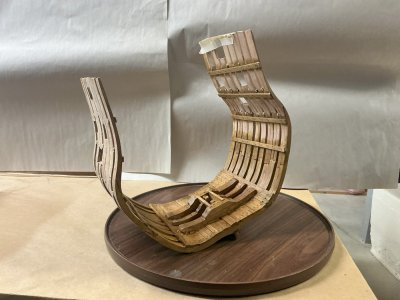
The first two digits of the part number of the internal structure correspond to the cabin number in the drawing (such as pump well 19, bread oven 21, etc.), and then the width of the wooden strip used in the cabin can be measured on the corresponding template, and the thickness of the wooden strip can be measured on the drawing, I can summarize: the bulkheads of the pump well 19 (19A, 19B, 19C1, 19C2, 19D1, 19D2), and the bulkheads of the cabin 20 (20C, 20D, 20H, 20G), and the panels of the bread oven 21 (21A, 21B , 21C) , are made of 1×4 wooden strips (in the laser-cut board #13, #14), then the bulkheads of the cabin 20 (20A, 20B, 20E, 20F) are made of 2×4 wooden strips (in the laser-cut board #10), and so on.
Some other parts can be found in the laser-cut boards according to the numbers in the drawings.
Finally, if you have any questions, feel free to leave me a message.

Unicorn Model
 
Thanks so much for your detailed reply as that was exactly what I needed to know. If I have further questions I will definitely reply to this posting.
 
Welcome to the forum and I will follow your build of the Bonhomme Richard!

It is a very nice kit and the many logs on this forum will give ideas on how to customize it to make yours unique.
 
Once I get to a good spot, I will post some photos of my build although my work is most likely not as good as most of yours. I make these kits for my enjoyment and not as museum quality builds.

For family, friends, fellow modelers, etc., I make videos as I do my building and place them in a Drop Box account, usually once a month. My current video is the final one for the Mamoli USS Constitution.

Would it be against the rules at SoS, if someone is interested, for them to send me a direct message to get the link to my videos and if they want, to be added to my email list? I do not want to do anything illegal and be kicked out of SoS.
 
Welcome from the “Not a Troll. I am 80 and just enjoy glueing wood pieces. You are WAY above me in what you do. I am truly impressed…
 
I have posted the first three photos of my build. I used a coping saw and chisel to make the gunport openings, having to take the saw blade out of its frame to get it between the ribs due to the spacers and then reassembling it to do my cuts.


I have stained and varnished the wood that I do not plan to paint, using Occre’s Oak Dye and their Satin Varnish. I first applied a single coat of Model Expo’s Pre-Stain Wood Conditioner; then three coats of the dye, sanding after each application using 320 grit sandpaper; then two coats of the varnish, using the sandpaper after the first coat but using a green plastic kitchen scour pad after the second one. Using the pad was how Occre had you doing the Titanic’s decks and I really liked the way the decks came out, so have used this method for all my subsequent projects.


The primary wood of my kit is cherry. My original thought was to stain the cherry with a cherry stain. However, by doing so (I did a test case of the scrap wood from cutting the cargo hold deck planking), the stain was too dark for my taste and covered the nail heads. Although it might seem strange, I also used the oak dye on the cherry wood and really like how it looks.


Like Signet, I could not find the side pieces with no numbers for the mast support shown in Step 50 of the color instruction booklet (Step 49 showed the other pieces for the mast supports). From the 30” x 36” sheet of drawings, the part appeared to be Part #1512. Like Signet I found this part in the basic kit box, but it was not the correct size or shape. My kits were purchased separately six months apart, so they are in two boxes. From Signet’s build log, I did find them in the interior upgrade box. These parts from the interior upgrade box were also numbered as Part #1512.

It appears to me that basic kit Part #1512 was replaced with a new Part #1512 when Unicorn Models produced the interior upgrades, although the color booklet in Step 196 shows old Part #1512 against the middle supports (Part #1505 and 1506) and the notches in Part #1504 and 1508 visible. I liked the new Part #1512 better, so went with them. I did use old Part #1512 elsewhere. I did not like that Parts #1511 were rectangular but at least one of them should have been on an angle like old Part #1512 to butt against the mast’s wedge. By measuring, I discovered that if I only used one and a half of Part #1511 and trimmed one edge of old Part #1512 to have no slope; then glued them together; and placing this assembly at both ends of the mast support was just what I needed to tightly support the mast wedge, when the time comes to do so.

I used Jim’s @Jimsky method of simulating the nail heads by drilling holes in the wood and then filling them with wood fill, as I did not want to have to subject my model to having to pound around 1500 nails into it. I used a 1 mm drill bit to make a hole in the planking and support beams and then filled it with Minwax walnut wood fill, scraping off as best I could any excess that I managed to get on the surface of the deck planking and beams and not in the hole. After the wood fill had dried, I sandpapered off the fill not in the hole. I plan to use this technic for the interior structures and the rest of the deck and hull planking.

I will be using train track grey ballast on top of this cargo hold planking with the barrels on top of the ballast. Thus, I really did not need to stain and varnish that planking plus make the faux nail heads, but decided to go ahead and do so just in case I changed my mind about the ballast; plus it was good practice.

Next, I will be making the shot locker and pump well, Structure #19. I have purchased from Amazon some 3 mm steel balls (the same size as what came in the kit) to place on both levels of the shot locker like I saw in Brad’s build log. Once I get to a good spot, I’ll post more photos.
 
Back
Top