This is my first attempt at building a model ship and although I have a background in woodworking, the scale is a bit different! I’m very much a “newby” at this. So, have patience.
This is a “build log” for the Artesania Latina 1805 Swift Virginia Pilot Boat. I picked this as it was recommended as a good place for a newby to start...hmmm.
I will begin by giving a review of the materials. I don’t have a prior kit to compare with but here’s my observations of what AL sent: Everything was there according to the parts list and appears to be in good condition (with one exception I’ll discuss below). All the “documentation” is contained on a CD. Some my be disappointed, but I printed off everything (yep, used a bit of printer ink). That’s the only downside I can see at this point. But, on the computer, you can expand the images quite a bit before they pixelate and see details close up. I think this will be helpful because there is no verbal description in the instructions of how to do the rigging – just pictures. I’ve read through all the instructions (several times) and they seem OK but this is my first time so we’ll see. The CD also contains some interesting videos on (for example) tapering a mast. I think a lot more videos would be super particularly for us newbys.
There were a few issues: First, even though the parts list indicates the walnut is 0.6 and 0.5mm, my caliper indicates at most 0.5 and 0.4mm respectively. Probably no big deal, but…
Second, this kit does NOT provide for double planking of the hull, even though some places I read indicated it did. I was looking forward to that. The instructions specify painting the hull after single planking. I WILL BE double planing which means I’ll be buying some walnut and I’ll be staining it (I feel wood ships should show the wood with some notable exceptions – eg HMS Victory, she must be painted black!)
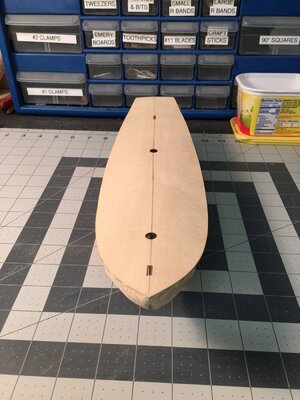
The last issue (so far) was much more serious. The main (keel?) bulkhead was extremely warped. I tried everything I could think of to straighten it: dry clamping – nope; hot water soak then clamping – nope; hot water soak then ironing (much to my wife’s amusement) and clamping – this worked for a while but the warp came back. I gave up! The darn thing just would not straighten. I thought about a trip to the hobby store for a piece of plywood but opted against it for the “experience.” So, I carefully glued up all the hull bulkheads square to the main bulkhead in spite of the warp (see picture).
By the way, I found some 90-degree “square” pieces of aluminum 1”x1.5”x1” in the deck-hardware section of Fleet Farm but probably available in any hardware department. I tuned them exactly square with a vice and machinists square and a hammer – they worked GREAT for clamping the hull bulkheads to the main bulkhead! And, they are non-porous so the glue does not adhere. I think they cost about 50-cents each.
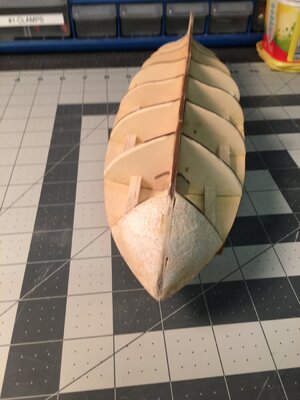
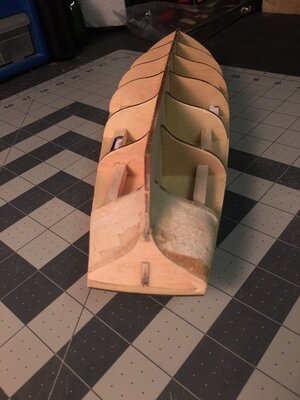
Anyway, after gluing all the bulkheads together, I carefully measured the distance between each hull bulkhead and cut 1/4”x1/4” balsa spacers carefully sanded them to the exact size and glued them between each hull bulkhead on both the port and starboard sides (see next picture). Then, as I glued the sub-deck to the main bulkhead I clamped the stern portion of the keel bulkhead straight (see picture).
Also, serendipitously, it appears that the balsa spacers will give me clamping purchase for gluing the sub-deck to the hull bulkheads as the deck slopes in multiple directions. I’m not sure how I would do that without the spacers. Sometimes you just get lucky – but well see.
That’s all for now. I’ll update this when I get to the next “pausing point.” But I have a LOT of yard work to do over the next few weeks, so be patient. Comments solicited and very much welcomed.


This is a “build log” for the Artesania Latina 1805 Swift Virginia Pilot Boat. I picked this as it was recommended as a good place for a newby to start...hmmm.
I will begin by giving a review of the materials. I don’t have a prior kit to compare with but here’s my observations of what AL sent: Everything was there according to the parts list and appears to be in good condition (with one exception I’ll discuss below). All the “documentation” is contained on a CD. Some my be disappointed, but I printed off everything (yep, used a bit of printer ink). That’s the only downside I can see at this point. But, on the computer, you can expand the images quite a bit before they pixelate and see details close up. I think this will be helpful because there is no verbal description in the instructions of how to do the rigging – just pictures. I’ve read through all the instructions (several times) and they seem OK but this is my first time so we’ll see. The CD also contains some interesting videos on (for example) tapering a mast. I think a lot more videos would be super particularly for us newbys.
There were a few issues: First, even though the parts list indicates the walnut is 0.6 and 0.5mm, my caliper indicates at most 0.5 and 0.4mm respectively. Probably no big deal, but…
Second, this kit does NOT provide for double planking of the hull, even though some places I read indicated it did. I was looking forward to that. The instructions specify painting the hull after single planking. I WILL BE double planing which means I’ll be buying some walnut and I’ll be staining it (I feel wood ships should show the wood with some notable exceptions – eg HMS Victory, she must be painted black!)
The last issue (so far) was much more serious. The main (keel?) bulkhead was extremely warped. I tried everything I could think of to straighten it: dry clamping – nope; hot water soak then clamping – nope; hot water soak then ironing (much to my wife’s amusement) and clamping – this worked for a while but the warp came back. I gave up! The darn thing just would not straighten. I thought about a trip to the hobby store for a piece of plywood but opted against it for the “experience.” So, I carefully glued up all the hull bulkheads square to the main bulkhead in spite of the warp (see picture).
By the way, I found some 90-degree “square” pieces of aluminum 1”x1.5”x1” in the deck-hardware section of Fleet Farm but probably available in any hardware department. I tuned them exactly square with a vice and machinists square and a hammer – they worked GREAT for clamping the hull bulkheads to the main bulkhead! And, they are non-porous so the glue does not adhere. I think they cost about 50-cents each.
Anyway, after gluing all the bulkheads together, I carefully measured the distance between each hull bulkhead and cut 1/4”x1/4” balsa spacers carefully sanded them to the exact size and glued them between each hull bulkhead on both the port and starboard sides (see next picture). Then, as I glued the sub-deck to the main bulkhead I clamped the stern portion of the keel bulkhead straight (see picture).
Also, serendipitously, it appears that the balsa spacers will give me clamping purchase for gluing the sub-deck to the hull bulkheads as the deck slopes in multiple directions. I’m not sure how I would do that without the spacers. Sometimes you just get lucky – but well see.
That’s all for now. I’ll update this when I get to the next “pausing point.” But I have a LOT of yard work to do over the next few weeks, so be patient. Comments solicited and very much welcomed.