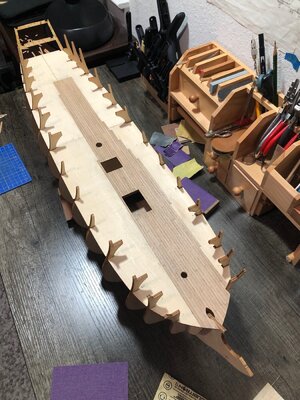
Build Log: "Norske Løve" by Billings Boats

Is it not easier, to cut in the false deck at the correct location some additional notches Or widen the existing one´s
Later on I guess, all the area of the deck will be planked with planking stripes so all notches will be covered anyhow.
BTW: also usually the part of the bulkheads higher than the deck will also be cut ..... only my fast opinion
 
I assumed he had already glued in the false deck…. If not, then yep, pull it out anD re-notch, it’s all going to be covered or out of sight….
 
Thank you for your concern. You were right!
I went to the hardware store. Bought several clamps and try squares. The frame is installed correctly. My assumption that the slots in the deck were correct was wrong. Many were too shallow, and some were shifted to the right or left.

I should be ready for the flooring now. Not sure what wood to use. Cannot find the part number on the drawing.
Arne, I am glad you took the time to investigate and correct it. This is a crucial part of the ship build, even though it all gets covered up. ;)
On the deck planking, they don't note what to use, however there is a large quantity of beechwood veneer that is extra, I am using it for the deck boards. On the old kit, they had a printed deck sheet and the veneer boards were not supplied. So I think it's safe to assume those are for the deck.
Also I chose a 120mm length for the boards and am using a standard 4 board stagger pattern, shifting 30 mm. I drew lines on the deck sheet at 30 mm apart for this. You can use any pattern you choose, that is just what I went with. ;)


norske-09.jpg
 
Arne, I am glad you took the time to investigate and correct it. This is a crucial part of the ship build, even though it all gets covered up. ;)
On the deck planking, they don't note what to use, however there is a large quantity of beechwood veneer that is extra, I am using it for the deck boards. On the old kit, they had a printed deck sheet and the veneer boards were not supplied. So I think it's safe to assume those are for the deck.
Also I chose a 120mm length for the boards and am using a standard 4 board stagger pattern, shifting 30 mm. I drew lines on the deck sheet at 30 mm apart for this. You can use any pattern you choose, that is just what I went with. ;)


View attachment 262968
I believe that the butt end deck plank joints are to be centered over a frame/beam member; not necessarily some dimension. In the tack of reality go with the frame/beam spacing for your joint and fastening. Just a thought. Rich (PT-2)
 
I believe that the butt end deck plank joints are to be centered over a frame/beam member; not necessarily some dimension. In the tack of reality go with the frame/beam spacing for your joint and fastening. Just a thought. Rich (PT-2)
That’s what I did Rich, frames are 60mm apart. So I doubled the imaginary beams and went with 30mm. And then used a 120mm length board. ;)
 
I recommend that you adjust the deck IF your frame intervals measure correct top to keel. If you strive for absolute perfection, you will meet yourself coming around the corner. Then you will come to loathe returning to work on the model. Remember, it's a kit. The only way you can get perfection is to build from scratch. I shall watch your continuing log with interest.
 
Thanks.
Thanks for all the helpful suggestions. I have renotched the deck. So far things look good.
Being a raw beginner I have no ambition about perfection. I just want to enjoy a challenging hobby. The further I get into this I realize that I have very much to learn.
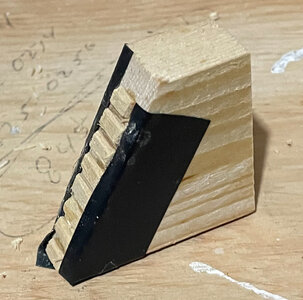
For example, my next challenge is to build the two steps for the hatch. Thee are no instructions. Each staircase is 15 mm wide, 34 mm tall and has 7 steps, 4mm deep. Slant is at 60 degrees. I have built a jig, jig.jpg

The plan is to superglue one step at a time to the sides. The black tape is to keep the steps from being glued to the jig. Will let you know if it works.. Would appreciate any suggestions.
 
Thanks.
Thanks for all the helpful suggestions. I have renotched the deck. So far things look good.
Being a raw beginner I have no ambition about perfection. I just want to enjoy a challenging hobby. The further I get into this I realize that I have very much to learn.
For example, my next challenge is to build the two steps for the hatch. Thee are no instructions. Each staircase is 15 mm wide, 34 mm tall and has 7 steps, 4mm deep. Slant is at 60 degrees. I have built a jig, View attachment 263414

The plan is to superglue one step at a time to the sides. The black tape is to keep the steps from being glued to the jig. Will let you know if it works.. Would appreciate any suggestions.
You can make a jig as you have. Or you can lay the two sides at the appropriate angle (side by side), tape them down top and bottom, then make horizontal lines where the steps will be. Then you can either notch them…or not. Depends how much work you are willing to do. Then you can glue the steps to one side, one at a time and use a square to ensure they are perpendicular to the side board. Then when dry, glue the opposite side board on.
 
One suggestion Arne, before you get too far. I usually save installing the ladders, gratings, railings, etc. for later in the build. The logic is, you need the decks and walls in place to be able to fair the hull and plank it, but you don't need anything else prior to that. Fairing the hull, planking it and finally sanding it, is messy and you will work with the ship upside down and have a lot cleaning to do afterwards with either a vacuum attachment or blower (hairdryer). So small delicate parts are best left off until you get past that point in the build. They can be broken or get in the way of clean up. Of course you are free to work however you chose, but this my logic and helps me avoid a lot of frustration otherwise. ;)
 
Thanks. I already learned this the hard way. Given the lack of instructions I assumed that the best strategy was to work sequentially drawing by drawing. Drawing number three has lots of putsy stuff that I now realize I should come back to later.

I am now working on the hull. To my surprise the kit does not include any nails. Fortunately I had a number of 10mm nails left over from my previous project. Have ordered more from MicroMark (Billings appears to be out of stock). I do resent paying more for postage tahsan fro the nails.
Are you going to add a second layer on the hull?
No, I am going with a single plank hull. So no nails. I will add some treenails above the waterline where it is not painted. But that’s after it’s planked. So I assume since it is intended to be a single planked hull, they don’t advocate using nails. But some people do and don’t sink them and later reuse the holes for treenails. So there are options. I plan to use nails on the wales.

You should post pictures of your progress. And if you have any questions, don’t hesitate to ask. ;)
 
Last edited:
How do you secure the planks without nail?
With either wood glue (pva) and clamps, or CA glue. Thick CA needs no clamps, especially if the planks have been pre bent. You want to pre bend them first so they will lay down easier and not fight the clamps or glue. Some people use push pins and nail below the board into the frame, and let the edge of the pin clamp the board. However this can split your frame. Other use clips. There are many ways to clamp.
Some steam or soak boards in water, but they tend to swell and can leave gaps when dry. I would recommend a book, or find a utube video on hull planking for all the different methods.
In addition, do not use CA between planks, as it will soak into the wood and won’t take stain. Only use CA on the frame and back side of the plank. Use wood glue between boards, sparingly. It can be scraped and sanded off, unlike CA. And if you don’t glue the planks to one another, they will flex in between frames when you sand, and won’t level out!
Hope I didn’t miss anything. ;)
If my eyes and prior plank bending is not deceiving me by avoiding water and using isopropyl alcohol it is absorbed for bending and does not cause the wood fibers to swell and then shrink. I am not sure why but that is my experience that you may want to try. Rich (PT-2)
 
Heat is the ticket…. There is enough moisture in the wood already and heat applied at the right spot will cause most woods to bend and hold the shape…. Although on some severe curves a little water on the plank helps produce steam and increase heat applied to that section. Tapering, edge bending, and bending to the correct curve of the area, (bow, stern, etc) to form the plank to its position prior to gluing is the secret…. A little chamfering of subsequent rows helps tuck the row joints in tight. There is a steep learning curve- especially on the older, bluff bows….
 
I have unfortunately concluded that building such a complex and poorly documented kit as The Norske Løve is beyond my skills at this time, so I am putting it on hold until I lean more. I should have noted that Billings recommends this kit for "experts". Maybe I will go back to it when Dean62 when finished his excellent build report.

In the meantime I am leaning towards Chris Watton's Sphinx. He tells me he will start shipping next week. Any other kit suggestions for a relative novice?
 
I can recommend the Lady Nelson from Amati’s Victory Models line. It is also a Chris Watton design, not as modular as the Sphinx, but it has all the elements of building a larger ship, just smaller size so you see results quicker. It will teach you most all aspects of ship modeling and has a much easier rig and hull shape for first timers, not very expensive either. It is also double planked, and has gunport patterns that make that aspect of building a bit easier for you. Also has great instructions and plans, and is geared towards making your first model a success. Uwe found a great “”build in motion” video linked here: https://shipsofscale.com/sosforums/threads/video-tutorial-amatis-lady-nelson-built-in-motion.7820/
I know the temptation is to build a bigger model with lots of guns and rigging but there is a lot to learn as you have realized and this would be a great tool for that….. I’m sure there will be other suggestions as well….. good hunting!
Lou
 
I would recommend Tender Avos' from the Master Korabel manufacturer. It is the same class Cuter\Tender as Lady Nelson, but it is futures one main difference. The planking material for the hull is pre-spilled, They are laser cut by shape. This dramatically reduces the effort for the novice builder and doesn't require extensive knowledge of 'of how to plank the hull'. Also, all parts are precisely made and a nice fit.
Another advantage is, you don't have to order from overseas. Egor @craftysailor our member has it in stock across the border store. Check it out. Also, we have a few build logs of this beautiful tender. I don't know your skills, but I also don't know anyone who regretted building Master Korabel's kits.


one of the build logs

 
Back
Top