Coppering pattern

Joined
Jul 10, 2021
Messages
1,464
Points
393

Location
Vancouver Island
I'm investigating coppering the Discovery1789. I found an article on "Academia" called "The Introduction and Use of Copper Sheathing" by Mark Staniforth. In it he states that merchant ships were coppered starting where the stem meets the stern. This way the joints face down and to the stern. He also states that the Royal Navy has the joints facing up and to the stern. This may not sound too important, but the merchant way ends up with the coppering rows in a big arc at the waterline and the Navy way has the top row as a nice straight line. I'm assuming that to get the joint facing up, the Navy would start plating at the waterline at the stern and work down.
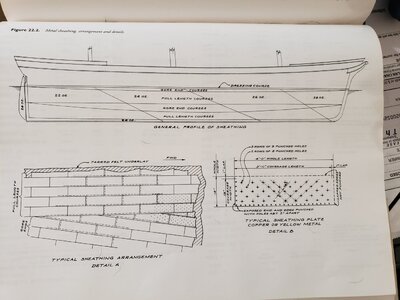
I just looked at Goodwins "English Man of War" and he says (Pg 225 Fig 10/1) that the joints face down and back on the Navy ships.

Does anyone have a little more info on this?
 
Longridge in "Anatomy of Nelson's Ships" agrees with Staniforth that the Navy Joints faced up. I haven't confirmed that the Navy started at the waterline and worked down though. It would make more sense in that starting at the keel and working up would mean that you would have to tuck the second sheet in behind the first. Sounds very cumbersome.
 
Thanks for that. If I'm looking at it right, they started at the keel/stern and worked forward and up. That seems to be the most common method, but I still have those couple of mentions that the English Navy did it differently that are nagging me. I'm waiting for the copper tape to arrive in a week or two, so I've still got time to decide.
 
Well, I looked at it from a physics/hydrodynamic function. When water is flowing over the hull moving forward, you want a nice laminar smooth flow. Having the over laps follow the flow makes sense.
 
I'm investigating coppering the Discovery1789. I found an article on "Academia" called "The Introduction and Use of Copper Sheathing" by Mark Staniforth. In it he states that merchant ships were coppered starting where the stem meets the stern. This way the joints face down and to the stern. He also states that the Royal Navy has the joints facing up and to the stern. This may not sound too important, but the merchant way ends up with the coppering rows in a big arc at the waterline and the Navy way has the top row as a nice straight line. I'm assuming that to get the joint facing up, the Navy would start plating at the waterline at the stern and work down.
I just looked at Goodwins "English Man of War" and he says (Pg 225 Fig 10/1) that the joints face down and back on the Navy ships.

Does anyone have a little more info on this?
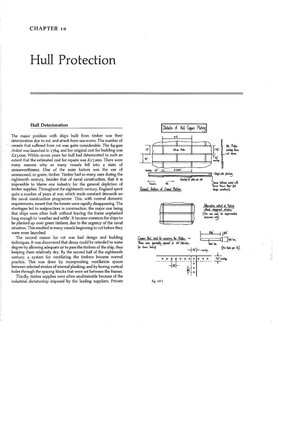
Hi, I hope it can help you with the copper plating of your model

rame.jpg
 
Hi Frank. I have that book, but it doesn't mention the Navy method of plating from the top down that I found in the two places that I mentioned in the first post, Mark Staniforth and Longridge.
 
I did work of a similar nature way back in my youth as a metalworker, and think tucking the sheets wouldn’t be at all difficult on a real ship, as the copper sheets are pretty thin and large enough to be manipulated in this way. You’d nail the top row, tuck the next row, nail the bottom of the top row, and so on. But doing the same at small scale with sticky-backed copper tape, now that would be a different story.
 
I can't claim to have intimate knowledge about this but I understood that the plates overlapped from the waterline down. As Kevin said, on a real ship this would be easy enough to do. With tape it makes more sense to invert the hull and work from the keel up, so you get the same overlap without the hassle of trying to lift the bottom edge of the sticky tape above.

IMG_20220724_163047037.jpg
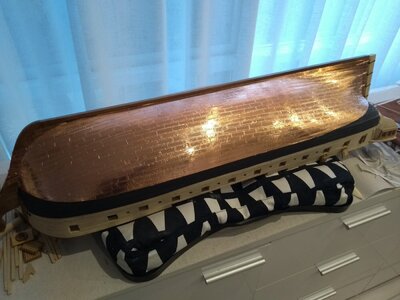
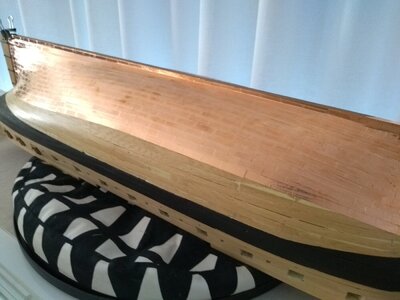
This is my first ever attempt at coppering so it's a bit rough, but I think the method of application is sound.

IMG_20221030_152638188.jpg

I found a 6 inch length of tape easy to handle which, at 1:48 scale, gave me six by four foot plates.
 
Yup, looks spot on MM. One thing I am still curious is about the actual technique on driving copper/yellow metal fasteners. As copper is so softhow were the fasteners driven into the hull...
 
The Muntz/yellow metal was a lot harder than copper. It must have worked otherwise shipwrecks would be mostly bent nails ;) ;)
But coppering ship's bottoms began in 1760's in the RN and the diagram in #6 above stipulates 'copper' nails. Muntz yellow metal was not developed until much later so the question still remaining is - how did they drive a 5/32" copper nail into wooden sheathing? They used literally thousands of them - roughly 60 per 4 ft sheet. More unsolved mysteries of the sailing ships of old. ;)
 
I imagine they were forged which would work harden them. The Egyptians used copper chisels to build the pyramids. I dunno, I've wondered the same thing many times.
 
They may have just hardened them using heat and quenching. Worth remembering that the bronze age was 3000 - 5000 years earlier and I wouldn't be surprised to find that 99% of what we know today, regarding metallurgy, was known in the 1700's, including a great deal that is now forgotten.

Ian, that's a fine bit of coppering you've done there. How did you imprint the nail patterns?
 
From most photos I have seen, the work started at Keel and Stern and worked up and forward, with exceptions of top band which could be several rows thick, it was from keel and started a few rows below the water line and ended with upper row on top of lower rows.

Can't say for sure, but the top rows flowing straight with waterline seemed to be more for show more then design of installation, they were still effective in use, but gave a nice look to the ship in the water.
 
They may have just hardened them using heat and quenching. Worth remembering that the bronze age was 3000 - 5000 years earlier and I wouldn't be surprised to find that 99% of what we know today, regarding metallurgy, was known in the 1700's, including a great deal that is now forgotten.

Ian, that's a fine bit of coppering you've done there. How did you imprint the nail patterns?
Heating and quenching copper doesn't harden it. Copper doesn't behave like steel. If you heat copper to red heat you can either let it cool slowly or quench it. The end result is softer copper. Learned this in high school when we were making copper ash trays.
 
Heating and quenching copper doesn't harden it.
Quite true, except for some copper alloys. I’m kind of assuming they weren’t using pure copper, which could be completely wrong. If it was pure, you can easily work harden copper cold, it’s one of the reasons I always hated working with it. Twisting copper wire will make it hard.

Having said all that, I’m not confident hardened wire copper nails would have been strong enough to go into oak or teak. Maybe they used a bradawl or punch to create the hole and used the copper nail more like a rivet.
Yup, tgat is what I was thibkibg, like a pilot hole or bore...
 
They may have just hardened them using heat and quenching. Worth remembering that the bronze age was 3000 - 5000 years earlier and I wouldn't be surprised to find that 99% of what we know today, regarding metallurgy, was known in the 1700's, including a great deal that is now forgotten.

Ian, that's a fine bit of coppering you've done there. How did you imprint the nail patterns?
Hi Kevin
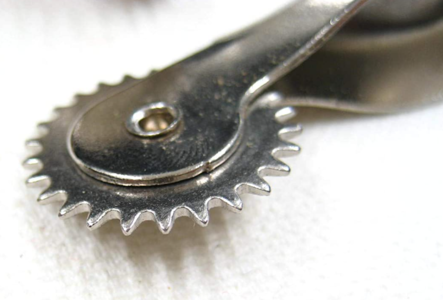
I'm a retired bookbinder and have access to what are commonly called 'farthing' wheels - small brass wheels for making decorative gold patterns on leather bindings.

https://shipsofscale.com/sosforums/...8-1-48-scratch-build.3940/page-10#post-253523

Held upright, I can just use the dotted edge, whereas in bookbinding I would tilt it over and work the full pattern.

Unfortunately they are not readily available except new, and are expensive.
 
Last edited:
'farthing' wheels
Ahh, I had noticed how regular was the pattern was, that's a very nice tool to have in the box. So, as an inveterate tool collector I googled a bit and found lots of variants of this, under the heading 'Sewing Tools Tracing Wheel for Sewing Pattern Carbon Copy Paper Hemline'. As these are cheap as chips I think I'll get one for later :)


1667325540974.png
 
Back
Top