- Joined
- Sep 3, 2026
- Messages
- 5
- Points
- 8

Starting a build log of the USS Enterprise, CV-6, 1/200 scale by Trumpeter

 |
The beloved Ships in Scale Magazine is back and charting a new course for 2026! Discover new skills, new techniques, and new inspirations in every issue. NOTE THAT OUR NEXT ISSUE WILL BE July/August 2026 |
|
 |
As a way to introduce our brass coins to the community, we will raffle off a free coin during the month of August. Follow link ABOVE for instructions for entering. |
|



Good luck with the build. Look forward to you log entries.Thanks, I'll take a look.
Just a couple of notes please:
1. This is my ship and although I'm trying for a June 1942, Battle of Midway build, I'm not totally tied to it to the point of it has to perfectly represent that date in time. First of all, I wasn't there and neither were any of the rest of us (unless you are a very advanced in age modeler) so at best we are doing educated guesses with some references to photographs or some very rare first-person detailed accounts of how the ship looked. I'm going to do my best, but people will be able to pick it apart if they want. I look forward to any advice anyone can give and will try to answer any criticism if possible. But again, the ship model isn't being completed to satisfy anyone but myself.
2. This is only my 3rd build. I've done the Trumpeter 1/200 USS Arizona and mostly completed the Trumpeter 1/200 Mikasa (I've actually been on that ship (or what's left of it in Yokosuka harbor in Japan when I was in the US Navy). I'm still pretty new at this and make tons of mistakes. Especially when handling P.E.
I didn't find this site for a while and it took further time for me to decide to try to do my first build log so I'm kind of behind here.
So far on this build I've worked on the hull:
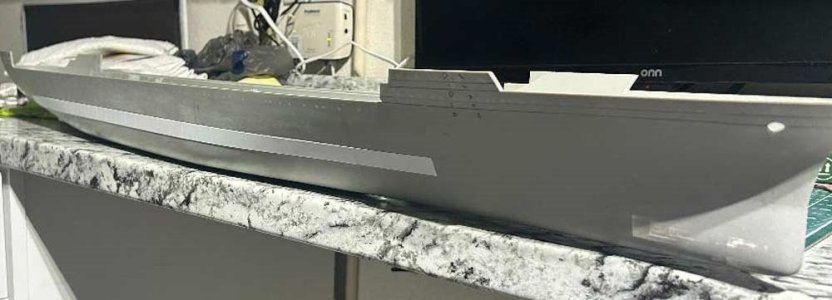
I have filled in all port holes because I found that none were round for re-drilling and addition of P.E. later. I also filled all other holes on the lower hull such as drainage holes for re-drilling later. The rectangular looking mooring chock & fairlead holes forward on both sides for rework. I also filled in the two hatchways near the stern because they were way too large according to pictures I have. I used what I call liquid plastic (extra thin glue mixed with scrap styrene bits that liquified).
I've removed the two molded on platforms on the forward hull on both sides of the ship for replacement later. I removed and sanded down the molded-on pipes in that same area for replacement, removed and sanded down the hawse holes to flush with the hull and reamed out what remained of the holes to roundness. I'll refine these two holes later as I've bought replacement hawse holes.
I've located and drilled out two mounting holes and mounted the hull temporarily to a flat plank I purchased from Home Depot. The plank is not totally flat, but fairly close and good enough for my purposes so far.
I've watched some of the Midwest Model videos on this ship on YouTube and giving him full credit, I copied his approach to the lower bow of the ship and added strip styrene and liquid plastic to build out the lower bow to a slightly more rounded shape.
I've added 0.02" thick styrene sheet cut to 0.66" wide for the Armor Belt. Each belt is made up of 3 pieces 8.64" in length for a total belt length of 25.92" which covers the area between Frame 47 and Frame 155. These frames were chosen because my research led me to believe that was where the belt was located. The top of the belt is located 0.28" above the waterline which itself is 1.46" from the bottom of the keel. Each of the 8.64" long section of the belt is divided into 9 sections of 0.96" length representing 16' long plates that made up the Armor Belt. Possibly the plates were longer, but I chose 0.096" (16') because it looked good and divided into the 8.64" lengths. Each plate edge was scribed in.
I hope this wasn't too long. My first post. I'll be trying to add pictures as I can and more posts. Thank you.