• LUCZORAMA SHIPWRECK SCAVENGER HUNT GIVEAWAY. 4 Weeks of Fun • 1 Legendary Prize ((OcCre’s Fram Ship)) • Global Crew Welcome!
    **VIEW THREAD HERE**

Fair American 1:48 by Model Expo

Joined
Nov 4, 2021
Messages
1,106
Points
393

Location
Tokyo, Japan
Initially I did not intend to do a build log for my latest project, Model Expo’s Revolutionary War Brig Fair American, for several reasons. The first is that my skills are not developed to a point as to attract much interest. The second is that this is a pretty ubiquitous kit that has been around for quite awhile.

But before I explain why I decided to do the build log, I have to explain why I chose this as my next project. Decades ago, when I was living in the single officer dorm at Misawa Air Base, I found an ad for this kit in a magazine and, having done some of the Midwest Productions kits, I thought I would try a real ship. I got as far as attaching the bulkheads to the keel, but 1:1 life, to include acquiring a new bride put it on hold and I never got back to it. Hauled it through multiple moves over 30ish years, and eventually figured (as we prepared for yet another move) I was never going to get to it. So out it went. Fast forward to about three years ago, the local hobby shop in Newport RI was going out of business and I ended up buying several wooden ship kits, to include my recently completed St Gildas. Working on St Gildas got me to regretting having given up on Fair American years before and when Bob Hunt @lauckstreet recently had his practicum for MEFA on sale, well, it was like the fickle finger of fate thumping me in the chest. So I purchased Bob’s practicum and recently purchased my second MEFA.

So why the build log? This kit was originally released in 1978, and Bob’s practicum, as well as the kit plans and instructions, appears to be based on that kit. But as I had suspected all along, the kit I got in 2025 is different from the kit I bought in 1992. So my purpose in creating this build log is not for the entertainment or erudition of any current denizens of SoS, but to document as best I can the differences between the NOW kit and the THEN kit for those future builders of MEFA who may be interested.

Caveat emptor; the photos and labels of the kit on ME’s website and on the box are of the old kit and do not reflect the new kit. For example, the photos show a nice plastic parts organizer box that is no longer included, and the box top still says the kit includes brass cannons, even though the new release includes white metal cannons. Lucky for me, I kept all materials from the original kit but the hull and plans, although some of them have been used for spares in other builds. I have not yet done a close comparison of the cannons, so I cant yet say if one is inferior to the other, I simply highlight it ad something that has changed.

Another change that was immediately apparent is that the pre-cut and tapered dowels for the yards Have been replaced with un-dimensioned lengths of dowel. Acknowledged that the pre-tapered dowels were not quite where they needed to be, they were a time-saver.

Some changes appear to be positive, though. The keel is now a single laser-cut piece of hardwood, rather than two pieces that needed to be glued together, so no need to worry about gluing up the keel straight. The original kit included a separate piece of dimensioned lumber for the false keel, whereas the new kit has a laser cut false keel. I haven’t yet had a chance to check the length of the false keel in my kit, but in the practicum, Bob mentions the false keel in his was ~1/4” too short, which implies there must have been a version in between my 1992 kit and the 2025 kit that still had a two-piece keel but a laser-cut false keel.

What other differences will we find as we progress? Time will tell!
 
Hey Namabiiru,

I'm curious and pull up my chair to watch your progress and the construction of the ship. I'm looking forward to a new project from you. I'm sure you'll do a masterful job. :D

Best regards
Günther Ship-1
 
Spent the morning with a nylon wire brush for the dremel and an emory board to get the loose char off the bulkheads. The original kit had solid wood bulkheads, but this one has plywood bulkheads. The plywood produces a lot more char and really makes a mess. I can see that it's also going to be more challenging to fair the bulkheads since I'll be sanding and carving across the grain.
 
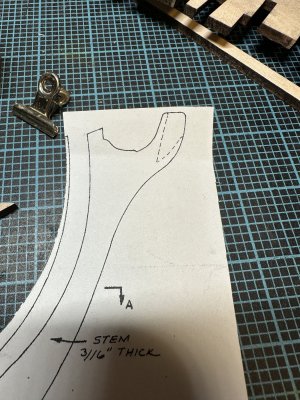
Getting slightly ahead of myself since I haven’t even started attaching bulkheads yet, but as I was working on fixing some problems with the keel and sternpost, my attention was once again drawn to this dashed line in the plans I remember from the old kit:
IMG_5856.jpeg
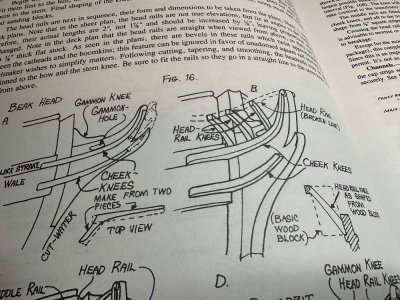
There is no mention I can find of it in the instructions nor in Bob Hunt’s practicum, but I found this illustration in the instructions that appears to show that area as cut out for the figurehead:
IMG_5857.jpeg
I’ve been study Chuck’s (@The Gavel) Lovely Renee, which seems to confirm this.

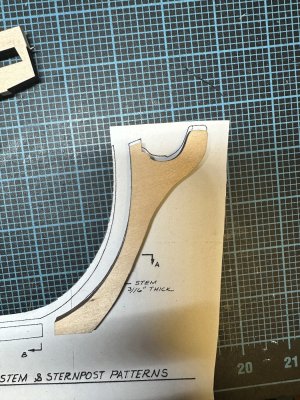
As I was pondering whether to taper first and then cut the slot for the figurehead or vice versa, I noticed two things: The laser cut kit part does not match the plans:
IMG_5858.jpeg
and the grain is running in the worst possible direction for me to do any cutting and have any hope of winding up with an intact stem.

That leads me to the conclusion that I’m going to build up a stem that matches the plans from multiple pieces just like on a real ship. I’ll have to work on that in between bulkheads.
 
ME claims that the kit is based on the model at Annapolis, but it does not say if it is modified in any way. The vee for the figurehead may be what is done on the contemporary model. I would think the figurehead would cover it anyway. If it's something about which you are concerned, possibly the best way to find out is contact the curator staff at Preble Hall at the Naval Academy. museumcurator@usna.edu

Some other useful information is available. Have you read the following paper on building the Fair American? https://www.sdshipmodelersguild.org/documents/builds/FairAmerican1780BuildLog.pdf It may be helpful in your adventure.

Allan
 
ME claims that the kit is based on the model at Annapolis, but it does not say if it is modified in any way. The vee for the figurehead may be what is done on the contemporary model. I would think the figurehead would cover it anyway. If it's something about which you are concerned, possibly the best way to find out is contact the curator staff at Preble Hall at the Naval Academy. museumcurator@usna.edu

Some other useful information is available. Have you read the following paper on building the Fair American? https://www.sdshipmodelersguild.org/documents/builds/FairAmerican1780BuildLog.pdf It may be helpful in your adventure.
I will say I’m not so much concerned with accurately depicting a model of a ship for which little documentation exists, as I am with getting the right steps in the right order and being able to discern where the kit and/or instructions have shortcomings I need to resolve. To be honest, it’s the fabrication that appeals to me more in this hobby than the research. I know that is not shared by all, and would possibly get me booted from other web fora, but there it is.

I had not seen Mr Lonnecker’s paper previously. Thanks for sharing that. Very informative. Although I doubt my limited skills and resources will permit me to achieve the same level, there is much to learn from it. I am trying to incrementally up my game with this build. Some day I will fully comprehend that by the time I finish buying or scratchbuilding replacement timber, fittings and ropes to improve on what’s in the kit I’m better off skipping the kit altogether. But for now, baby steps.
 
Namabiiru! (BTW, I finally looked your call sign up on the web. Love it!)

So glad you mentioned my build because it alerted me to your build! I am now WATCHING you! ROTF

We share perspectives on this avocation, I think. I know I spend a lot of time looking into the history of my last and my current builds. It helps me understand what cool things to add that the kit does not talk about and in that way I started taking risks, particularly with making the rigging as complicated as possible, and thereby advancing my skills - at least I hope so.

My Lovely Renee was my big plunge into upping my game. Funny though, I thought I was the cheese when I finished - at least where I showed the natural wood with some tree nailing below the waterline rather than paint with "hull tallow" and my spider web of rigging, only to see a build on ME's website where the modeler had added all of the headsail rigging :D.

The Fair American is one of my great loves - as you know I love the model so much I built her twice! My first build was later than yours. I got the first kit under similar circumstances to yours - the demise of a great hobby shop :eek:. I don't remember that kit well - except for two things - the chain plates and the bass cannon. I got my second kit in 2021. No chain plates and white metal cannon. I don't even remember whether the keel and bulkheads were solid or plywood (nasty stuff IMHO). So, I just got up and took a look - my stem was solid and I think the instructions called for the notch for the figurehead. As to the gap between the false keel and the stem, mine looks to be about 1/16. The absence of chain plates had me puzzled and frustrated so I took about 6 months off and one day I just figured out that I could just make them and how I would do that.

In any event, I did what you seem to be likely to do - replaced all of the guns with brass ones (although mine are too small) - replaced the gun carriages - replaced all of the blocks and all of the rigging line and upgraded the wheel and the stern lantern with 1:48 scale mini-kits and added a boat from ME.

I celebrate your "keel laying" and thank you for starting this log!

Blessings. Peace. Gratitude.
Chuck
Thanks so much for that input, Chuck! So honored to have you watching! I’ve already ordered the wheel, stern lantern and boat based on your build!

Luckily, I’ve still got the brass cannons from the old kit. Unfortunately, chain plates, pintles and gudgeons have all been sacrificed to other builds so I’ll have to make those myself this time around.
 
Namabiiru! Excellent! I'm so excited about your project that I may overshare, like I am about to do ROTF Please, let me know when too much is enough.

A couple of thoughts - First as to belaying the rigging, I can't remember whether the kit had the really nice brass pins, but If I had to do it again, I would supplement them. There are gaps in my pin rails and I even have a strange bloated wooden one filling a hole I made (port and starboard) in the poop deck railing. For me, sometimes when the tiny things fall off the work table or skip out of the tweezers they are gone forever. Also if you are going whole hog on the rigging (I hope so:D) be sure to get yourself sufficient shroud cleats. I didn't add them (didn't really think to do it, or maybe my impatience flared up and I just couldn't wait for an order to arrive. In any event, they will make a neat and very useful detail.

As to the metal work on the rudder and perhaps generally - I think the kit supplied pintles and gudgeons are no great loss. You probably have the kill to make your own out of brass. I didn't have any metal working skill when I built Lovely Renee so I went with the paper method using dots of Titebond to simulate the bolt heads. Oddly enough, learning to manufacture brass parts is essential in this hobby from the level-up perspective. I'm thinking about Paul @dockattner Kingfisher build. Since he was working in 1:48 scale, if you haven't already, you might take a look at that log. Paul made the most fantastic anchor.

OK. Just in case you missed it - that was the oversharing I was talking aboutROTF

Blessings. Peace. Gratitude.
Chuck
So much goodness in there! Thank you for that info. No oversharing here that I can see!

Will go find @dockattner ’s Kingfisher build. I cried at the end of his Vasa build!

I almost added cleats to the shopping cart while I was poking around SSMC, but decided I might see if I can find a way to “mass-produce” some myself. I definitely plan to go as whole-hog on the rigging as skill and references permit. Tell me: Did you use the kit rope or replace it with AM rope? The rope in this boxing seems of better quality than I recall, but it’s pretty shiny.

Thanks for contributing!
Namabiiru!

As to your search in Paul's Kingfisher log, maybe you should PM him and get the index - it will take several enjoyable hours to find it ROTF

I replaced all of the rope. I have yet to meet kit supplied rope that wasn't too shiny. I have some mast cleats. I'll PM you.

Blessings.
Chuck
 
Hey guys,

Since I was pinged...

Here is my anchor though sadly I provided very little in the way of construction details (basically I cut the bulk of the anchor from dimensional brass sheet using a coping saw): https://shipsofscale.com/sosforums/...70-1-48-pof-completed-build.11130/post-422829

There's a bit more to see of the fabrication of pintles and gudgeons: https://shipsofscale.com/sosforums/...70-1-48-pof-completed-build.11130/post-357473

And here: https://shipsofscale.com/sosforums/...70-1-48-pof-completed-build.11130/post-359665

Hope this helps!
Thank you, Paul!
 
Hey guys,

Since I was pinged...

Here is my anchor though sadly I provided very little in the way of construction details (basically I cut the bulk of the anchor from dimensional brass sheet using a coping saw): https://shipsofscale.com/sosforums/...70-1-48-pof-completed-build.11130/post-422829

There's a bit more to see of the fabrication of pintles and gudgeons: https://shipsofscale.com/sosforums/...70-1-48-pof-completed-build.11130/post-357473

And here: https://shipsofscale.com/sosforums/...70-1-48-pof-completed-build.11130/post-359665

Hope this helps!
I just got through reviewing those links. Brilliant! Not sure how I missed your Kingfisher build, but hopefully I can spend some time going through it more thoroughly.

I can see that I’ve been doing rudder hinges all wrong. Looking forward to trying it your way. Did you use a cup burr to round the pins for the hinge straps?
Exactly. I like Busch twin cut cup burs vs others - they don't clog as easily though they do tend to be a bit pricier.
 
Namabiiru!

Turns out I did use shroud cleats on Lovely Renee! Thinking about it, finally recall that I wish I had just added more pin rails around the masts and more cleats to the existing bitts. That's what the problem was for me - I did not set up enough belaying points for all of the extra ropes coming down close to the masts and I even omitted the topmast burton tackle. So, since you plan to go whole hog on the rigging - don't do what I did. ROTF

Blessings.
Chuck
 
Back
Top