Getting started with keel up scratch building

  • Thread starter Thread starter MOG
  • Start date Start date
  • Watchers Watchers 8
before you start investing in tools i suggest you begin your scratch building odyssey with building a sem-kit. The major part of scratch building is in the building of the model. Either you will love it and want to do it again or you will get frustrated with it and take a step back.
A model like Hahn's Hanna is a small uncompleted build which gives you an understanding of what to expect. At this point there is no need for all the tooling, the frames are laser cut, but don't let that fool you. The frames are cut oversize .040 so you have 1mm tolerance to work in from start to finish. building from semi-scratch has no instructions like a kit it is up to you to figure out the building process.

scratch building is like going from a build it out of the box kit to kit bashing to semi scratch to full blown scratch, adding tools and knowledge along the way.
 
there are about 439 parts in a framed hull and deck of the Hannah. It just might be a better start with just a timbering set with those parts cut out so a builder can focus on how to built it.
you can totally start from scratch and cut and thickness sand 110 liner feet of framing stock. The problem with small thickness sanders is they are hand fed there is no power feeding of the material. What happens when you feed the material by hand it is difficult to feed at the exact same rate so you get pieces slightly thicker or thinner

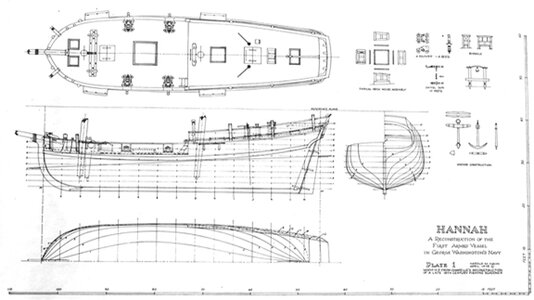
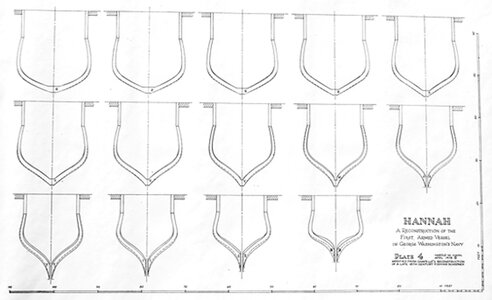
note: these plans are distorted and can not be used to build from, they are only for show


hannah 1.jpghannah 2.jpghannah 3.jpghannah 4.jpg
 
Last edited:
there is nothing wrong with the small hobby size thickness sanders for small jobs. It is when you want to sand down 100 to 250 linear feet of framing stock to build frame blanks or try to sand sheet stock 3 x 24 and get a constant thickness

about thickness sanders with no power feed
check out the link

 
Last edited:
Michael
I don't suppose any power tool is an absolute "must have" to create a masterpiece. Look at the contemporary models at Preble Hall, RMG, Musée National de la Marine and others that were made before electric tools existed. It is more for our convenience and saves time for us (and the positive feeling from knowing we made everything on our own.)
Allan
 
  • Like
Reactions: MOG
a lot of my modeling is done with hand tools i only use power tools to prep up scale dimensioned wood from heavy lumber.

but scratch building kind of requires big tools to cut down wood into scale sizes, that would be difficult by hand. or buy dimensional lumber.

you can buy a lifetime supply of resawn wood for the cost of the tools to do it yourself.
 
Michael
I don't suppose any power tool is an absolute "must have" to create a masterpiece. Look at the contemporary models at Preble Hall, RMG, Musée National de la Marine and others that were made before electric tools existed. It is more for our convenience and saves time for us (and the positive feeling from knowing we made everything on our own.)
Allan
your right about the tools, yes I have a few tools, maybe way to much money tied up in them over the years , but I'm still mainly a do it by hand power guy
 
a lot of my modeling is done with hand tools i only use power tools to prep up scale dimensioned wood from heavy lumber.

but scratch building kind of requires big tools to cut down wood into scale sizes, that would be difficult by hand. or buy dimensional lumber.

you can buy a lifetime supply of resawn wood for the cost of the tools to do it yourself.
there are about 439 parts in a framed hull and deck of the Hannah. It just might be a better start with just a timbering set with those parts cut out so a builder can focus on how to built it.
you can totally start from scratch and cut and thickness sand 110 liner feet of framing stock. The problem with small thickness sanders is they are hand fed there is no power feeding of the material. What happens when you feed the material by hand it is difficult to feed at the exact same rate so you get pieces slightly thicker or thinner

note: these plans are distorted and can not be used to build from, they are only for show


View attachment 455769View attachment 455770View attachment 455771View attachment 455772the The semi kit Hannah sounds like a great Idea to get my feet wet, Advise taken lets jump small first So the Hannah it is
 
there are about 439 parts in a framed hull and deck of the Hannah. It just might be a better start with just a timbering set with those parts cut out so a builder can focus on how to built it.
I agree with you David and for the majority of ship modelers, kits and timbering sets are the best way to go and we are all very lucky to have those choices. For me one of the things I love about scratch building is that I am not as limited in choosing which vessel to build. There are thousands of high resolution plans available from RMG and the Danish archives alone, from which to choose. This does not make scratch building superior, just different and one more option.

As to hand feeding wood through a thickness sander such as the Byrnes, again, you are absolutely correct, but I have found that with just a little practice in maintaining steady pressure in pushing the wood through, a strip of wood will not vary in thickness more than about 0.002". If I have more than 0.001 over the entire length I just run the piece through again. By the same token if I was manufacturing as you do, I would go for something more efficient and sophisticated as you have done.
Allan
.
 
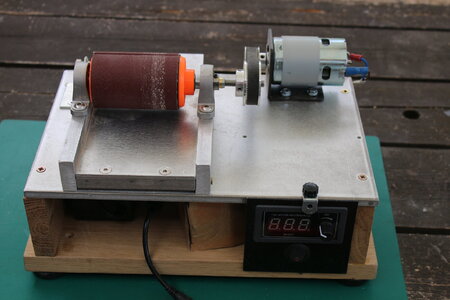
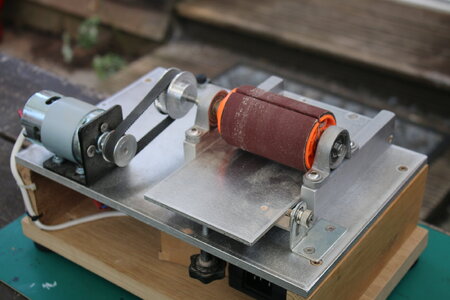
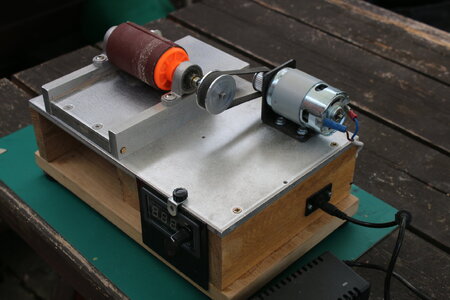
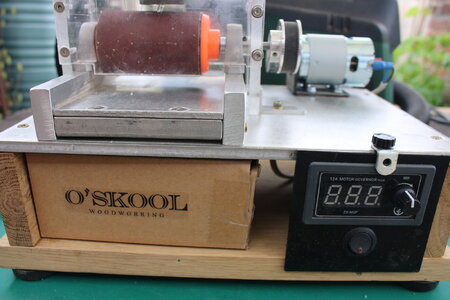
At last I have got round to building a mini thickness sander. I used a 24v DC motor & transformer. The drum is from Amazon USA by 'O'SKOOL Woodworking. I made / modified the shafts on my mini lathe to fit 10mm bearing blocks. The mod was to the RH shaft, utilising a brass shim to make the 3/8" dia fit the 10mm dia bearing. I found it to be good judgement on my behalf, in buying the 'speed governor plus', as it produced more power to the motor. With the motor connected directly to the 24v DC power, it only ran at 100-150 rpm! As soon as the speed control was connected, it gave a much added power boost 500rpm + ! I'm now off to construct a hood for dust extraction. It probably doesn't appear so, but changing the abrasive is quite easy by removing the LH bearing screws & slackening the RH ones, these are self-aligning, therefore nothing needs re-adjusting.

IMG_5431.JPG

IMG_5432.JPG

IMG_5433.JPG
 
Very nicely done Stuart! Do make a hood and suction port for your shop vacuum. The dust is incredibly fine and will coat a room (and nose and lungs) in a few minutes. (I speak from experience)
Allan
 
Last edited:
there are about 439 parts in a framed hull and deck of the Hannah. It just might be a better start with just a timbering set with those parts cut out so a builder can focus on how to built it.
you can totally start from scratch and cut and thickness sand 110 liner feet of framing stock. The problem with small thickness sanders is they are hand fed there is no power feeding of the material. What happens when you feed the material by hand it is difficult to feed at the exact same rate so you get pieces slightly thicker or thinner

note: these plans are distorted and can not be used to build from, they are only for show


View attachment 455769View attachment 455770View attachment 455771View attachment 455772
Ok Dave the Hannah sounds good to me , first question Sem Kit and or timbering set or both ? Best place to get them ?
 
Very nicely done Stuart! Do make a hood and suction port for your shop vacuum. The dust is incredibly fine and will coat a room (and nose an lungs) in a few minutes. (I speak from experience)
Allan
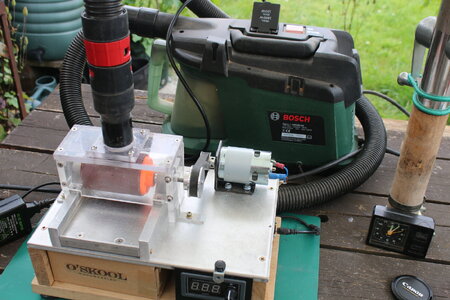
Done it! A 'sexy' see-through extraction 'hoody'. My Bosch Easyvac auto starts at around 300rpm. I've improved the input shaft, by making a new one-piece one, eliminating shims & the previous run-out. No, the pulley is not out of alignment, despite the pulley looking 'cock-eyed', it's the wide angle lens implying it.

IMG_5434.JPG

IMG_5435.JPG

IMG_5436.JPG
 
Last edited:
Hi all I have part of the site several years now and have some experience building mainly kit bashing my projects, however they all started from kit. I think its time to try scratch building from the keel up. I would like to call on the experience here for any start-up tips, advice, or ideas.

Mike
Hallo @MOG
we wish you all the BEST and a HAPPY BIRTHDAY
Birthday-Cake
 
Well, one of the nicest things about scratch-building is that the money you save buying kits can be used to buy tools and, of course, he who dies with the most tools wins! ;)

Seriously, though, it's not a huge inconvenience to have a friend with a good selection of larger woodworking stationary power tools or a local cabinet shop mill your raw wood stock down to manageable dimensions from which you mill whatever you need for modeling purposes with the "Byrnes trifecta," (the 4" table saw, and the disk and thickness sanders (which are now reportedly back in production) and a decent scroll saw. You can cut shapes by hand with a coping or jeweler's saw, of course. Ripping thin stripwood, though, is a job for a very accurate table saw. It's always a surprise to see what people can turn out with just hand tools or inferior power tools and, to one extent or the other, most all of us make do with what we can afford, but I'd urge anybody getting into it to save up and get the Byrnes machines (which aren't likely to come up on the used market very often) and a decent scroll saw (For some reason, there are lots of good ones on the used market, but they aren't always cheap... there are also a ton of "toy" ones out there... don't waste money on them.) These tools will get a lot of use and to a great extent the quality of your modeling will depend upon quality tools.

Now, that said, tools aren't the most important requirement for scratch-building. That prize goes to knowledge, which takes more effort and, while inexpensive, isn't for sale on the retail market. You've got to research, study, and learn. It makes perfect sense, but it's surprising how many modelers, conditioned perhaps by their "paint-by-numbers" ship model kit experience, completely overlook that to be a successful scratch modeler one must learn how the prototype vessels they will be modeling were actually built. Without that knowledge, it becomes very difficult to design how your model is to be built.

In order to learn how boats and ships are built, you need to spend some time studying the subject. It is a subject that is in its entire scope extremely extensive and complex, so it's best to start with something simple like a small yacht or workboat rather than attempting an 18th century first or second rate man-o-war! There are many good boatbuilding text books available. I recommend you start with something like Howard I. Chapelle's Boatbuilding, one of the "Bibles" of the genre. (https://www.amazon.com/Boatbuilding-Complete-Handbook-Wooden-Construction/dp/0393035549) This book walks you through the construction of a small sailing yacht of "workboat" construction, beginning with an explanation of the conventions of naval architectural draughts and the "mysteries" of things like "tables of offsets" and methods of lofting the timber shapes required to assemble the boat. To get a better grasp of these essentials, I also recommend Chapelle's companion volume, Yacht Designing and Planning. (https://www.amazon.com/Designing-Planning-Howard-Irving-Chapelle/dp/0046230114/ref=sr_1_1?crid=15PUJQPJ9HY22&dib=eyJ2IjoiMSJ9.Lsfvy-IdqHU0lglfS_t3MwyVNsyGxmvY1O6e5a_38oex0uoe3SHH6HmtSlNJUoPe8gPwX-qoeons6QsGqEozCleLwabC-1lcdrgDbASbxfhqIR0rzd47ybbFjng7_M93ISdAa-5MB9LWlPOCB7wVcmcSNu3zX0lqSpFNZlSH5X_PmsCnEz2fgp6ZOrY9iSXJ.T2rfUU0jZRaiCdiR5MT6hQcvPkv0ZYYVLi3scEC3bJI&dib_tag=se&keywords=Chapelle+Yacht+Design&qid=1723523753&s=books&sprefix=chapelle+yacht+design,stripbooks,178&sr=1-1) This latter volume contains practical instruction on the necessary drafting skills required, including the use of drawing instruments, some of which you will want to acquire. These will probably best be found used on eBay because CAD has become the industry standard and quality drafting instruments are going the way of the button hook, buggy whip, and 8-track stereo. Reasonable minds may differ, but to my mind, unless one has already learned to use advanced CAD programs or is otherwise so inclined, what is required for ship modeling from older plans drawn manually is much more easily done manually without trying to translate them to CAD in order to work with them. (Without drifting too far afield, suffice it to say that the development of the curves required in lofting a fair hull shape is relatively easy using the old "batten and ducks" method compared to trying to generate the many fair curves required with a CAD program, a task often challenging even for the more advanced CAD software.) Although Chapelle explains the process of lofting, his treatment is somewhat limited, being focused on the relatively simple boat he uses as his example. When you get to where you need to develop advanced features, for example the shape of a curved elliptical transom, I believe Alan Vaitses' manual, Lofting is a very valuable reference work to have on hand. He covers it all in easily understandable language from the basics to the farthest reaches of the skills of the master loftsman. (https://www.amazon.com/Lofting-Allan-H-Vaitses/dp/0937822558) Don't be scared off by lofting. It's not difficult once you learn the basic concepts and the biggest secret of all is that you don't necessarily have to do all the lofting required for the prototype if you are only building a model. Sometimes, all that's required (and may even be available in the draughts or offsets) are the shapes of the stem, keel, stern post, sections, and sheer to build the hull of it and, for goodness sakes, don't attempt an "as built" fully framed square rigger right out of the gate! There are lots of alternative methods for building a hull besides the most difficult. The "bread and butter" or "lifts" method using the "waterlines" to define the hull shape is the easiest of all and one of the most frequently encountered methods in the magnificent models seen in the world's great maritime museums. The Navy Board style models which are the highest form of the ship modeler's art are, in fact, a rarity among the best ship models. If your intention is to become a jeweler, it's best not to attempt a Faberge egg on your first try. :rolleyes:

A lot of scratch-building scaling can sometimes be done successfully with a copy machine that will scale to a desired size but be aware here again that it often requires a specialized large-size architectural copy machine to enlarge small drawings to scale size without distortion and that such enlargements yield drawings with lines so widened as to be somewhat useless for useable scale model patterns. Additionally, it is the case sometimes that the extant "plans" may only be a table of offsets and a simple elevation drawing, perhaps with only a reference to a "generic" rigging and sail plan, and you will have to loft the shape of the hull yourself anyway, so you might as well learn how. (Most of the hulls designed before the early 1900's were designed by carving a half-model and taking the offsets off the half-model, so frequently no fully developed lines drawings will exist for them at all!)

One tool the scratch-builder will find invaluable... or at least many do... is a proportional divider. This is a "double-ended divider" which permits, among other useful tricks, measuring a distance with two points on one end and yielding the same distance in a larger or smaller proportion between the points on the other end, with the degree of enlargement or reduction set as the user desires. Simply explained, it's an instrument that lets one measure a distance on a plan and get twice that distance, or any other proportion selected, for transfer to the work. It is an essential tool for lofting plans to the scale you want for your modeling and it's lofting that opens up an incredibly large number of options for the modeling subjects one may wish to build, particularly ones nobody has ever built before! (What a novel concept! ;)) The knowledge of how boats and ships are built and how their plans are translated into the parts that make up the vessel depicted is the essential skill required for a modeler to progress beyond kit assembling to true scratch-building. Of course, there are a few very good (and very-expensive) books that have done this work for the reader, and these can be used as instruction manuals. They are very good, but the modeler that relies upon them is only building from scratch to the extent they are sourcing their own materials, which denies them the greatest advantage of scratch-building, the ability to build whatever vessel they care to.

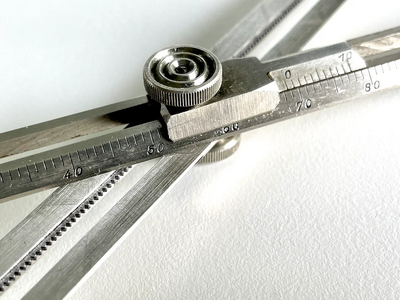
Lest I provide only enough information to get somebody in trouble, I should say that if and when you set about acquiring a proportional divider, it should be what is called a "universal proportional divider" which is scaled in decimal equivalents and not one of the less sophisticated ones that is only scaled in "halves, thirds" or in measures of distance which are scaled for navigational use. The "universal" proportional dividers, so called because they are scaled in a way that permits their doing any of the many amazing things that could be done with the instrument, were the "top of the line" in the days of manual drafting and were sold by firms such as Keuffel and Esser, Dietzgen, and Bruning. They will invariably be "ten inch" proportional dividers with a rack and pinion Vernier adjusting feature. Look closely for the decimal scaling (increments of tens, pictured below.) The back of the velvet lined fitted case usually has a handy metal plate with the decimal equivalents on it. There will also be a variety of formulae for many really handy modeling tasks like dividing any measured distance into a desired number of equal segments which is essential to lining off and spiling plank shapes. They will look like this:

The universal proportional dividers are ten inches long. Don't get one that's six, seven, or eight inches long! That's not the right type.

1723525599712.png

Note the rack and pinion Vernier adjustment and the equal "by tens" decimal equivalent scaling.
1723526236619.png

Realize that there is an active community of drafting instrument collectors who will pay top dollar for mint examples of instruments such as proportional dividers. These are quite fine instruments with parts of German silver having all matching serial numbers that were hand-fitted by skilled master German instrument makers. The collectable ones in "as new" fitted cases can run somewhere north of $200 or more, but don't be scared off. "Users," often with battered cases, but otherwise fully functional, can sometimes be had for as little as $50 or $75 and will always hold their value in any event because they aren't making them anymore and probably never will again. If one is patient and keeps an eye open, you can still catch a bargain on a "user" instrument on eBay or etsy.

In summary, if you know how boats and ships are built and you can read the draughts and/or the table of offsets and loft the subject vessel to the scale you desire on your drawing board, building it from scratch becomes as easy as building the highest quality kit of that model, if not even easier. It's this skill that's really the only transitional "bump" in the learning curve from kit building to scratch building.
 
Last edited:
Back
Top