Gilles 17-inch canoe - Pear wood (canoe #4)

Joined
Feb 18, 2019
Messages
685
Points
353

I have not had a chance to do much work on this model in the past couple weeks.
Canoe #3 and 4 were started at the same time: I worked on both up to a point.
This one is again based on the original design but, at the same time it is a bit different in the way the ribs are installed.

Photo # 1: planking, stem and nails
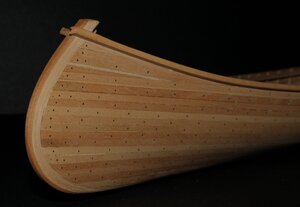
_DSC2557 aa.jpg

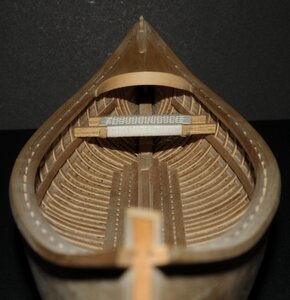
Photo # 2: Ribs and half-ribs. The seat is only there to verify the symmetry / leveling of the side strips (level looks ok)
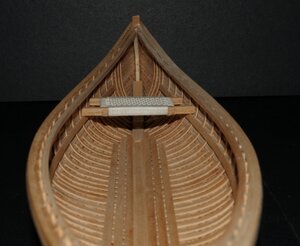
_DSC2563 aa.jpg


G
 
I have not had a chance to do much work on this model in the past couple weeks.
Canoe #3 and 4 were started at the same time: I worked on both up to a point.
This one is again based on the original design but, at the same time it is a bit different in the way the ribs are installed.

Photo # 1: planking, stem and nails

View attachment 179826

Photo # 2: Ribs and half-ribs. The seat is only there to verify the symmetry / leveling of the side strips (level looks ok)

View attachment 179832


G
What do you mean by "ribs" and "half ribs"? I would think that we have been installing "half ribs" butting to an inner keel plank with three additional keel "planks" being laid over those. Just wondering as I cannot tell from the photo of your precise work. It is going to be interesting to see how Mahogany accepts rib bending compared with my Cherry experience. I don't want to get it too wet which would create other adhesion as well as possible mold problems later. PT-2
 
In the model...
the ribs are installed in half (as you mention) but represent full ribs that would run from the gunwale on one side to the gunwale on the other side: so even on the model they can be called full ribs.
The half ribs, the shorter ribs, are installed the same way on the model, in half length, but they are also supposed to be fitted in full length.

Fitting the ribs in half lengths is just a matter of convenience: makes it a lot easier on the model.

Here is a view the canoe # 4 (similar to the view above) showing small progress.
The deck is as per my usual shape and length (8 cm) from the sharp corner behind the stem to the pointed sides towards the middle. The rounded area where the edge trim is located is 2 cm deep (radius).
The shorter ribs come up to the level located at the 9th strip from the gunwale.
The "decorative" strips marking the "support" for the seats are located at the joint between the 5th and 6th planking strip from the gunwale (or first planking strip).

_DSC2590 tiff aa.jpg

Note:
Half ribs is something I rarely include in my canoes.
On many canoes (full size) the ribs are wider and more spread apart than what I normally represent on the model. The half ribs are sometimes installed to stiffen larger, longer canoes to increase the load capacity.

In the model, I feel that it can add a different aesthetic element: but really, as far as the model is concerned, it is all very subjective.

G.
 
In the model...
the ribs are installed in half (as you mention) but represent full ribs that would run from the gunwale on one side to the gunwale on the other side: so even on the model they can be called full ribs.
The half ribs, the shorter ribs, are installed the same way on the model, in half length, but they are also supposed to be fitted in full length.

Fitting the ribs in half lengths is just a matter of convenience: makes it a lot easier on the model.

Here is a view the canoe # 4 (similar to the view above) showing small progress.
The deck is as per my usual shape and length (8 cm) from the sharp corner behind the stem to the pointed sides towards the middle. The rounded area where the edge trim is located is 2 cm deep (radius).
The shorter ribs come up to the level located at the 9th strip from the gunwale.
The "decorative" strips marking the "support" for the seats are located at the joint between the 5th and 6th planking strip from the gunwale (or first planking strip).

View attachment 180490

Note:
Half ribs is something I rarely include in my canoes.
On many canoes (full size) the ribs are wider and more spread apart than what I normally represent on the model. The half ribs are sometimes installed to stiffen larger, longer canoes to increase the load capacity.

In the model, I feel that it can add a different aesthetic element: but really, as far as the model is concerned, it is all very subjective.

G.
One question about the half-rib spacing. . . are they located between the typical stations, half-stations, and quarter-stations? That would be an addition of more ribs, or are they at the typical spacing quarter points?
I like the appearance and appreciate their function.
PT-2
 
One question about the half-rib spacing. . . are they located between the typical stations, half-stations, and quarter-stations? That would be an addition of more ribs, or are they at the typical spacing quarter points?
I like the appearance and appreciate their function.
PT-2
Thinking back to the sanding sealer on the Mahogany, I have been using Tightbond which is water solubable. The sealer that I got is noted as "soap and water cleanup". I am hesitant about using it if it can weaken the glued strips and have the hull fall apart. Do you have experience or a thought about using the sealer? I will continue with other detailing work but hold off on any more exterior sanding. Maybe a test with a few strips and then the sealer will give me an answer. PT-2
 
Canoe #4 is done. Just need to add some brass rings.
Paddles? They will be added later.
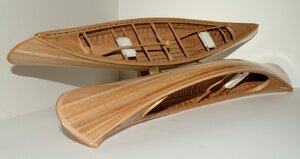
Here is a photo of the 2 vessels made with pear wood: #4 is upside down.
The posted image is 1600 pixels on the long side so you may want to click on it for better view: it will give the viewer a good idea as to the outside finish.

_DSC2726 aa.jpg

I will eventually make a canoe including a traditional green painted finish (it will be #5).
G
 
I will eventually make a canoe including a traditional green painted finish (it will be #5).

Well change of plan for canoe #4, as prior to yesterday I totally forgot to make a painted one.
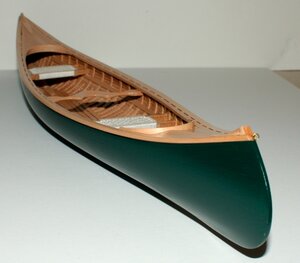
Today I decided to refinish this model .... It is now green.
After going to the lake to photograph part of the fleet in the water this morning, I figured that the 20+ hours spent putting nails (about 900 of them) in this one was not that important, and since I am not sure how long it will be until I can produce another model... what the heck .... the varnish was sanded down, paint was applied (2 coats), the nails disappeared, then one coat of water based varnish, and that is it for today. So now I am back to the varnishing stage: it should be completed in the next three days.

Here is a photo for now.
By the time varnishing is done, the finish should look like glass again.

_DSC2839 aa.jpg

G.
 
Well change of plan for canoe #4, as prior to yesterday I totally forgot to make a painted one.
Today I decided to refinish this model .... It is now green.
After going to the lake to photograph part of the fleet in the water this morning, I figured that the 20+ hours spent putting nails (about 900 of them) in this one was not that important, and since I am not sure how long it will be until I can produce another model... what the heck .... the varnish was sanded down, paint was applied (2 coats), the nails disappeared, then one coat of water based varnish, and that is it for today. So now I am back to the varnishing stage: it should be completed in the next three days.

Here is a photo for now.
By the time varnishing is done, the finish should look like glass again.

View attachment 181402

G.
Beautiful!
This has the classic appearance that you are very familiar with. It is also similar to the rebuild Old Town stripper that sent to you before and after restoration. PT-2
 
Back
Top