Golden Hind - 1:60 - scratch from F.Gay plans

Joined
Aug 3, 2020
Messages
53
Points
78

Location
Italy
As a young modeller I was always fascinated by galleons. When I moved into the wooden ship building one of the most important references here in Italy turned to be the Lusci's Ship Model Builder's Handbook. Spent a lot of time studying such monography with particular interest in the second section related to the relevant vessels since the ancient times. This is how I discovered the plans of F.Gay that depicted the Golden Hind galleon also with inner details.

Immagine 005.jpg
 
…so, I started this kit long ago, most probably in 2007 while the previous picture is dated 2008. Only few years ago I was able to complete the ship meanwhile I discovered the SoS forum and resources. My idea is to make anyway a WIP with the pictures I was able to collect just to show this work to all of you! :);). Do not be surprised if the work seems quick, indeed it took really much more time!!!! :p

Since I was really fascinated by the plans I discovered, my purpose just from the beginning was to partially show the interior of the ship at least from the hatches. Consequently you can see several frames already emptied. As far as the planking I used lime wood strips as a first substrate while the final one is with 1x4 walnut strips. The walnut strips have also some kind of a pattern just to avoid being the same strip all along the length of the whole hull.
 
Last edited:
In the below pictures a detail of the lower portion of the whole hull and the extremity of the stem. Such part was made from walnut while the keel was derived from plywood, a good one but not with the proper colour. My idea at the beginning was to paint white the lower hull and I did not pay too much attention to this. Only in a later stage such decision turned out to be a problem because I discard the option to paint the hull and the colour of the plywood keel was not pleasant

Immagine 002.jpg

Immagine 010.jpg
 
The extremity of the stem has been attached to the hull and I started working on the support beams of the bow walkaway. As you can see (black arrow) some planks are missing since they will protrude to the farthest extremity of the walkaway. In the picture it is also possible to see better how much the frames of the hull were emptied. A modelling technique to give strength to the hull is to apply several strips of medical bandage and to fix it with a proper glue. The UHU glue turned out to be very useful for the purpose.

Immagine 014.jpg
 
Dear All, thank you for the feedback at my posts! I have found some incredible craftsman work here that is on another level… but in any case, it is important to follow each one project and gradually improve. Back to my work the first “non-conventional” detail I had to face was the bow walkway floor made of several short strips with a specific pattern. Starting from a square strip I had to figure out how to cut a lot of small equal pieces. Here below the template, I manufactured (version 1) and the improved (version 2) actually used.

Cattura.JPG
 
Using the plan as a template and with the aid of some rulers I was able to attach the small blocks to gain the final walkway. Once reshaped it was installed in place and finally, I was able to complete the second planking of the whole hull with the missing strips protruding until the extremity of the bow. The rough work has been done, it was November 2008 and the Galleon was so ready for the further retouch work.

Immagine 032.jpg
 
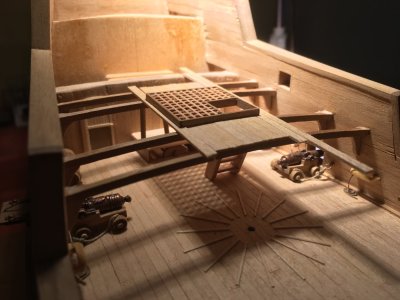
2009 has been a tough year for several aspects related to personal, family, health and work matters. Most probably that is the reason I never was not able to find any pictures related to the work done during this period. I remember working on the ship hold based on the admiral F. Gay plans and also completing the lowest deck of the Galleon. Here attached some pictures acquired at a later stage of the construction showing such detail.

Image1.jpg
 
When I start working on the lower deck fittings and structures, I spent a lot of time questioning how many openings had to be performed in order to see the detail…:rolleyes: My final decision was to use only the main hatch as a “window” on the below deck thus to avoid any fictional hole in the main deck. So, I made a cad template of the main deck and started analysing what was really necessary to detail!

Attached also a picture of few custom bult “furnishings”. For the pump I was very happy to use for the first time the lumber coming from an USA based company called Northeastern Scale Lumber. As you may know here in Italy, we have the Amati that has an outstanding catalogue for fittings and all kind of wood. Unfortunately, the smallest strips are 1x1, 0.5x3, 1x2 mm and so on. Instead, the Northeastern Scale Lumber goes really small starting from 1”x2” in HO scale that is about 0.3mm thickness and 0.6mm width!! Very nice :p

GH-autunno-10 002.jpg

GH-autunno-10 017.jpg
 
The work on the lower deck has been completed. I followed exactly the plans trying to reproduce what was indeed visible through the main hatch. All the rest was omitted. I added some fittings along the sides just to give an idea (or at lest to try) of a busy deck… perhaps in the future I may rearrange depending on the final outcome and on what will be the real feeling of the model once completed

Cattura.JPG

GH-autunno-10 004.jpg

GH-autunno-10 012.jpg

GH-autunno-10 016.jpg
 
Start working on the main deck and first decision was to give the proper curvature. Unfortunately, there are not many supports to lay down the part, so I figured out how to realize this. I discard the option to build first the pre-shaped beams and to lay down only the planks (too time consuming). Another option was to make some vertical supports and to glue the deck forcing the curvature, but again I discard since not foreseen in the plans. So, my decision was to make the deck as a stand alone part and to glue on its bottom some curved (and very stiff) beams, so to get in advance the required curvature.

GH-autunno-10 053.jpg

GH-autunno-10 056.jpg

GH-autunno-10 058.jpg

GH-autunno-10 060.jpg
 
Start working on the main deck and first decision was to give the proper curvature. Unfortunately, there are not many supports to lay down the part, so I figured out how to realize this. I discard the option to build first the pre-shaped beams and to lay down only the planks (too time consuming). Another option was to make some vertical supports and to glue the deck forcing the curvature, but again I discard since not foreseen in the plans. So, my decision was to make the deck as a stand alone part and to glue on its bottom some curved (and very stiff) beams, so to get in advance the required curvature.

View attachment 460923

View attachment 460924

View attachment 460925

View attachment 460926
Excellent technique. Keep on bashing!
 
Excellent technique. Keep on bashing!

Thank you very much! I will keep on posting my work with a reasonable interruption due to the summer holiday. Just for clarity and not to seem so quick in the building process ;) :p , this is indeed a “retrospective WIP” since fortunately the Holden Hind is already complete! I started the construction in 2007 and after several pauses, I was finally able to finish it in 2022. Pauses were related to other modelling project and a long period of work abroad...
 
Thank you very much! I will keep on posting my work with a reasonable interruption due to the summer holiday. Just for clarity and not to seem so quick in the building process ;) :p , this is indeed a “retrospective WIP” since fortunately the Holden Hind is already complete! I started the construction in 2007 and after several pauses, I was finally able to finish it in 2022. Pauses were related to other modelling project and a long period of work abroad...
I had to add at least two details to a finished model, and all the rigging can get in the way. But, when you look at a model which you KNOW you skipped a step in detail that you could have installed, it relaly bothers you, and of course nobody else. JUST YOU. So, after weeks of thinking about, you get out some wood, fashion a few more parts, and with your longest set of tweezers, reach in and add that cherry on top of the cake. Now you can get some real sleep. Those little details you skipped that cannot be accessed, being buried behind rigging or otherwise inaccessebly, you swear and oath to install on the next model. This is the ordeal we go through when we have an attack of impatience and rush to finish a model just a little bit quicker.
 
So, I was able to install the main deck and to complete some additional details like the larger beams on the hull and the covering of the vertical walls. You can also see the beams on both sides of the guns portholes, I am planning to properly cover the sides above the deck also from inside

GH-inverno-10 002.jpg

GH-inverno-10 003.jpg

GH-inverno-10 006.jpg
 
So, the inner walls were covered with walnut strips following also the openings for the main guns and the smaller guns of the fore and aft castle. A nice detail turned out to be the “U” openings on the slender and streamlined walls that enclose the bow walkaway.

Modelling tip: for the purpose I positioned a card template and cut (a little bit smaller) the openings by hand one by one. Final touch was done with proper shaped rasp and a small wooden “gauge” I covered with a sheet of sandpaper thus to have all opening the same

GH-inverno-10 007.jpg

GH-inverno-10 010.jpg
 
Back
Top