Height of Gunports and adding a spacer

Joined
Dec 3, 2019
Messages
214
Points
103

Location
USA
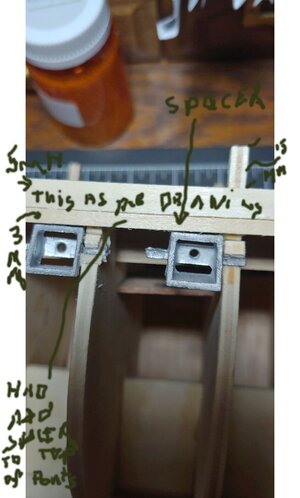
I have had a lot of problems with the gunports or my Mamoli USS Constitution. This is my first wood ship and I do not have the experience as what I can modify to make things work. I attached my first plank of 5 mm according to the drawing; however, this left a 3 mm gap between this plank and the top of the gunports, so I put in a 3 mm spacer.

Should I move the gunports again so that they are flush with the 5 mm plank? Is the position of the gunports that critical, since there will be another layer of planks over these?

This was my hangup before all my arthritis problems. I want to get on with building this ship, but I am afraid I will make a mistake that I can not correct.

As I am getting over 7 back surgery I would appreciate any help.
John Burger
 

Attachments

  • 20210108_123623_HDRa.jpg
    20210108_123623_HDRa.jpg
    124.4 KB · Views: 24
Not sure I can be of much help however I had the very same problem with my old Mamoli kit and I didn't resolve it satisfactorily as I've had to put different size spacers as I started planking and then again on the second planking. I relied on the cutouts on the frames for placing my gun ports which in the end didn't work out as hardly any line up properly. There are a couple of builders on this site that show you how they lined up their gun ports properly so I'd go look for them, they are here's
 
Thank you. Nice to know someone else had problems with the metal gunports.
I plan on grinding those stick out to far.
I just want to move forward. It has a year since I have been able to work the model.
I have several other models I want to work on. I am 77 so time is getting short.
 
Hello, John. External planks don't necessarily follow the deck line. The gun port always follows the deck line. See below the gun ports between the anchor stock

1612309694969.png
 
OHello, John. External planks don't necessarily follow the deck line. The gun port always follows the deck line. See below the gun ports between the anchor stock

View attachment 210523
Thank you. This is helpful.
Not sure I can be of much help however I had the very same problem with my old Mamoli kit and I didn't resolve it satisfactorily as I've had to put different size spacers as I started planking and then again on the second planking. I relied on the cutouts on the frames for placing my gun ports which in the end didn't work out as hardly any line up properly. There are a couple of builders on this site that show you how they lined up their gun ports properly so I'd go look for them, they are here's
Randre: I am confused about the 3x3 (43) posts that are supposed to go from the first strip (42) above the gun port to the strip (42) under the gun port. If I do as shown I will have to cut through the false deck. Is that what you did?
 
Thank you. This is helpful.

Randre: I am confused about the 3x3 (43) posts that are supposed to go from the first strip (42) above the gun port to the strip (42) under the gun port. If I do as shown I will have to cut through the false deck. Is that what you did?
Sorry JohnB, I can't exactly recall what I did there but I know I didn't have to cut through the false deck as these should be below the deck and the primary purpose was to have something to glue on when glueing the planks between the gunport.
 
Thank Randre.
In order for me to put the 3x3 posts so that they were even with the top of the plank I have had to cut into the false deck. From what I see I am going to have to raise the false deck. I some places it is about 2mm, but in others it is about 4mm.
The cutting of the frames were really way off. I''ll get right some how. I keep reminding myself this is the first layer of planking so much will be covered up.
I hope I can get the false deck raised without too much damage and it keeps with following parts.
Again thank you for responding.
 
Randre
Do you remember how many part 42 strips you attached above the gun ports. One drawing shows 3 and one shows 4. I can't find any mention of how many in the written instructions.
 
Back
Top