• LUCZORAMA SHIPWRECK SCAVENGER HUNT GIVEAWAY. 4 Weeks of Fun • 1 Legendary Prize ((OcCre’s Fram Ship)) • Global Crew Welcome!
    **VIEW THREAD HERE**

Help with warped decks on Minicraft 1:350 Titanic

Joined
Jan 5, 2022
Messages
8
Points
13

I’ve lurked for a while - reading through “ChrisSC”s Titanic build log multiple times.

This is my first build in 20 years - since my teens when I assembled things as fast as possible so I could play with them, lol.

Unfortunately, I didn’t follow ChrisSC’s procedure for dealing with the warping, and am now stumped about how to proceed.

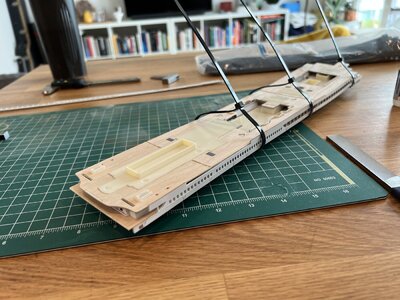
I’ve glued the top 2 decks together, and then glued the superstructure sides to that. I also had to cut off the locating tabs on the hull (that’s another story). I thought that if I fit the superstructure sides to the decks, then the whole subassembly should fit the hull. Well… not so much.

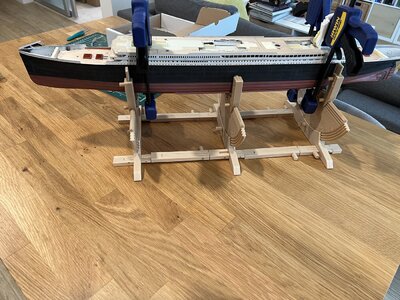
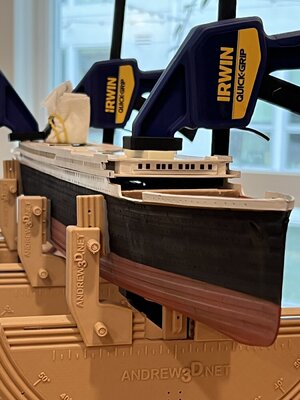
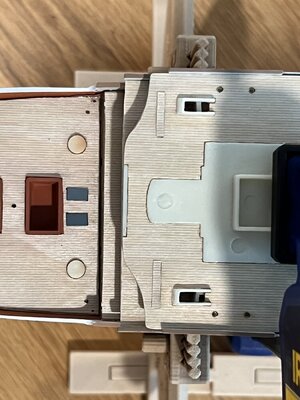
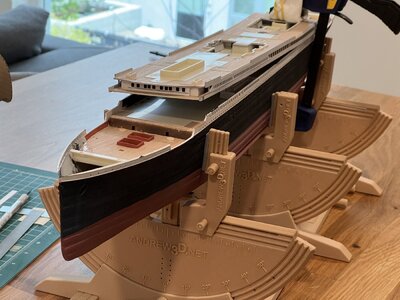
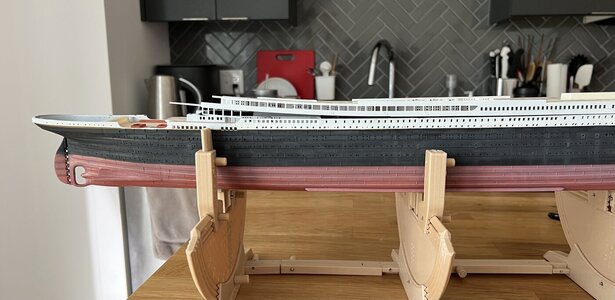
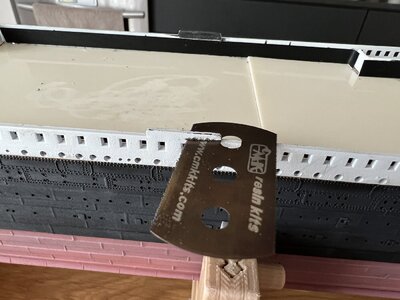
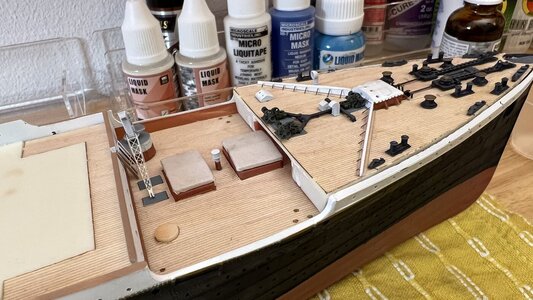
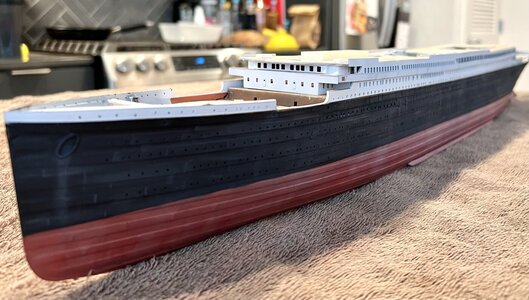
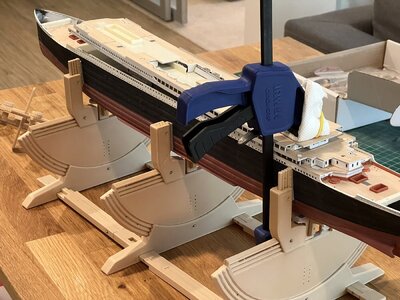
I’ve attached pictures showing how bad it is. I included one “glamour shot” of the forecastle just for fun.

Luckily, I *can* press the forward end down hard enough so that it makes contact with the hull - *without* the superstructure sides breaking or popping off (which was my first concern).

That leaves (at least) 2 problems:

1. Contact with the hull is poor and not even long the length of the ship. I’m not too worried about how it’ll look from below, but I am worried there won’t be enough contact to hold after the clamps are removed.

2. So much pressure is required to make contact that it’s hard to perfect the position. I’m practically crushing certain contact points just to get others to kiss - so there’s no opportunity to slip it left/ right if needed. It’ll also be really hard to apply glue to the hull and *then* get the superstructure in position (without smearing glue everywhere) … but if I clamp it first, there’s no gap in which to apply glue!


I’m really hoping the more experienced folks here can lend some wisdom.

How would you tackle this? Is this doable - or should I buy another kit and throw away months of progress by redoing the superstructure?!

Which end would you glue first (bow or stern)?
11B9EC27-9400-454B-8348-96FB380D71FA.jpeg9A8C0722-0CB6-454C-BBB6-9FF067EFE0E0.jpegA8BC6C53-B867-429B-9F8A-7A16082CF099.jpegB3890272-7EBE-4703-BBB9-815EF20F6AE8.jpeg1DD24D80-FD23-4DEA-ABCA-D0B5632F9AF6.jpegDCF2CCC2-CD22-447D-8674-396BAF930EDF.jpegF43EFDA3-4F34-42C6-AFA8-6D8D367834A0.jpeg1F1D11FF-5952-463C-9DAD-9C3376BFDE8C.jpegD06B9EDA-850B-4157-8644-3910BEBE1D2C.jpeg
 
First, let me start off with saying so far your work looks great (with the obvious exception we are discussing)!
So, please correct me if I’m incorrect here.
the kit is a plastic kit!
To glue them together it is just gluing the pieces edge to edge?
One last question at this point. What have you used to perform the assembly so far?
 
Thanks Corsair!

Yes, it’s a plastic kit. There’s also aftermarket 3d printed pieces and brass photo-etch, but none of that is relevant to the warping problem.

I’ve used plastic cement (Tamiya extra thin) when I can (plastic to plastic), but most of the big stuff is secured with thick CA glue. The 2 top decks and superstructure are all held together with CA glue.

Re: “edge to edge”… I think the answer is yes? I’m not familiar with glueing methods for wood kits.
 
I can only think of flipping it upside down supported on both ends only. Now I would get out mamas' hairdryer and put some heat in the middle while adding weight to see if it moves. Use a straight edge to see if you are gaining ground. If this doesn't work, I would put on my big boy pants and try the oven.
 
I can only think of flipping it upside down supported on both ends only. Now I would get out mamas' hairdryer and put some heat in the middle while adding weight to see if it moves. Use a straight edge to see if you are gaining ground. If this doesn't work, I would put on my big boy pants and try the oven.
Whoa…
I’m not sure I own any pants that big, haha.
It gets the gears turning, though! Thanks!
 
If you have bonded the upper big pieces with CA, experiment with some of the debonder on some of the sprue and make sure it won't damage the plastic. If it doesn't, I consider debonding the main pieces to the upper section. Then reassemble following the instructions. Incidentally, I would recommend you continue to use the Tamiya glue for styrene kits for gluing all plastic to plastic. It will actually bond the plastic much better. Be careful not to use too much because it will melt the plastic. Only use the CA glues to attach resin and photoetch parts to the plastic or to each other because the plastic glue with not work for the resin or brass.

I would recommend not using the oven or even the hair dryer since if you go too far, you are only left with buying another model.

If the CA debonder damages the plastic, I would recommend just forcing it down (since you said you can do that without damage) and using the plastic cement to bond the pieces together. The other thing you might be able to do to help the pieces align is to go to a hobby store (I think they even have it at Michaels) and get some sheet styrene and glue tabs on the inside of the wall of the lower part that would also glue to the inside of the upper part. Again, just be careful now much of the plastic glue you use. :)

I hope that helps !
Thanks!
I used A LOT of CA bond the decks and superstructure sides (the mating surfaces were painted first). And even if I were to debond them… the warping would still be there (this kit is well known to have horribly warped parts out of the box). Still I may try this.
The “force it down and hope” approach is starting to seem more likely, though. I’ve been letting it sit clamped under pressure since posting, and have heard a couple of “pops” while working on other parts. So maybe some glue points supporting the innate warping are letting go?
It could be that you induced the warp by some of your gluing. However, if you disassemble it, you may be able to remove the warp by holding it down on a known straight surface as the glue dries. However, the force it down is probably much easier at this point.
I'll keep my fingers crossed for you with what ever method you select ! :)
 
Another wild idea is to use contact cement. Place spots of contact cement at key contact points between the pieces. Then clamp the warped pieces down. Where they connect with the contact cement they should bond in place. The only down side is you get one chance to get the right fit…once bonded you won’t be able to move the pieces around.

I work with styrene plastic on my wood models all the time. Sometimes I need to make deep curves around a mast with sheet styrene. A heat gun is indispensable in softening and shaping the styrene. Try clamping down the ends of the warped plastic deck assembly onto a board then apply heat to the center section. The heat will soften the plastic and perhaps allow the assembly to reshape itself. This will take patience and perhaps many attempts but in theory it should work. Clamp, heat, unclamp and check progress, clamp, heat, repeat…
 
Last edited:
Not sure if I read article correct. If plastic try hot air gun / weights.
Obviously taking off decking is preferable.
So what about damage - plastic card / putty
Yes…. It’s a pig!
Big mess…
But outcome + your mind peace…
If not .. just leave it and hid if possible…

You have ship and only can tell but a friend or enemy and say zero … what they think….
 
Use a different type of glue that doesn't set up so fast. I'm thinking of Testors liquid glue in a tube.Smear the glue all over the parts that stick together and clamp it down on both ends. That should do the trick. If these surfaces are painted then scrape off the paint where the pieces touch each other (both ) and then apply the glue. Your model looks great and the work you have done so far looks great too. The warp isn't bad so glue it and clamp it down and let it set. The warp will disappear.
 
First, I think you project is looking really good - particularly the hull paint and crisp lines between paint areas.

I’ll have to agree with the suggestions above that you disassemble the structure. Here’s why: The warped decks are now glued in place to the superstructure in their curved form. As you attempt to bend the assembled structure, you’re creating a shearing force along the length of the decks where they are fused to the superstructure, preventing them from bending. Something will have to give and you won’t like the result. Corsair suggests debonder for the CA. If that doesn’t work, I’d go with some fresh xacto blades and do some surgery. Take your time. Once you free those decks, get busy flattening them out.

It sucks, but we’ve all had to retreat on our projects and start again on certain areas. I think that this is the best course of action.
 
Wow, really appreciate all the responses - thank you!!

It ended up working out okay. Not perfect, but this was *supposed to be* a practice run for the 1:200 Trumpeter Titanic :)

I didn’t have the guts to debond the superstructure; over the past year, I’ve attempted similar surgery attempts, and each made such a foul up that I had to start over (new parts). And I just wasn’t prepared to do that in this case.

I used e6000 glue. It’s really slow, and easier to control than CA. I even glooped it over the hull a couple of times, and it was easy to clean up (it pulled off in clean “ropes”).
Then clamps.

I left the clamps on for a week, then reinforced all the joins with thick CA. The superstructure is slightly wider than the main hull, so there’s a good hidden lip along which to run that reinforcement.

I let that sit a day and removed the clamps… REALLY hoping not to hear *pop* *pop* as the parts separated. Thankfully, it seems pretty secure.

Thanks again for the tips. If I run into this problem again, I’ll use the trips to remove the warp before gluing

B5A8E944-A322-4E95-AFA2-83A92AD36EC5.jpeg
 
Wow, really appreciate all the responses - thank you!!

It ended up working out okay. Not perfect, but this was *supposed to be* a practice run for the 1:200 Trumpeter Titanic :)

I didn’t have the guts to debond the superstructure; over the past year, I’ve attempted similar surgery attempts, and each made such a foul up that I had to start over (new parts). And I just wasn’t prepared to do that in this case.

I used e6000 glue. It’s really slow, and easier to control than CA. I even glooped it over the hull a couple of times, and it was easy to clean up (it pulled off in clean “ropes”).
Then clamps.

I left the clamps on for a week, then reinforced all the joins with thick CA. The superstructure is slightly wider than the main hull, so there’s a good hidden lip along which to run that reinforcement.

I let that sit a day and removed the clamps… REALLY hoping not to hear *pop* *pop* as the parts separated. Thankfully, it seems pretty secure.

Thanks again for the tips. If I run into this problem again, I’ll use the trips to remove the warp before gluing

View attachment 357101
Very glad it worked out!
 
I’ve lurked for a while - reading through “ChrisSC”s Titanic build log multiple times.

This is my first build in 20 years - since my teens when I assembled things as fast as possible so I could play with them, lol.

Unfortunately, I didn’t follow ChrisSC’s procedure for dealing with the warping, and am now stumped about how to proceed.

I’ve glued the top 2 decks together, and then glued the superstructure sides to that. I also had to cut off the locating tabs on the hull (that’s another story). I thought that if I fit the superstructure sides to the decks, then the whole subassembly should fit the hull. Well… not so much.

I’ve attached pictures showing how bad it is. I included one “glamour shot” of the forecastle just for fun.

Luckily, I *can* press the forward end down hard enough so that it makes contact with the hull - *without* the superstructure sides breaking or popping off (which was my first concern).

That leaves (at least) 2 problems:

1. Contact with the hull is poor and not even long the length of the ship. I’m not too worried about how it’ll look from below, but I am worried there won’t be enough contact to hold after the clamps are removed.

2. So much pressure is required to make contact that it’s hard to perfect the position. I’m practically crushing certain contact points just to get others to kiss - so there’s no opportunity to slip it left/ right if needed. It’ll also be really hard to apply glue to the hull and *then* get the superstructure in position (without smearing glue everywhere) … but if I clamp it first, there’s no gap in which to apply glue!


I’m really hoping the more experienced folks here can lend some wisdom.

How would you tackle this? Is this doable - or should I buy another kit and throw away months of progress by redoing the superstructure?!

Which end would you glue first (bow or st
Hallo @awagnerjcu08
we wish you all the BEST and a HAPPY BIRTHDAY
Birthday-Cake
 
Hello...... what is the age of your kit and which release is it ? I have the 11350 release which I am looking to start here soon.

Thanks,

Bob
 
Hello @spacecraftcreator.
This was the newer centennial kit, which I think is the same model number as yours. I threw away the box, so can't check.

Although, now that you mention it, I also bought a backup that was from a much older run (even different moldings on the forecastle & emergency stairs on the boat deck). And some of the pieces on the older kit were cleaner / sharper. 2 Of those pieces were the superstructure sides that were warped in the first place. So, not that surprising that it was pretty messed up at first.

Have you started your kit? If so, would be great to see some pictures here :)
 
A technique for straightening out warped pieces of polystyrene models is to force them into the proper shape with whatever clamps, rubber bands, bits of wood and/or whatever you can figure out and then heat the piece up in hot water. Polystyrene usually can be straightened at around 175 to 195 degrees Fahrenheit. Start at a lower temperature and increase gradually until the plastic starts to yield. You can include a test piece like a sprue from the kit in the water to see how it reacts. If you get it too hot you can cause worse deformation. Once the piece seems to have straightened, cool it in cold water. Of course, this is much easier to do before gluing any pieces together but it may still be possible with a partly assembled model. Fair winds!
 
Back
Top