HM Armed Cutter Alert (1777) - Vanguard Models - 1/64

Liquid hide glue is a slow setting amber colored water-soluble glue that is easily reversable with warm water even after having fully dried yet is very strong when fully dried. Unlike cement (e.g. CA) Glue dries, it does not cure or polymerize, undergoing a structural chemical change. Shellac has this virtue, being reversable with denatured alcohol, as opposed to alkyd resin varnishes.
Hide glue (made from hide scrapings, hooves and connective tissue, basically it is J-ello) is probably the oldest glue known to man. Originally melted into hot water in a glue pot. The liquid kind comes in a typical plastic glue bottle and is available in hardware stores and online under different brand names such as Tite Bond.
It has a shelf life of a few years. The slow set is problematical for us modelmakers in a hurry, but a real virtue for making adjustments before the glue sets up or dries, as well as for its ease of complete reversibility, especially useful when affixing rigging lines to belaying points. Just make sure you leave a long tail to the line before permanently trimming the tail end. Furniture and ship models built with hide glue will stay stably put together for centuries if kept in a stable environment and out of UV light.
 
Last edited:
A nicer form of hide glue is Rabbit-skin glue. And it is also very durable over centuries if not exposed to too much moisture, has a track record of probably 500 years.


Rabbit skin glue is an animal glue created by prolonged boiling of animal connective tissue. Rabbit skin glue can be bought in powder form, little pellets or in larger chunks. Preparation involves using the correct proportion of water to glue to achieve the correct consistency and strength. It should be heated to just short of the boiling point. Too much heat results in a product with reduced adhesive qualities. Manufacturers of rabbit, and cow & horse hide glue recommend dissolving at 60–63 °C (140–145 °F).
 
Smart approach indeed, using colours to understand what you understand. In another life I had a similar system, albeit with a mind map.

About rigging: although I am not (yet) into wooden ships, I think this ‘cheating’ is perfectly acceptable. There’s no use in coming to a standstill over something that in the end is minor.

About reality: I sailed on a three mast clipper (Stad Amsterdam), amongst others cross Atlantic. Real sailing. Hard work. Looking up at all the lines and knowing there are kilometers of them … I think the modeller is excused taking a shortcut here and there.
 
Smart approach indeed, using colours to understand what you understand.

It was working well until I ran out of pens. :D

In another life I had a similar system, albeit with a mind map.

I wish I had a map of my mind. I often get lost in here. :D

About rigging: although I am not (yet) into wooden ships, I think this ‘cheating’ is perfectly acceptable. There’s no use in coming to a standstill over something that in the end is minor.

Rigging is minor? Heresy! :D Sacrilege! ROTF

About reality: I sailed on a three mast clipper (Stad Amsterdam), amongst others cross Atlantic. Real sailing. Hard work. Looking up at all the lines and knowing there are kilometers of them … I think the modeller is excused taking a shortcut here and there.

I envy your memories of trips like that. It must be an amazing experience.
 
My grandfather was a ship's baker - mostly for NZSL (Rangitiki, Rangitani) emigrant ships and Bay Lines. He did one crossing in a barque (Garthsnaid?) in the 1920;s. His comment 'never again'.
 
More work on the mast today.

PB160114.JPG

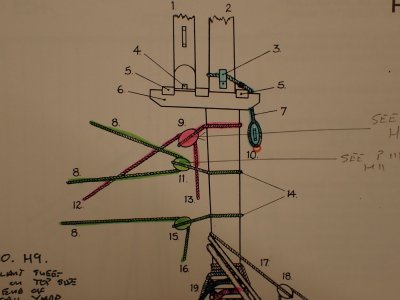
My goal was to strop and fit block #9, the boom topping lift standing block. The rope that goes through there holds up the tip of the boom at the bottom of the mainsail. which is a fore and aft 'driver'. I also intended to strop and fit #11 and #15. They are both gaff halyard standing blocks. The line through them goes back and forward a couple of times and controls the angle of the gaff, the spar at the top edge of the driver. It doubles between these blocks and the gaff for extra pulling power when the wind is trying to fold the driver in half and this system is keeping it to the correct aerodynamic curve.

I thought the three were an evening's work.

PB160108.JPG

Here's the prepped block fitted into the machine.

PB160109.JPG

And after a few rotations, the seizing is almost done. I've dabbed it with CA to hold it together.

PB160110.JPG

It looks like a potato on a sling. ROTF I've left the darker seizing thread ends attached because I want to wrap them over the knot I'll have to tie around the mast, hiding it from sight.

PB160111.JPG

It was a very fiddly job getting the knot into the right place.

By the way, you can see that I've highlighted the edges of the black painted section.

PB160112.JPG

It took some time but this was the result.

Note also the foot of the poorly fitted topgallant mast. I had to shim the trestletrees because the dowel for the mast had no square section. but the sloping butt of the mast is all my fault. It's the first time I've noticed it and it indicated they the topgallant mast is firmly fixed in position with a ten degree twist to starboard. I'm not happy. I am not happy. :mad:

PB160113.JPG

And from the side. That thin paint hides nothing! :D

So it was stropped and fitted and looks good enough. The problem was that it took well over an hour to do. It IS a fiddly little son of a bosun, and I'm still getting up a head of steam with the rigging generally but an hour and a half was quite demoralising so I took the dog out for a walk, and contemplated just tying it all together with simple knots. It's 1/64 which is quite tiny for my big hands. In plastic aircraft I never went below 1/48 and in tanks, 1/35.

I decided to pack it in for the night and post an update. Then I came home and started on the next one.

PB160115.JPG

And then the one after that. :D

They were more or less the same operation, except with longer seizings and together they took about the same time to complete as the first one. I'd have been even quicker if I hadn't made some adjustments to the machine which made it much less efficient. The knots aren't as hidden as I'd have liked but they are somewhat obscured which will be good enough against the black painted mast.

As a whole then, quite a productive day.
 
By the way, you can see that I've highlighted the edges of the black painted section.
That paint job is awesome mate, truly.
When I graduate to something near your level that's the bar I want to aim for.
I'm not happy.
Not sure about what you're not happy about, to me, and I'm certain many, many others, it looks the dogs Kerry Packers.
 
Got some nifty details going on there. Does you use bees wax on the lines?

That’s a good question. I meant to mention that. I applied wax to the threads on the first block. I find that it makes polyester thread a little less slippery and easier to handle. However when it came to tying that tricky little knot right underneath the block I realised that I needed the thread to be slippery, so the second and third blocks were not treated with beeswax.

I don’t think that it makes a great deal of difference to the appearance of polyester thread. But I certainly like to use beeswax on natural fibres. I like the way it makes them slide through the blocks and keeps the hairiness under control.
 
Last edited:
If this evening is anything to go by my posts for the next few weeks may become a little monotonous. “ I tied some string on today.” “ I tied some more string on today.” “ you know that stringy stuff? Well, I tied some on today.”

That isn’t a lot of rigging on a cutter, but it is still going to take many days’ work and each with little to show you. Don’t be surprised if I stop daily posts and save up until I have something interesting to show you or talk about.

(@The Ships Cat , you had the same thing happen when you began your planking. )
 
More work on the mast today.

View attachment 484587

My goal was to strop and fit block #9, the boom topping lift standing block. The rope that goes through there holds up the tip of the boom at the bottom of the mainsail. which is a fore and aft 'driver'. I also intended to strop and fit #11 and #15. They are both gaff halyard standing blocks. The line through them goes back and forward a couple of times and controls the angle of the gaff, the spar at the top edge of the driver. It doubles between these blocks and the gaff for extra pulling power when the wind is trying to fold the driver in half and this system is keeping it to the correct aerodynamic curve.

I thought the three were an evening's work.

View attachment 484581

Here's the prepped block fitted into the machine.

View attachment 484582

And after a few rotations, the seizing is almost done. I've dabbed it with CA to hold it together.

View attachment 484583

It looks like a potato on a sling. ROTF I've left the darker seizing thread ends attached because I want to wrap them over the knot I'll have to tie around the mast, hiding it from sight.

View attachment 484584

It was a very fiddly job getting the knot into the right place.

By the way, you can see that I've highlighted the edges of the black painted section.

View attachment 484585

It took some time but this was the result.

Note also the foot of the poorly fitted topgallant mast. I had to shim the trestletrees because the dowel for the mast had no square section. but the sloping butt of the mast is all my fault. It's the first time I've noticed it and it indicated they the topgallant mast is firmly fixed in position with a ten degree twist to starboard. I'm not happy. I am not happy. :mad:

View attachment 484586

And from the side. That thin paint hides nothing! :D

So it was stropped and fitted and looks good enough. The problem was that it took well over an hour to do. It IS a fiddly little son of a bosun, and I'm still getting up a head of steam with the rigging generally but an hour and a half was quite demoralising so I took the dog out for a walk, and contemplated just tying it all together with simple knots. It's 1/64 which is quite tiny for my big hands. In plastic aircraft I never went below 1/48 and in tanks, 1/35.

I decided to pack it in for the night and post an update. Then I came home and started on the next one.

View attachment 484588

And then the one after that. :D

They were more or less the same operation, except with longer seizings and together they took about the same time to complete as the first one. I'd have been even quicker if I hadn't made some adjustments to the machine which made it much less efficient. The knots aren't as hidden as I'd have liked but they are somewhat obscured which will be good enough against the black painted mast.

As a whole then, quite a productive day.
Great job! But if you suddenly want to dive even deeper into rigging work, here's some food for thought))) just don't scold me loudly))
Screenshot_20241117_004743_Gallery.jpg
But I think for your scale this will be excessive, most likely no one will see it.

Another point is that maybe such a binding was not provided for this class of ship, it is still for a battleship. But it is still interesting. It is a pity that even if this is true, it is extremely difficult to implement due to the scale. I am waiting for your new updates!
 
Last edited:
Great job! But if you suddenly want to dive even deeper into rigging work, here's some food for thought))) just don't scold me loudly))
View attachment 484613
But I think for your scale this will be excessive, most likely no one will see it.

Another point is that maybe such a binding was not provided for this class of ship, it is still for a battleship. But it is still interesting. It is a pity that even if this is true, it is extremely difficult to implement due to the scale. I am waiting for your new updates!

Scold you? Not at all. I THANK YOU for reminding me to consult C Nepean Longridge, The Anatomy of Nelson’s Ships. The style of the beautiful drawings is immediately recognisable.

PB170120.JPG

I was puzzled for a moment by the change from a single strop (in red) to a double (in blue) but on page 240 I found this diagram.

PB170119.JPG

And now I understand one method used by the riggers to attach a standing block to a spar. The long free end is left in place so that the seizings may later be undone and a stretched strop re-tightened around the mast until it creaks (using a tackle on a heavy duty fitting or strong hands on a lighter one). Longridge's drawings are based on HMS Victory but the methods will have been similar on Alert - a rope remains a rope and a spar a spar, no matter how large or small they are.

It had been bothering me that Goodwin’s AotS Alert appears to suggest that the looped strop must have spliced in place and never needed adjusting for tightness.
Goodwin's drawing is a simplified sketch. It’s better than the kit’s plan which is to tie the block to an eyebolt, but it doesn’t quite explain the mechanism.

Thinking as an engineer it's clear to me now that the eighteenth century sailor would have needed a quick method for replacing a broken or damaged block at sea. There would be no time for making splices in the heat of action. It's also clear that ropes, even tarred ropes, always stretch in use and some form of adjustment must have been in use.

Understanding is my major goal in building models so you have made my day, Sergey. Thanks again!

~~~~~~~~~~

Can I replicate it in 1/64 with simple tools, wood and thread? Well, not exactly. However, I have demonstrated that I can make an eye splice and I think that the 'Longridge Method' will make it easier for me to attach these standing blocks to the mast. I will not be able to make the tiny seizings on the other end, the blue end, but I can perhaps simulate them with a little paint.

You say that no-one will see it. I will show you something in a day or two. Challenge accepted! ROTF

~~~~~~~~~~

And for those who don't have Longridge on their bookshelves, here's the full drawing. (Made by hand with pencils and a pen!)

PB170121.JPG
 
Back
Top