You are using an out of date browser. It may not display this or other websites correctly.
You should upgrade or use an alternative browser.
You should upgrade or use an alternative browser.
HM Armed Cutter Alert (1777) - Vanguard Models - 1/64 - Completed Build
- Thread starter Smithy
- Start date
- Watchers 33
-
- Tags
- alert vanguard models
- Joined
- Dec 3, 2022
- Messages
- 1,322
- Points
- 443

Great workmanship and patience!
Thank you Superglue!
Love the coppering. The patina is so authentic.
It was my favourite part of the build until I did the next stage and the next. Model boats are like symphonies, they become more lovely as they grow to their resolution.
[My goodness Smithy, you’re feeling a bit poetic this morning!]
Good luck on keeping a tidy work bench. I lost that battle many moons ago.
I do fairly well for a while. I’ve trained myself to al least drop my tools in one place and to clear away properly at the end of each session. Except … nobody’s perfect and sometimes I don’t do that, then next session makes more mess and in a couple of days I’m really hampered by my untidiness.
I do find that my work is tidier when my desk is neat and uncluttered. That’s just me though, I know many people would find it ridiculous to ‘waste time’ on cleaning up. (Like the Ex.)
No need to reply. Just posting my thoughts.
Maybe it’s the tidiness thing again but I like to reply to anyone who takes time to write to me, even if it’s just to say hello. I appreciate your thoughts and comments. They are my reward for writing about my adventures in modelling.
Tanks for watching and taking us into Page Three!
- Joined
- Dec 3, 2022
- Messages
- 1,322
- Points
- 443

Bitts and Pieces
Page three in six days? To me that seems very strange. Because I've re-lived most of the build while I wrote about it, I seem to have been here for months. On the other hand, to have such a party going on at my little place in such a short time is very, very encouraging to me. You are all so friendly! It's brilliant. Big thanks
 to all who visited, liked and especially commented here - you are driving the build forward most effectively.
Anyway enough waffle; let's chat about boats.
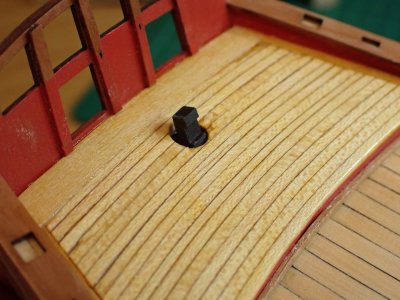
I cut the hole for the rudder post. It will only peep out of the deck this much but Mr Davis of The Built Up Ship Model told me that the hole needs to be much larger.
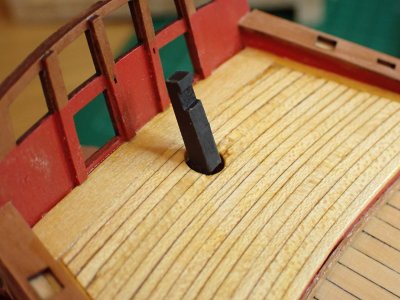
In order to unship the rudder for maintenance, especially at sea, it would need to be raised much higher, like this.
In fact I needed to make the hole about 1mm bigger. It's completely unnoticeable, and in fact as I intend to fit the leather sealing 'skirt' around it, completely invisible. However it gives me a little smile to know that little bit more about how my boat worked back in its time.
The splintering of that horrible wood wipes the smile off the old face pretty pronto.
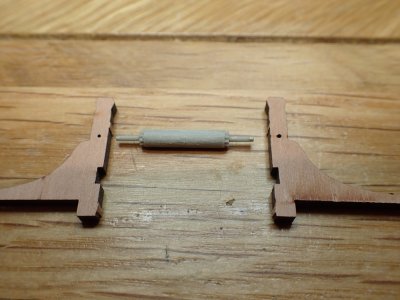
Next we have the jeer windlass and topsail bitts. The drum is a resin piece, which is a material I don't much like. The two spindle ends are too thick and fragile and the wood texture was added by me while sanding off the mould parting lines. We gain two things from using resin here. The first are the pawl drums at the sides which will be unnoticed under the ropes that will surround it. The second gain is not having to cut a piece of dowel to the correct length. I don't imagine that it even saved Vanguard Models any money. Just a multi-media gimmick then.
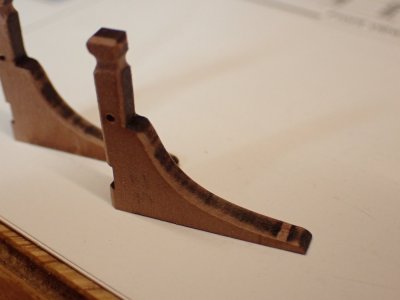
The topsail bitts had their edges rounded. Everything should have its edges rounded because this was standard practice. Waves and weather tended to throw seamen into sticking-out-pieces of the boat so sharp edges were removed to ease the pain a little. Thanks for that tip Mr Davis.
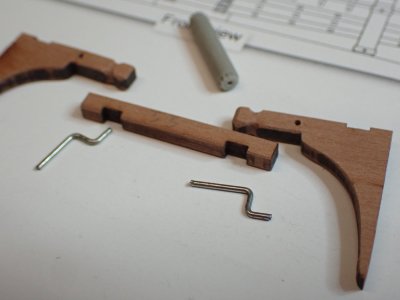
I retained the winch drum and made new cranks to pin it all together. As I look at that photo I wonder whether the handles might not have been wood, for a more comfortable grip and better power transfer. I'll see about that as soon as I finish here.
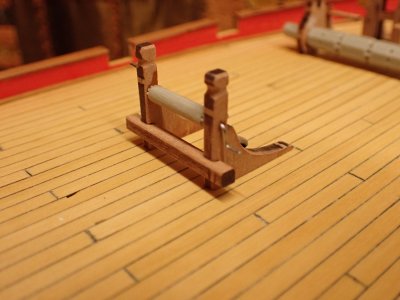
Note that I cut off the locating tabs which would have fitted into the holes in the deck had I remembered to cut them out during the deck planking. Sigh! I'll put a pin into the bottom of the bitts because the grain goes up and down which would make a weak end-grain joint to the deck if I relied on glue alone. I'm anticipating tying a lot of ropes to this thing and the last thing I'll need is for it to come loose.
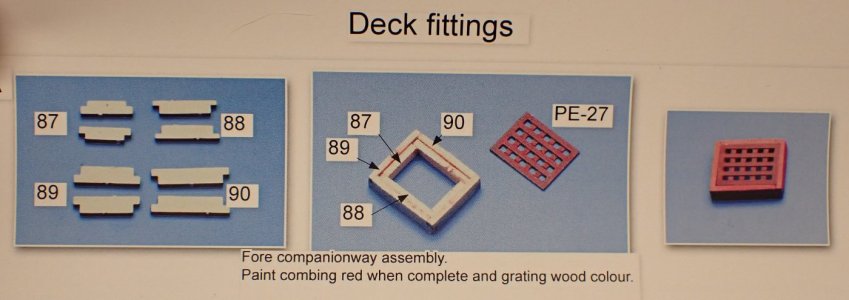
This is the kit supplied way to make the fore companionway. I recoiled in horror when I saw the halving joints. Surely it should be mitred like a picture frame?
"Nay lad," says Mr Davis, "that would give ye weak corners with shim edges that would rot away in a trice. Halving joints are perfectly correct."
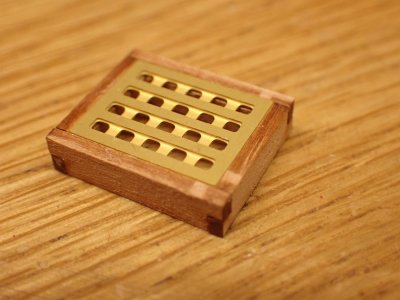
And when assembled around the grating, to keep it square, I must admit that it looks pretty good. Now it has had a night to harden off, I'll be chamfering here and there and it will be fabulous.
What about that grating? The acid bath can't etch sharp corners into thick brass like this and I haven't a square file that fine. I have some wooden grating pieces and I could make a companionway with them but is the game worth the candle. Two days work for such a small improvement? There are three gratings so that's a week's worth of work. No, I'll accept the compromises on what I'm belatedly realising is an easy-build model for novices. I'll save building my own gratings for the next build and not rush my learning.
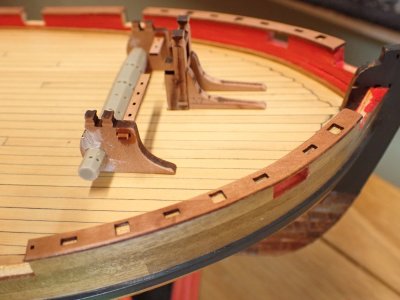
The big windlass assembly is almost ready for paint once I've sanded down the filler and stuck on a little ironwork. I'm not happy with my paintwork yet. I've tried Vallejo acrylics and Humbrol enamels and neither produced a good result when I brushed them on wood. I've been sealing the wood with Rustin's Sanding Sealer but perhaps that's not enough. Do I need to prime and undercoat first? Can I combine those stages by brushing on gesso as I would if I was doing an oil painting on canvas or board?
Any advice on painting would be welcome, preferably before I finish building the remaining objects for the deck.
Last edited:
No, not yet. I'll reconsider this option when I begin the rigging which will compel such close attention that hacking at a few bulkheads will be a welcome relief.
Good morning Smithy. I avoid doing two ships at once- I always build with the - what I want to do vs what I have to do principal. Sometimes we just have to face the have to do’s and if I had a second ship I would never get to these. E.g rigging cannonsThe great danger would be stopping rigging when it became difficult, then stopping planking when it became difficult and then starting a third ship!
 . In your case if I started the Le Requin I doubt I would finish the rigging of the Alert
 Beautiful work on the transom and the coppering. Cheers Grant
- Joined
- Dec 3, 2022
- Messages
- 1,322
- Points
- 443

rigging cannons
Yes Grant, I see your point.
It occurs to me that wanting to begin another boat before I finish this one is nothing more than my naked greed.

As the great philosopher Mr F. Mercury put it, “I want it all, and I want it now!”
Last edited:
- Joined
- Jun 17, 2021
- Messages
- 2,696
- Points
- 588

Fun following along.
On my 1;96 Flying Cloud model I used copper tape cut into easily workable sections. I dispensed with overlapping and just scored vertical lines with a 1/8" wide sharp chisel. I didn't worry about protecting the copper from my sweaty, oily, hands, since no distinct palm or fingerprints were being left behind. Only a nice uniform patina that mellowed out the shiny copper to a nice uniformly dull, nonglossy, natural umber patina. Better to be lucky than good! For the sake of scale, I also dispensed with nail or rivet dimples. Too distracting, I thought, at that small scale.
Yours looks just fine.
I also have no problem with departing from the plans and modifying a model for the sake of logical believability and aesthetic rationale. Like extending the height of the bulwarks to accommodate the height of the guns if those are close enough to scale. I have seen too many model kits, where the guns never fit right, right out of the box, and according to plan, to give much of a s**t what the plans and kit design calls for. It's what the finished product looks like that matters in the end. Your coppering looks pretty nice, suitably old and funky, by the way.
 keep up the good work,
Pete
On my 1;96 Flying Cloud model I used copper tape cut into easily workable sections. I dispensed with overlapping and just scored vertical lines with a 1/8" wide sharp chisel. I didn't worry about protecting the copper from my sweaty, oily, hands, since no distinct palm or fingerprints were being left behind. Only a nice uniform patina that mellowed out the shiny copper to a nice uniformly dull, nonglossy, natural umber patina. Better to be lucky than good! For the sake of scale, I also dispensed with nail or rivet dimples. Too distracting, I thought, at that small scale.
Yours looks just fine.
I also have no problem with departing from the plans and modifying a model for the sake of logical believability and aesthetic rationale. Like extending the height of the bulwarks to accommodate the height of the guns if those are close enough to scale. I have seen too many model kits, where the guns never fit right, right out of the box, and according to plan, to give much of a s**t what the plans and kit design calls for. It's what the finished product looks like that matters in the end. Your coppering looks pretty nice, suitably old and funky, by the way.

Pete
Hi Peter,I have seen too many model kits, where the guns never fit right, right out of the box,
What you say is sad but true. Accurate cannon are easy to make and much less expensive with today's technology so I am surprised the kits have not made progress in this area. Seems like the majority we see from the kits look like Borgard pattern cannon which were only around from about 1716-1724.
Allan
- Joined
- Dec 3, 2022
- Messages
- 1,322
- Points
- 443

Fun following along.
I am filled with delight whenever someone has fun with my writing or modelling. Thanks for letting me know, Pete.
On my 1;96 Flying Cloud model I used copper tape cut into easily workable sections.
I've used that stuff and will do again. It patinated in the egg box and actually made brighter colours than these thick plates.
I also dispensed with nail or rivet dimples. Too distracting, I thought, at that small scale.
That was my view too. I'm a fan of 'scale effect' making my models look like the real thing as seen from 64 times further away. I though a sharp eyed person would see that the bottom was textured and multi-hued, but individual nails in specific patterns? Nah.
I also have no problem with departing from the plans and modifying a model for the sake of logical believability and aesthetic rationale. ... It's what the finished product looks like that matters in the end.
Right on. Its my toy and I'll play with it how I like.
I'm finding that here on SoS most people are really tolerant of each other's different styles, skills, opinions. I like that. There are other sites where disagreeing with the experts is just asking for a roasting.
That said, I do like to find out, if I can, what the real things were like, even if I choose not to strive too hard to replicate them. On this kit I'm changing some things to be more accurate and some to be less so. "I am large, I contain multitudes."
Your coppering looks pretty nice, suitably old and funky...
It's actually a self-portrait.


I look forward to these inspiring logs Smithy, awesome mate 

Now I've finished those LED's I can start "puttin' wood int thole" - I've been watching ship builder videos from UK to learn the terminology
You're friend from the colonies.
Cat.

Now I've finished those LED's I can start "puttin' wood int thole" - I've been watching ship builder videos from UK to learn the terminology
You're friend from the colonies.
Cat.
- Joined
- Dec 3, 2022
- Messages
- 1,322
- Points
- 443

Now I've finished those LED's I can start "puttin' wood int thole”
I’ve replied to this at length on your build log.
- Joined
- Dec 3, 2022
- Messages
- 1,322
- Points
- 443

Help Needed on Paint
Does anyone have wise words based on experience of painting wood? I know how to paint plastic (and filler) to a glass like finish but I’m still struggling with getting a decent finish on the wood.
Specifically, I get grain raising and showing through and different woods always seem to leave different textures AND colours.
Clearly I need to be using undercoat and or primer, preferably both in one. Does Stynylrez stick to wood? That was my old favourite on plastic.
What topcoat is best in your experience. I have Tamiya and Vallejo acrylic, very old tins of Humbrol enamel and a range of artist's oil paints available.
I also have acrylic gesso which may work.
I can and will run experiments but you might be able to save me some time as paint experiments will mean hours of drying time.
Last edited:
- Joined
- Aug 14, 2018
- Messages
- 689
- Points
- 403

Hi Smithy.
Which parts of Alert are you thinking of painting and is it 'a glass like finish' that you are seeking? For a really glossy coloured finish on wood you would need a primer with good filling and sanding qualities, for something the size of Alert two coats, sanded between application, of something like Vallejo Acrylic Polyurethane primer works fine. When fully cured it is easily overcoated even with w/s based enamels. I like Tamiya best for top coats. But I have to say that, for something like Alert, I like the painted wood to look like 18th century painted wood, grain, flaws and all. For that reason I would normally use just the finish coat without primer.
Just my point of view.
All the best JJ..
- Joined
- Dec 3, 2022
- Messages
- 1,322
- Points
- 443

Thanks Allan.Non waterbased sealer is probably best
My experiments already confirm the danger of water based primers used without a sealing layer. My test strips of pear wood bowed, cupped and warped alarmingly. I’m curious to know whether they will straighten on drying. I don’t expect them to.
Water based paints on bare wood also caused distortions while oil based paint soaked right through to the reverse side. That’s where glue would be on a model so that’s definitely a bad idea.
I’v prepared other test strips with two coats of shellac and am waiting for that to dry before proceeding.
I don’t expect to discover anything unexpected. (But then, who does?) I’m having fun just confirming which paints and methods I should avoid. It’s slow mindless work, just right on a day when I’m feeling slow and mindless.
I’ve had a couple of insomniac nights and a week of total immersion in our hobby so something like paint trials is enough for today.
I currently predict that I’ll settle on a method using shellac as sealer, then acrylic primer as combination primer and undercoat, with acrylic paint as topcoat (probably Vallejo but possibly Tamiya).
- Joined
- Dec 3, 2022
- Messages
- 1,322
- Points
- 443

But I have to say that, for something like Alert, I like the painted wood to look like 18th century painted wood, grain, flaws and all. For that reason I would normally use just the finish coat without primer.
Thank you JJ. I did that but had issues with grain raising. I’m only painting small fiddly bits like the bitts and sanding between coats is a bit of a pain.
I agree with you about letting some grain show through though and a matt finish is definitely the thing for the eighteenth century.
Acrylics also suit the dogs sensitive nose and short drying time is useful.
- Joined
- Dec 3, 2022
- Messages
- 1,322
- Points
- 443

Paint Exploration - A Rather Boring Digression
(which may be skipped with little effect on the story)
(which may be skipped with little effect on the story)
Well, with help from @Jack Jäger and @AllanKP69; plus some online research and a battery of physical tests of the things I have on hand, I now have a painting process that suits me. There were no big surprises, in fact no radical changes to my painting methods on plastic. However, before today I was trying out different ideas in a random sort of way and confusing myself rather than learning anything. A day's systematic trial has put my mind at ease about the best way for me to paint on wood. That's not to say I won't do it differently and better later on but for now I'm content.
It was quite fun to experiment. I always enjoyed high school science.
I drew a grid to organise my variables. The first one was whether to seal the wood first or not so half of my tests were done on smooth bare wood and half on pear wood treated with a coat of sanding sealer and a coat of shellac. I let this dry well and rubbed each layer down with 0000 wire wool.
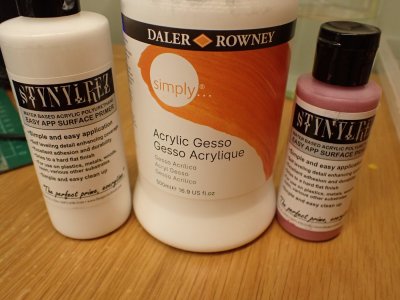
Then I tested four undercoat/primers. StyNylRez acrylic polyurethane surface primer, "for use on plastics, metals, woods, resin, various other substrates". This was my go-to primer on plastic models, usually sprayed on, but also brushable. I have a variety of colours to suit the final finish and tried white and pink. Acrylic gesso which is a similar substance but with ground marble (probably artificial nowadays) mixed in for gap filling - it's used by painters to prepare canvas and wood panels for use. and the fouth possibility was 'No Primer'.
Two sealer conditions times four primers equals eight lines of inquiry.
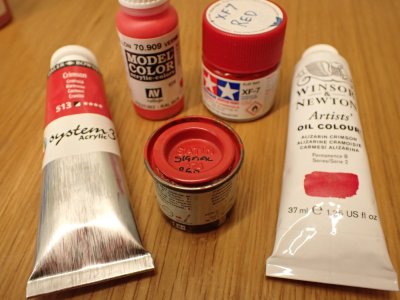
I have five paint ranges on hand and tested them all. Vallejo and Tamiya acrylic model paint - on plastic I'd always detail paint with a brush using Vallejo and airbrush Tamiya. The artist's oils I only ever used on figure models and for weathering. I didn't expect them to be useful but since I had them, they were tried. System 3 Acrylic is tube paint for artists. It's a cheap one, bought in a sale on impulse and not very good but since I had them... Finally Humbrol enamel which I've already used on this build. I've also used Vallejo. I didn't prime either and I'm not certain that I sealed the wood. Neither gave great results when used carelessly.
Two sealer conditions X four primers X five paints = 40 lines of inquiry.
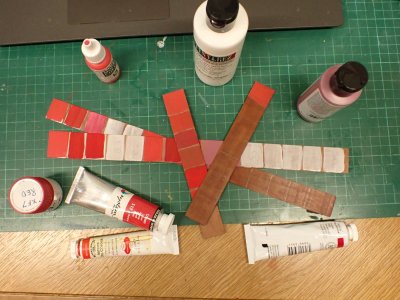
Applying anything to bare wood was problematic.
All of the primers being water based, raised grain and when the fluff was sanded off there were holes in the coverage. The water on one side of the wood caused cupping, warping and bowing to the unsecured wood but this mostly straightened out later.
It was obvious that gesso is too thick for this use. I've used it as a filler on first plankings but it was hard to sand smooth. I'd forgotten that. It's got ground rock in it so as a filler and as a primer, it's no good.
Painting on bare wood, no sealer, no primer wasn't much use either. Oils soaked right through my 2mm pearwood, or at least the oil did. That would make drying time very long but more seriously, do I want linseed oil soaking through my planks and attacking the glued joints below? No thanks. Enamel and all the acrylics caused temporary cupping and the colours were dull and drab.
Shellac.
I've been reading about this remarkable old material. Have a look on Wikipedia, it's fascinating. Though it's organic, it's also a thermoplastic substance. It's plastic! That's the stuff I'm so familiar with painting onto. A good sign.
It goes off in the bottle if you keep it for too long. The dry flakes last forever but once its dissolved in alcohol the clock is ticking. My sanding sealer has gone like sour milk because it's life-expired. Who knew? Not I? I'll buy some fresh tomorrow. Or send away for flakes.
The first coat should be thinned. I knew that last year but I had forgotten.
It's beautiful, smells reasonably nice, dries fast and is a wood finish in it's own right. It comes in many different shades depending on the tree that the beetles were feeding on.
The worst thing about it is that it makes the wood look so nice it's heartbreaking to cover it with paint.
Back to the Trials
Both colours of StyNylRez painted onto the shellac without a problem. There were two fish-eye patterns in one place. This is caused by the incorporation of microscopic particles of wax from the Lac beetles that get harvested with the lac flakes. It made no difference to the final paint finish but if you buy flaked shellac try to get a de-waxed product. I had abandoned the gesso by now so that was five tests less to do.
Generally, painting over shellac with no primer produced dull colours but no distortion of the wood. They may even be historically accurate colours but dull is just dull!
Pink Stylnyrez was just as bad with the five reds. However, different undercoat colours are sometimes surprisingly effective. Yellow paint is much easier to paint over pink primer and produces a much better finish. Painting yellow is usually quite tricky without this.
White StyNylRez over shellac made a smooth and receptive ground for the red paints. And here are the verdicts on the paints
The oils were found guilty of stinking the place out and bothering the dog's nose. They were also guilty of taking too long to dry and being a swine to clean up after.
The artists acrylic was guilty of not having enough pigment. Brushing it was nasty leaving brushstrokes everywhere even after two coats.
Humbrol Enamel was a co-defendent of the oils and was also sentenced to the storeroom for being stinky.
Two coats of Vallejo (and acrylics always need two thin coats) was cleared of all charges and declared the go-to paint of my modelling future.
There was a surprise verdict on the Tamiya acrylic paint. On plastic, it's always been a swine to paint with a brush because it dries so fast due to high alcohol content but here, it brushed 90% as well as the Vallejo. If ever I need to airbrush wood, I'll reach for the Tamiya and if I'm short of a colour in the Vallejo range, Tamiya will step in as a replacement.
SO, what I learned today was to turn my wood into plastic with shellac and then paint it exactly like I did on the last 200 plastic kits. Stynylrez first then Vallejo on a brush or Tamiya in an airbrush. Good to know and fun to find out.
~~~~~~~~~~~~~~~~~~~~~~~~~~~~~~~~~~
p.s. I'm sorry about this update. I think it's the most boring thing I've written since Third Year Chemistry homework.
Last edited:
- Joined
- Aug 14, 2018
- Messages
- 689
- Points
- 403

You are a man of unfathomable industry SmithyPaint Exploration - A Digression
Well, with help from @Jack Jäger and @AllanKP69; some online research and a battery of tests of the things I have on hand I now have a painting process that suits me. There were no big surprises, in fact no radical changes to my painting methods on plastic. However, before today I was trying out different ideas in a random sort of way and confusing myself rather than learning anything. A day's systematic trial has put my mind at ease about the best way for me to paint on wood. That's not to say I won't do it differently and better later on but for now I'm content.
It was quite fun to experiment. I always enjoyed high school science.
I drew a grid to organise my variables. The first one was whether to seal the wood first or not so half of my tests were done on smooth bare wood and half on pear wood treated with a coat of sanding sealer and a coat of shellac. I let this dry well and rubbed each layer down with 0000 wire wool.
View attachment 477400
Then I tested four undercoat/primers. StyNylRez acrylic polyurethane surface primer, "for use on plastics, metals, woods, resin, various other substrates". This was my go-to primer on plastic models, usually sprayed on, but also brushable. I have a variety of colours to suit the final finish and tried white and pink. Acrylic gesso which is a similar substance but with ground marble (probably artificial nowadays) mixed in for gap filling - it's used by painters to prepare canvas and wood panels for use. and the fouth possibility was 'No Primer'.
Two sealer conditions times four primers equals eight lines of inquiry.
View attachment 477401
I have five paint ranges on hand and tested them all. Vallejo and Tamiya acrylic model paint - on plastic I'd always detail paint with a brush using Vallejo and airbrush Tamiya. The artist's oils I only ever used on figure models and for weathering. I didn't expect them to be useful but since I had them, they were tried. System 3 Acrylic is tube paint for artists. It's a cheap one, bought in a sale on impulse and not very good but since I had them... Finally Humbrol enamel which I've already used on this build. I've also used Vallejo. I didn't prime either and I'm not certain that I sealed the wood. Neither gave great results when used carelessly.
Two sealer conditions X four primers X five paints = 40 lines of inquiry.
View attachment 477405
Applying anything to bare wood was problematic.
All of the primers being water based, raised grain and when the fluff was sanded off there were holes in the coverage. The water on one side of the wood caused cupping, warping and bowing to the unsecured wood but this mostly straightened out later.
It was obvious that gesso is too thick for this use. I've used it as a filler on first plankings but it was hard to sand smooth. I'd forgotten that. It's got ground rock in it so as a filler and as a primer, it's no good.
Painting on bare wood, no sealer, no primer wasn't much use either. Oils soaked right through my 2mm pearwood, or at least the oil did. That would make drying time very long but more seriously, do I want linseed oil soaking through my planks and attacking the glued joints below? No thanks. Enamel and all the acrylics caused temporary cupping and the colours were dull and drab.
Shellac.
I've been reading about this remarkable old material. Have a look on Wikipedia, it's fascinating. Though it's organic, it's also a thermoplastic substance. It's plastic! That's the stuff I'm so familiar with painting onto. A good sign.
It goes off in the bottle if you keep it for too long. The dry flakes last forever but once its dissolved in alcohol the clock is ticking. My sanding sealer has gone like sour milk because it's life-expired. Who knew? Not I? I'll buy some fresh tomorrow. Or send away for flakes.
The first coat should be thinned. I knew that last year but I had forgotten.
It's beautiful, smells reasonably nice, dries fast and is a wood finish in it's own right. It comes in many different shades depending on the tree that the beetles were feeding on.
The worst thing about it is that it makes the wood look so nice it's heartbreaking to cover it with paint.
Back to the Trials
Both colours of StyNylRez painted onto the shellac without a problem. There were two fish-eye patterns in one place. This is caused by the incorporation of microscopic particles of wax from the Lac beetles that get harvested with the lac flakes. It made no difference to the final paint finish but if you buy flaked shellac try to get a de-waxed product. I had abandoned the gesso by now so that was five tests less to do.
Generally, painting over shellac with no primer produced dull colours but no distortion of the wood. They may even be historically accurate colours but dull is just dull!
Pink Stylnyrez was just as bad with the five reds. However, different undercoat colours are sometimes surprisingly effective. Yellow paint is much easier to paint over pink primer and produces a much better finish. Painting yellow is usually quite tricky without this.
White StyNylRez over shellac made a smooth and receptive ground for the red paints. And here are the verdicts on the paints
The oils were found guilty of stinking the place out and bothering the dog's nose. They were also guilty of taking too long to dry and being a swine to clean up after.
The artists acrylic was guilty of not having enough pigment. Brushing it was nasty leaving brushstrokes everywhere even after two coats.
Humbrol Enamel was a co-defendent of the oils and was also sentenced to the storeroom for being stinky.
Two coats of Vallejo (and acrylics always need two thin coats) was cleared of all charges and declared the go-to paint of my modelling future.
There was a surprise verdict on the Tamiya acrylic paint. On plastic, it's always been a swine to paint with a brush because it dries so fast due to high alcohol content but here, it brushed 90% as well as the Vallejo. If ever I need to airbrush wood, I'll reach for the Tamiya and if I'm short of a colour in the Vallejo range, Tamiya will step in as a replacement.
SO, what I learned today was to turn my wood into plastic with shellac and then paint it exactly like I did on the last 200 plastic kits. Stynylrez first then Vallejo on a brush or Tamiya in an airbrush. Good to know and fun to find out.
~~~~~~~~~~~~~~~~~~~~~~~~~~~~~~~~~~
p.s. I'm sorry about this update. I think it's the most boring thing I've written since Third Year Chemistry homework.
 JJ..
JJ..- Joined
- Dec 3, 2022
- Messages
- 1,322
- Points
- 443

Hi Smithy.
Which parts of Alert are you thinking of painting and is it 'a glass like finish' that you are seeking? For a really glossy coloured finish on wood you would need a primer with good filling and sanding qualities, for something the size of Alert two coats, sanded between application, of something like Vallejo Acrylic Polyurethane primer works fine. When fully cured it is easily overcoated even with w/s based enamels. I like Tamiya best for top coats. But I have to say that, for something like Alert, I like the painted wood to look like 18th century painted wood, grain, flaws and all. For that reason I would normally use just the finish coat without primer.
Just my point of view.
All the best JJ..
After due deliberation it seems that I agree with you almost entirely except that I will always seal the wood even if trying for dull 18th century authenticity, and that I can use up my Vallejo paint as well as my Tamiya stocks.
- Joined
- Dec 3, 2022
- Messages
- 1,322
- Points
- 443

You are a man of unfathomable industry SmithyJJ..
If you mean you can't fathom out why I do these things, I agree with you on that too.
- Joined
- Dec 3, 2022
- Messages
- 1,322
- Points
- 443

A Little More On The Bitts and Pieces
"Who you callin' a little moron? Oh, right, sorry."
I nearly forgot to mention last night's actual work on the boat.
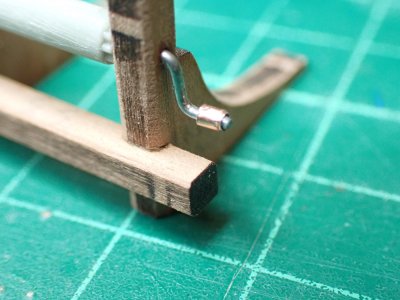
I made nice wooden (when painted) hand grips for the jeer windlass.
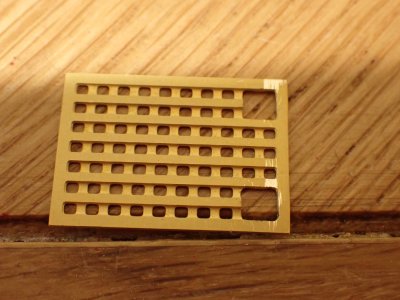
I made the main hatch, including cutting holesi n the brass for the cables to disappear into the depths of the cable flats. Instead of this, the kit has two holes in the deck! That's craaaazy, the rain would get in. I guess the brass was ordered without the holes and the designer had to improvise.

Unfortunately, those two holes in the deck were just about the only ones I failed to plank over completely. I thought they were where the pumps would go so I carved out a little hole so I wouldn't lose the place. Fortunately, by edging the hatch and the jeer assembly forward just a little, I can cover up the holes. Now, where shall I put those pumps?
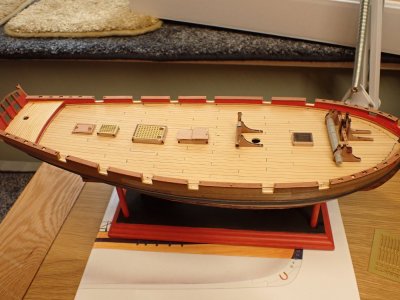
That's all the centreline sub-assemblies assembled. There's a load of other little things to attach to the hull next, and some painting of parts, and then I'll glue in and rig a dozen guns. With the centerline sub-assemblies safely parked out of the way, the guns will be quite accessible, I hope and trust.
Last edited:


