HM Armed Cutter Alert (1777) - Vanguard Models - 1/64

.s. I'm sorry about this update. I think it's the most boring thing I've written since Third Year Chemistry homework.
Are you kidding me ? ;)
You got me getting up at 6:00 a.m. to come and get to read your posts, the stories and the experiences before I go on my morning walk :p
Brilliant mate, I got no idea what you're talking about but it's bloody educational and you even gave advice on airbrushing paint which was something I was considering for my build in places. I have airbrushed black/white portraits before but that's an entirely different medium.
Keep them coming Smithy mate, warts and all. Okay

TSC
 
I think I said above that the last week here on SoS has been like New Years Eve? Well, you know what happens if you party every day!

I’ve been goggling at my laptop and phone so much and writing so often that it’s disturbing my sleep (insomnia and nightmares) and nibbling away at the time I need to be spending on Buddy, exercise, on reading, modelling household chores, on my life in general during the day.

The building of Alert is changing from a relaxing pastime to something of a rush with self imposed deadlines and an urgent need to find something to write about something to do. It’s turning into a full time job of work! (Pardon my use of the w-word.)

I retired early because of pressure of work. I burned out in fact. I can’t retire from retirement so I’m going to limit my time here.

I’ll try the period between sitting down for tea at five to Buddy wanting to go out at seven thirty. I can read your posts while I eat and then reply and write an update, if anything’s happened, while the pots and pans are soaking in the hot water.

I thought I’d let you know in advance. I’m OK, and I want to stay that way. It’s curious, I’ve seen lots of news articles about the psychological effects of social networking - now I understand!
 
Deck Improvement


PA160005.JPG


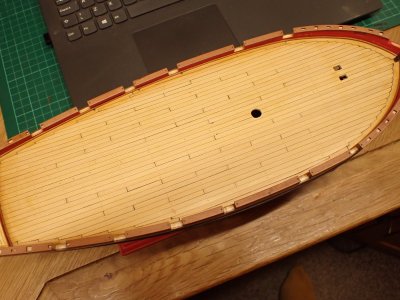
Guns, bitts, companionways, hatches - there's a mounting list of things that will impede access to the deck itself in the coming weeks. It's important that I'm completely happy with that deck before I stick anything down. Today then, I made a tiny improvement, I think. Bearing in mind that it's not quite finished yet, can you see the difference?

That's right, it now has treenails. Actually, many more than three! :D

PA160004.JPG

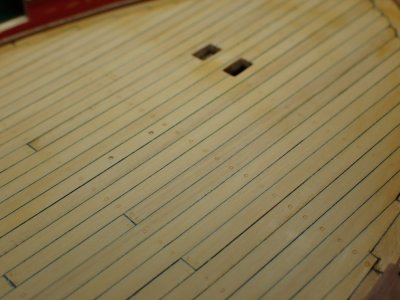
Here's a close up.

Whether or not to make treenails on a 1/64 model is a matter of taste, in my view. There's a strong argument against in the fact that they are more or less invisible close up and from 128 feet away (scaled up from looking at my model from two feet off) totally invisible. Yet am I to be enslaved by the evil mistress Accuracy?

I'd rather be seduced by Accuracy's nicer twin, Beauty. I decided that my deck would be slightly more beautiful, or at least would appeal to Beauty's second cousin Interest if I had a bash at suggesting deck beams and other underlying structure. And that's my reason for simulating the treenails that held the deck planks down. I'm an old engineer as well as an old romantic. ;)

PA160003.JPG

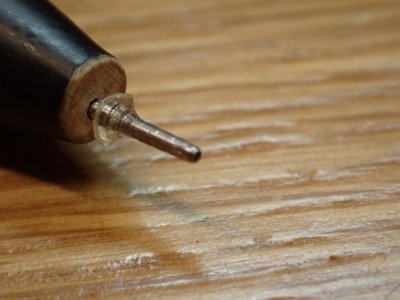
I made a tool by fitting a paintbrush handle to an old hypodermic needle I found in the park. No' not really. It's a blunt ended hollow needle for applying glue with a syringe. I sharpened it on fine wet and dry paper so that it would act as a cookie cutter. In use I press it onto the shellac'ed deck and move the handle in a circle which cuts through the varnish and impresses a circle on the planks. The needle isn't glued into the handle because over time it fills up with debris that needs to be cleared by pushing a fine wire through it.

PA160002.JPG

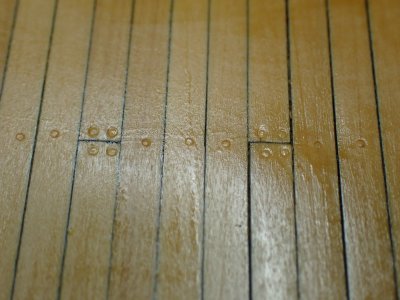
Then, to develop the effect into visibility, I applied a thinned coat of Button Polish (dark shellac) This either penetrates the cracked layer underneath or just fills in the circle, I can't tell without a microscope.

The final step, which is not yet completed is to rub away the rest of the dark shellac with 0000 wire/steel wool. I put too much button polish on so it's a long job.

The deck is slightly more yellow at the moment but since it wasn't oak planking but the cheap softwood, Deal, I don't think that's a problem. It might be a little darker at the edges and in places across the deck but again, I think a pristine white surface is inappropriate here. If they had holystoned it, they would have been through to the hold in a month!

~~~~~~~~~~~~~~~~~~~~~~~~

I did one more thing today which will move matters along - I sorted out the mess in my Alert's cardboard box. It was full of scraps of wood, various paints, empty frets (never make empty frets, my Dad used to say), unread notes, copper plates etc etc etc . Now it only contains the things I actually need. It was a pleasure to tidy that lot up and find out how little wood there is yet to use. It was a caution to find packet after packet of blocks and deadeyes and rather a lot of string...
 
Last edited:
Deck Improvement


View attachment 477739


Guns, bitts, companionways, hatches - there's a mounting list of things that will impede access to the deck itself in the coming weeks. It's important that I'm completely happy with that deck before I stick anything down. Today then, I made a tiny improvement, I think. Bearing in mind that it's not quite finished yet, can you see the difference?

That's right, it now has treenails. Actually, many more than three! :D

View attachment 477738

Here's a close up.

Whether or not to make treenails on a 1/64 model is a matter of taste, in my view. There's a strong argument against in the fact that they are more or less invisible close up and from 128 feet away (scaled up from looking at my model from two feet off) totally invisible. Yet am I to be enslaved by the evil mistress Accuracy?

I'd rather be seduced by Accuracy's nicer twin, Beauty. I decided that my deck would be slightly more beautiful, or at least would appeal to Beauty's second cousin Interest if I had a bash at suggesting deck beams and other underlying structure. And that's my reason for simulating the treenails that held the deck planks down. I'm an old engineer as well as an old romantic. ;)

View attachment 477737

I made a tool by fitting a paintbrush handle to an old hypodermic needle I found in the park. No' not really. It's a blunt ended hollow needle for applying glue with a syringe. I sharpened it on fine wet and dry paper so that it would act as a cookie cutter. In use I press it onto the shellac'ed deck and move the handle in a circle which cuts through the varnish and impresses a circle on the planks. The needle isn't glued into the handle because over time it fills up with debris that needs to be cleared by pushing a fine wire through it.

View attachment 477736

Then, to develop the effect into visibility, I applied a thinned coat of Button Polish (dark shellac) This either penetrates the cracked layer underneath or just fills in the circle, I can't tell without a microscope.

The final step, which is not yet completed is to rub away the rest of the dark shellac with 0000 wire/steel wool. I put too much button polish on so it's a long job.

The deck is slightly more yellow at the moment but since it wasn't oak planking but the cheap softwood, Deal, I don't think that's a problem. It might be a little darker at the edges and in places across the deck but again, I think a pristine white surface is inappropriate here. If they had holystoned it, they would have been through to the hold in a month!

~~~~~~~~~~~~~~~~~~~~~~~~

I did one more thing today which will move matters along - I sorted out the mess in my Alert's cardboard box. It was full of scraps of wood, various paints, empty frets (never make empty frets, my Dad used to say), unread notes, copper plates etc etc etc . Now it only contains the things I actually need. It was a pleasure to tidy that lot up and find out how little wood there is yet to use. It was a caution to find packet after packet of blocks and deadeyes and rather a lot of string...
I used a fine tip nail or brad set on my Flying Cloud deck. I like yours better.
 
In use I press it onto the shellac'ed deck and move the handle in a circle which cuts through the varnish and impresses a circle on the planks.
I love the subtle appearance and small size you achieved using this method rather than the dark oversized trennals we often see. In reality the fastenings were down into the plank and then covered with round or diamond shaped cover pieces so they are very subtle as are yours which look great!
Allan
 
Last edited:
Smithy, would you please post a little about this or copy what you have onto the thread "Tricks of the Trade" here at SoS. I think others would be interested in this if they do not see it here in your log.
Thanks
Allan

 
Shows how polite people are on this site Smithy Cheers JJ..

Yes, I was afraid of that. 'Politeness' is all too often borderline lying, the classic case being "Of course you don't look fat in those trousers, dear." ;)

I think honest feedback is invaluable in our hobby. In my view, it's not helpful to let a person persist in a mistake when we can easily help them to correct it. If worried about embarrassing them, we can always send a direct message.
 
Smithy, would you please post a little about this or copy what you have onto the thread "Tricks of the Trade" here at SoS. I think others would be interested in this if they do not see it here in your log.
Thanks
Allan


Since I asked if there was a section of the website for tech tips, and you made your thread, I found this:

Modelshipyard: Building Your Model

There are sub sections down there for tools, techniques, rigging, masting paints etc where we can post our tips with appropriate titles making them easier to find.
 
Back
Top