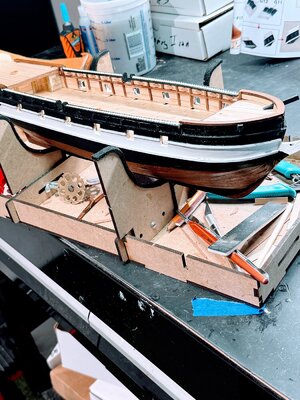
HMS Beagle by Occre - My First Build [COMPLETED BUILD]

Joined
Oct 30, 2023
Messages
181
Points
103

Location
Baton Rouge, LA
Hey guys, I wanted to share and document my journey through my first build. After countless videos, messages, posts, articles, I purchased my first kit from OcCre and have now started. I am buying tools, etc. along the way and will comment on those as well.

I appreciate any and all feedback.....just be kind, please.

IMG_6782.JPG

The unboxing....I like OcCre, everything appears to be there, seems like quality material....exciting times

IMG_6781.JPG
Number all parts, etc. and we're off!!!!

IMG_6784.JPG


Skeleton assembled....

IMG_6794.JPG

Forgot to take pictures of the deck planking process...but here is afterwards

IMG_6793.JPG

Added braces underneath......
 
Let me just say that planking has been a struggle for me. This project is a double plank hull which I did not know when I bought it but now I think was a very wise choice for me. The first planking if felt was a struggle and many mistakes were made and probably too much wood filler had to be used....


IMG_6806.jpg

I watched probably 5 videos on how to plank and saw 8 different ways.....I used a soldering iron for bending and I would say I have gotten much better at bending after this first build. Definitely a learning curve....

IMG_6807.jpg
I can't say with experience, but I felt like the Beagle is a tough ship to plank because the hull definitely has some curves to it. I decided to do hull without nails because I didn't want to deal with them in sanding process....not sure if I should have.... Anyway, first layer went on, I really underestimated the effect of tapering and the importance of planning out my planks.....I need more experience and advice in planking....
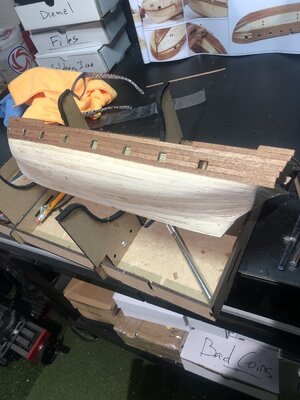
IMG_6821.jpg
After alot of sanding, wood filling, and more sanding, the 2nd level of planking went on. Planks are super thin, and I had to be very careful with glue but I felt I did a much better job on this outer planking. It was much easier to cut the planks and I did not try to force so many full length strips. I felt I made a mistake in the first planking of trying to curve too many long pieces and force it....I should have cut some strips short and fill in with pieces....I hope that makes sense....anyway we march on.

IMG_6822.jpg
Much happier with my 2nd planking. Another lesson learned....patience....do not try to finish something when you are tired or not really into it. Walk away and come back later......
IMG_6823.jpg
Some tricky spots on this mode. You experienced guys may laugh, but the stern was terrifying.....alot of sanding and it may not be pretty, but I got the basic form right. Again, very happy this was a 2 planking hull.

I did not take a lot of photos of planking process, it was just so hard for me and time consuming that taking photos was not on my mind. I will try to take more photos as i go.
 
Looking good! You’re just ahead of me on my build… just finished the first layer planking & working on the sanding/filling. I did use nails on mine… it’s not difficult at all to remove them with a pair of side nippers as long as you don’t really “drive them home”. Even if you do have to dig for a few, you can easily fill & sand over the holes.
 
You're off to a good start. If you get second planking right it will be no problem
I watched probably 5 videos on how to plank and saw 8 different ways.....I used a soldering iron for bending and I would say I have gotten much better at bending after this first build. Definitely a learning curve....

When I started my first ever planking I wached a lot of videos and tutorials turns out you only need to soak the plank in warm/little hot water and bend it with soldering iron. Tricky part goes on fitting planks, but it seems you already know that

John has a lot of "making off" videos from occre kits. Mabey they would be helpful. He made both Montanes and Beagle
 
My first build was the OcCre Albatros. So glad I chose OcCre for my first build. Customer service is great and there are lots of videos out there to help. Same as you, my Albatros was a great learning experience. Planking, glueing, bending, nails or no nails, definitely cut my teeth on that ship. After following these forums and learning from all the experienced builders here I can look back on Albatros and see all the things I learned on (i.e. mistakes I made). A pretty rough build but learned so much. And loved buying tools along the way! Good luck with your Beagle.
 
Chuck Pisarro did a fabulous little group of videos on YouTube on how to plank. Worth a look.
 
I know this is off topic, but the ref. to YT set me off! YouTube are now trying to 'blackmail' us into paying £12-99/mth to watch adfree, otherwise if you use 'adblocker', they let you watch 3, then block you. My argument is that if one has no intention to buy ANYTHING advertised, what odds is it to them? I, for one, will NOT have ads shoved down my throat. I refuse to watch ads on TV, so I record the programmes & skip the ads.
Microsoft blocked my PC last week, by not allowing it to connect to the internet, nor could I switch it off. I had to take to a repair shop to have Windows 11 installed. Microsoft didn't make any sort of help by loading an upgrade page.:mad:
 
I'm also on my first ship, the Occre La Candelaria. Just finishing up sanding & fairing the hull/bulwarks. I agree with your advice that if your not feeling it walk away & come back later. Looking really good & will watch your build with interest.
 
You picked a very ambitious first model for introduction. It's looking great. After I finish my San Juan I will be building the Beagle. I hope it looks as good as yours.
 
You picked a very ambitious first model for introduction. It's looking great. After I finish my San Juan I will be building the Beagle. I hope it looks as good as yours.
You may be right....I struggled on hull planking buy muddle my way through it....starting the paint and am a little anxious about the rigging....but we will see.
 
Update after the weekend....making progress....looks ugly right now, hoping it will come together.
IMG_6834.jpg
Finished the outer planking. The strips used are so thin, bending was easy, but I found out that gluing was tough due to the fact that it was so easy for the glue to soak through the planks. I definitely have to work on my planking skills. I also had time to start adding the rub rails.IMG_6835.jpg
I know there is probably a lot more filler having to be used than you guys...but this is my first model and I am resigned to the fact that this model will be considered my practice model and I am not giving up....it will be what it will be.
IMG_6836.jpg
Gentlemen, do not laugh or scold me....lol. This is a build log that will show the good, the bad, and the ugly. Damn, tapering planks is just mind blowing to me at this point. I definitely went beyond my stamina and worked a couple more hours than I should have. I will do my best to salvage this .... I am just so sick of planking at this point.
IMG_6837.jpg
By the way, the dark spot is where I tested the sealer that I plan on using. The wood is very pretty and I plan on using a satin finish on it. Also, this model is a partially painted hull, so hopefully a lot of my mistakes will be painted over......
IMG_6838.jpg
OK, so that's if for a few days.....I actually liked doing the rub rail work after the mind numbing days of planking. My plan is to clean up, sand, fill, paint the hull over the next couple of days.......
 
Good work ... as they say every day is a school day and the more you do the more confident you will get. Keep up the good work and welcome on board.
 
Progress report....several coats of paint and satin sealer. Also started working on some deck stuff and making the gun port shutters.....
IMG_6864.JPG
IMG_6865.JPG
will definitely need to repaint and do a lot of cleanup work.....
IMG_6866.jpg
Did not realize dust and handling the boat would cause so much damage to paint...I think I will complete as much work as I can and as a last step will repaint and touch up everything I can.....is this normal procedure for you guys?
IMG_6873.JPG
Began making the gun port covers....
IMG_6874.JPG
very tedious work....but somehow fulfilling and calming....enjoyed it but glad to move on.....
IMG_6875.JPG
Struggled getting the rudder intalled...not my best work, I felt the glueing was real messy....definitely a learning experience.
 
Progress report....several coats of paint and satin sealer. Also started working on some deck stuff and making the gun port shutters.....
View attachment 411872
View attachment 411873
will definitely need to repaint and do a lot of cleanup work.....
View attachment 411874
Did not realize dust and handling the boat would cause so much damage to paint...I think I will complete as much work as I can and as a last step will repaint and touch up everything I can.....is this normal procedure for you guys?
View attachment 411875
Began making the gun port covers....
View attachment 411876
very tedious work....but somehow fulfilling and calming....enjoyed it but glad to move on.....
View attachment 411877
Struggled getting the rudder intalled...not my best work, I felt the glueing was real messy....definitely a learning experience.
Progressing well .. ideal for the cold dark nights. I certainly found the need to tidy up paintwork but mainly where metal components painted, less so with wooden parts of the build. With regard to the rudder on my Occre Endeavour, I used a couple of shorts lengths of metal rod (paper clip would do as alternate) and drilled into the rudder and edge of the keel to add stability. Once painted black, hardly noticeable and stops the rudder being inadvertently knocked off.
 
Progressing well .. ideal for the cold dark nights. I certainly found the need to tidy up paintwork but mainly where metal components painted, less so with wooden parts of the build. With regard to the rudder on my Occre Endeavour, I used a couple of shorts lengths of metal rod (paper clip would do as alternate) and drilled into the rudder and edge of the keel to add stability. Once painted black, hardly noticeable and stops the rudder being inadvertently knocked off.
great idea for the rudder...thanks
 
Back
Top