• Ships of Scale has incorportated an extra level of security when you log In. Please follow on-screen prompts to acknowledge that you are not a robot via a "Check Box" or a "Pictorial Check Box Puzzle". This is needed due to higher level of AI Activity Security.
  • SUBSCRIBE TO SHIPS IN SCALE TODAY!

    The beloved Ships in Scale Magazine is back and charting a new course for 2026!
    Discover new skills, new techniques, and new inspirations in every issue.

    NOTE THAT OUR NEXT ISSUE WILL BE July/August 2026
  • Win a Free Custom Engraved Brass Coin!!!
    As a way to introduce our brass coins to the community, we will raffle off a free coin during the month of August. Follow link ABOVE for instructions for entering.

HMS Royal William by CharlesEdward – Euromodel - 1/72 -

Joined
Aug 11, 2026
Messages
123
Points
78

Location
Townsend MT
Launched in 1719 at Portsmouth. In 1782 Royal William took part in the navy operations which led to Gibraltar’s liberation. Also in that same year, the ship was involved in the salvage attempt of Royal George, which overturned in Spithead causing the death of 900 persons. In the end it was assigned as anchor-watch at Portsmouth, until 1813 , then demolished. Its survival for almost a century compares strongly with the typical six-year life span of so many other ships.

Overall Specifications:
BUILDING PLANS REF. 66/006 - CONSTRUCTION KIT REF. 99/006
MAXIMUM LENGTH 1140 mm.
HULL LENGTH 910 mm.
MAXIMUM WIDTH 510 mm.
HULL WIDTH 160 mm.
MAXIMUM HEIGTH 950 mm.
GUNS 104
SCALE 1:72
NO. PLAN SHEETS 17

I purchased this kit from Euromodel Como online for just around $2,000.00 or so back in 2010. This will be by far the most difficult model to build, as there are no conventional English printed assembly instructions included in the kit, only the 17 plan sheets with instruction in Italian. There are several pieces that are NOT INCLUDED in the kit and three require being built from scratch; the curved staircase or ladder to the quarter deck, both port and starboard versions, the stove with a chimney stack showing above the main deck, and two bow supports at the prow, both starboard and port versions. Although the plans do include detail drawings of the stove, curved staircase, (and bow support with dimensions of these parts. The kit doesn’t include wood stock for the staircase and stove, it does however include a large block of wood with a width, height and length of 2” x 3” x 8” to fashion the bow supports from. The curved staircases can be substituted with either a standard ladder or a “L” shaped ladder and still be historically accurate, as the Royal William underwent several refurbishing during its life and detailed records of exact changes are rare to come by.

There is a set of PDF English instructions by MSW member piratepete007, created while actually building the model kit using the Italian instructions as reference with help and support from the following members; Ken3335, Keith W, Denis R, Vince P, Pirrozzi and Bill Kent. My sincere thanks to them and other MSW members who gave advice and permission to use some of their photos. I have perused all of them and they will be MOST helpful during the FUTURE assembly, thank you MSW member piratepete007 et al.

There are 17 PDF documents of which the first one I already had a copy from several years ago. The remaining list includes the following files:

02 Hull and Main Deck Prep 03 First Planking 04 Main and Foc’sle Decks, Armament 05 First Planking Above the Main Deck 06 Upper Decks 07 Stern 08 Wales, Ornamentation and Bow 09 Hull Fittings

10 Ships Boat 11 Mast Construction 12 Yard Construction 13 Shrouds and Stays 14 Bowsprit Rigging 15 Foremast Rigging 16 Main Mast Rigging 17 Mizzen Mast Riggin

After I had checked if all available parts were included in the kit, I construction some of the hull up to the first battery deck, just to see how it looked.

The first two photos are of the current state of the model, showing the Starboard and Port hull. The First and Second battery decks are installed and according to the plan sheets, I will have to install all completed guns and carriages for the 1st and 2nd Batteries, even though you will ony see the protruding gun barrels. The scratch built stove will also be installed on its proper deck, completly hidden except for the protruding chimney onto the main deck.

100_1232.thumb.JPG.b33a60ef2342353a9581851e3f1d6022.JPG


I decided NOT to plank those lower gundecks as they won't be visible anyway.

100_1233.thumb.JPG.370b3fd909e8ecb2ac9ba9a228006088.JPG


Moving the camera along the Port side you will see closeups of the Port Bow, Midships, and stern.

100_1234.thumb.JPG.40d75755c539ae96f76a6a64044cf69d.JPG


100_1235.thumb.JPG.9a33bedea5e0e76a484e01ce7f25513e.JPG


100_1236.thumb.JPG.d2b393536131de811bff0286a6955baa.JPG


This hull so far is very solidly built due to the numerous strengthing pieces required by the plans to install, and consequenly relatively heavy compared to a lot of models. The following two photos show those strength pieces installed on both port and starboard sides.

100_1237.thumb.JPG.c41a980ea4709074170d6e887a737015.JPG


100_1238.thumb.JPG.f04f75cc97f64210ac8f733da273abbf.JPG


Each frame required pieces along the false keel and bulkheads to add strength to the hull structure.

100_1239.thumb.JPG.c8282a953c5230b6de96d6932ae964df.JPG


The Starboard side moving the camera forward toward the bow, you see the Starboard stern, midship, and bow area.

100_1240.thumb.JPG.21b718c5cde25e35c8d426ed0cc1b667.JPG


100_1240.thumb.JPG.21b718c5cde25e35c8d426ed0cc1b667.JPG


100_1241.thumb.JPG.b969c2805b19e089e0c108a75ddd2121.JPG


100_1242.thumb.JPG.08669160e0c697ca904f156f365048f7.JPG


The upper bulkhead support frame detail is in the next three photos.

100_1243.thumb.JPG.d21cdcbcf057677e6a8f5d87b25ec69d.JPG


100_1244.thumb.JPG.b41aa6516f5f9cc72b6a5b9e618e9fdd.JPG


The stern section facing forward showing the bulkheads.

100_1248.thumb.JPG.faf1aef3a8573e9be419e2e71775c4e1.JPG


Looking aft toward the stern from about the midship section.

100_1249.thumb.JPG.6744769698f5669175ee5a646dce49be.JPG


Looking at the bow, facing aft.

100_1250.thumb.JPG.b534c129ac2fed71e5e8d960d1fb97c0.JPG


Looking toward the stern, upper deck frame supports.

100_1252.thumb.JPG.83a1126af96dac4487c8b6d0f91d8b07.JPG


More frame views.

100_1251.thumb.JPG.fdb3ac8beece3363befd9c76a36121cb.JPG


A closeup of the bow facing aft.

100_1253.thumb.JPG.c8bb7d5f0bc1741896b8313d6b5051af.JPG


Thanks for showing interest, I would like to thank piratepete007 for the instructions he wrote with other members of this site.
 
Launched in 1719 at Portsmouth. In 1782 Royal William took part in the navy operations which led to Gibraltar’s liberation. Also in that same year, the ship was involved in the salvage attempt of Royal George, which overturned in Spithead causing the death of 900 persons. In the end it was assigned as anchor-watch at Portsmouth, until 1813 , then demolished. Its survival for almost a century compares strongly with the typical six-year life span of so many other ships.

Overall Specifications:
BUILDING PLANS REF. 66/006 - CONSTRUCTION KIT REF. 99/006
MAXIMUM LENGTH 1140 mm.
HULL LENGTH 910 mm.
MAXIMUM WIDTH 510 mm.
HULL WIDTH 160 mm.
MAXIMUM HEIGTH 950 mm.
GUNS 104
SCALE 1:72
NO. PLAN SHEETS 17

I purchased this kit from Euromodel Como online for just around $2,000.00 or so back in 2010. This will be by far the most difficult model to build, as there are no conventional English printed assembly instructions included in the kit, only the 17 plan sheets with instruction in Italian. There are several pieces that are NOT INCLUDED in the kit and three require being built from scratch; the curved staircase or ladder to the quarter deck, both port and starboard versions, the stove with a chimney stack showing above the main deck, and two bow supports at the prow, both starboard and port versions. Although the plans do include detail drawings of the stove, curved staircase, (and bow support with dimensions of these parts. The kit doesn’t include wood stock for the staircase and stove, it does however include a large block of wood with a width, height and length of 2” x 3” x 8” to fashion the bow supports from. The curved staircases can be substituted with either a standard ladder or a “L” shaped ladder and still be historically accurate, as the Royal William underwent several refurbishing during its life and detailed records of exact changes are rare to come by.

There is a set of PDF English instructions by MSW member piratepete007, created while actually building the model kit using the Italian instructions as reference with help and support from the following members; Ken3335, Keith W, Denis R, Vince P, Pirrozzi and Bill Kent. My sincere thanks to them and other MSW members who gave advice and permission to use some of their photos. I have perused all of them and they will be MOST helpful during the FUTURE assembly, thank you MSW member piratepete007 et al.

There are 17 PDF documents of which the first one I already had a copy from several years ago. The remaining list includes the following files:

02 Hull and Main Deck Prep 03 First Planking 04 Main and Foc’sle Decks, Armament 05 First Planking Above the Main Deck 06 Upper Decks 07 Stern 08 Wales, Ornamentation and Bow 09 Hull Fittings

10 Ships Boat 11 Mast Construction 12 Yard Construction 13 Shrouds and Stays 14 Bowsprit Rigging 15 Foremast Rigging 16 Main Mast Rigging 17 Mizzen Mast Riggin

After I had checked if all available parts were included in the kit, I construction some of the hull up to the first battery deck, just to see how it looked.

The first two photos are of the current state of the model, showing the Starboard and Port hull. The First and Second battery decks are installed and according to the plan sheets, I will have to install all completed guns and carriages for the 1st and 2nd Batteries, even though you will ony see the protruding gun barrels. The scratch built stove will also be installed on its proper deck, completly hidden except for the protruding chimney onto the main deck.

100_1232.thumb.JPG.b33a60ef2342353a9581851e3f1d6022.JPG


I decided NOT to plank those lower gundecks as they won't be visible anyway.

100_1233.thumb.JPG.370b3fd909e8ecb2ac9ba9a228006088.JPG


Moving the camera along the Port side you will see closeups of the Port Bow, Midships, and stern.

100_1234.thumb.JPG.40d75755c539ae96f76a6a64044cf69d.JPG


100_1235.thumb.JPG.9a33bedea5e0e76a484e01ce7f25513e.JPG


100_1236.thumb.JPG.d2b393536131de811bff0286a6955baa.JPG


This hull so far is very solidly built due to the numerous strengthing pieces required by the plans to install, and consequenly relatively heavy compared to a lot of models. The following two photos show those strength pieces installed on both port and starboard sides.

100_1237.thumb.JPG.c41a980ea4709074170d6e887a737015.JPG


100_1238.thumb.JPG.f04f75cc97f64210ac8f733da273abbf.JPG


Each frame required pieces along the false keel and bulkheads to add strength to the hull structure.

100_1239.thumb.JPG.c8282a953c5230b6de96d6932ae964df.JPG


The Starboard side moving the camera forward toward the bow, you see the Starboard stern, midship, and bow area.

100_1240.thumb.JPG.21b718c5cde25e35c8d426ed0cc1b667.JPG


100_1240.thumb.JPG.21b718c5cde25e35c8d426ed0cc1b667.JPG


100_1241.thumb.JPG.b969c2805b19e089e0c108a75ddd2121.JPG


100_1242.thumb.JPG.08669160e0c697ca904f156f365048f7.JPG


The upper bulkhead support frame detail is in the next three photos.

100_1243.thumb.JPG.d21cdcbcf057677e6a8f5d87b25ec69d.JPG


100_1244.thumb.JPG.b41aa6516f5f9cc72b6a5b9e618e9fdd.JPG


The stern section facing forward showing the bulkheads.

100_1248.thumb.JPG.faf1aef3a8573e9be419e2e71775c4e1.JPG


Looking aft toward the stern from about the midship section.

100_1249.thumb.JPG.6744769698f5669175ee5a646dce49be.JPG


Looking at the bow, facing aft.

100_1250.thumb.JPG.b534c129ac2fed71e5e8d960d1fb97c0.JPG


Looking toward the stern, upper deck frame supports.

100_1252.thumb.JPG.83a1126af96dac4487c8b6d0f91d8b07.JPG


More frame views.

100_1251.thumb.JPG.fdb3ac8beece3363befd9c76a36121cb.JPG


A closeup of the bow facing aft.

100_1253.thumb.JPG.c8bb7d5f0bc1741896b8313d6b5051af.JPG


Thanks for showing interest, I would like to thank piratepete007 for the instructions he wrote with other members of this site.
Succes with this build. I will follow your progress with great interest
 
The English instructions for this model came from members her on MSW, or the old site. piratepete007 as well as others here contributed in writing those 17 pdf files or I would not even be able to start this project. My sincere thanks and appreciation to all of you members here that developed those English instructions for this Expert / Professional kit and granted permission to use many of the very helpful photographs. I will try not to mess up much, but hey, I am doing the Montanes and Sao Miguel before I start this.
 
I have four of his books in my library, and Royal William is listed in the colored plates 'between the pages', but not a specific chapter for Royal William. I searched on the internet and found an used edition published in 1992, in good condition which list Chapter 4 as The First Rate Royal William. I found it in England, just bought it for under $60.00. Hopefully it might help me a lot.

Thanks Bryian.
 
The English instructions for this model came from members her on MSW, or the old site. piratepete007 as well as others here contributed in writing those 17 pdf files or I would not even be able to start this project. My sincere thanks and appreciation to all of you members here that developed those English instructions for this Expert / Professional kit and granted permission to use many of the very helpful photographs. I will try not to mess up much, but hey, I am doing the Montanes and Sao Miguel before I start this.


Any chance to share the PDFs? I’d love to take a look at them.
 
I can try, here is the link where I downloaded my copies of the 17 differen manuals: https://www.euromodel-ship.com/eng/royal-william-i-i.php
You will have to cut and paste I guess, I can't get an active hyperlink for that page.

You may also search Euromodel Como Royal William and get to there store page I believe. Follow and click on the manuals link there then click Royal William on the left of that page.

They seem pretty comprehensive, but are listed as inerpretive information. I purchased that kit back in 2010 from Euromodel's website, for just around $2000.00, it is now listed as almost $6000.00 to buy that kit now, still without English instruction.
 
I can try, here is the link where I downloaded my copies of the 17 differen manuals: https://www.euromodel-ship.com/eng/royal-william-i-i.php
You will have to cut and paste I guess, I can't get an active hyperlink for that page.

You may also search Euromodel Como Royal William and get to there store page I believe. Follow and click on the manuals link there then click Royal William on the left of that page.

They seem pretty comprehensive, but are listed as inerpretive information. I purchased that kit back in 2010 from Euromodel's website, for just around $2000.00, it is now listed as almost $6000.00 to buy that kit now, still without English instruction.

Link worked! Thank you!

I’ll be following your build.
 
Launched in 1719 at Portsmouth. In 1782 Royal William took part in the navy operations which led to Gibraltar’s liberation. Also in that same year, the ship was involved in the salvage attempt of Royal George, which overturned in Spithead causing the death of 900 persons. In the end it was assigned as anchor-watch at Portsmouth, until 1813 , then demolished. Its survival for almost a century compares strongly with the typical six-year life span of so many other ships.

Overall Specifications:
BUILDING PLANS REF. 66/006 - CONSTRUCTION KIT REF. 99/006
MAXIMUM LENGTH 1140 mm.
HULL LENGTH 910 mm.
MAXIMUM WIDTH 510 mm.
HULL WIDTH 160 mm.
MAXIMUM HEIGTH 950 mm.
GUNS 104
SCALE 1:72
NO. PLAN SHEETS 17

I purchased this kit from Euromodel Como online for just around $2,000.00 or so back in 2010. This will be by far the most difficult model to build, as there are no conventional English printed assembly instructions included in the kit, only the 17 plan sheets with instruction in Italian. There are several pieces that are NOT INCLUDED in the kit and three require being built from scratch; the curved staircase or ladder to the quarter deck, both port and starboard versions, the stove with a chimney stack showing above the main deck, and two bow supports at the prow, both starboard and port versions. Although the plans do include detail drawings of the stove, curved staircase, (and bow support with dimensions of these parts. The kit doesn’t include wood stock for the staircase and stove, it does however include a large block of wood with a width, height and length of 2” x 3” x 8” to fashion the bow supports from. The curved staircases can be substituted with either a standard ladder or a “L” shaped ladder and still be historically accurate, as the Royal William underwent several refurbishing during its life and detailed records of exact changes are rare to come by.

There is a set of PDF English instructions by MSW member piratepete007, created while actually building the model kit using the Italian instructions as reference with help and support from the following members; Ken3335, Keith W, Denis R, Vince P, Pirrozzi and Bill Kent. My sincere thanks to them and other MSW members who gave advice and permission to use some of their photos. I have perused all of them and they will be MOST helpful during the FUTURE assembly, thank you MSW member piratepete007 et al.

There are 17 PDF documents of which the first one I already had a copy from several years ago. The remaining list includes the following files:

02 Hull and Main Deck Prep 03 First Planking 04 Main and Foc’sle Decks, Armament 05 First Planking Above the Main Deck 06 Upper Decks 07 Stern 08 Wales, Ornamentation and Bow 09 Hull Fittings

10 Ships Boat 11 Mast Construction 12 Yard Construction 13 Shrouds and Stays 14 Bowsprit Rigging 15 Foremast Rigging 16 Main Mast Rigging 17 Mizzen Mast Riggin

After I had checked if all available parts were included in the kit, I construction some of the hull up to the first battery deck, just to see how it looked.

The first two photos are of the current state of the model, showing the Starboard and Port hull. The First and Second battery decks are installed and according to the plan sheets, I will have to install all completed guns and carriages for the 1st and 2nd Batteries, even though you will ony see the protruding gun barrels. The scratch built stove will also be installed on its proper deck, completly hidden except for the protruding chimney onto the main deck.

100_1232.thumb.JPG.b33a60ef2342353a9581851e3f1d6022.JPG


I decided NOT to plank those lower gundecks as they won't be visible anyway.

100_1233.thumb.JPG.370b3fd909e8ecb2ac9ba9a228006088.JPG


Moving the camera along the Port side you will see closeups of the Port Bow, Midships, and stern.

100_1234.thumb.JPG.40d75755c539ae96f76a6a64044cf69d.JPG


100_1235.thumb.JPG.9a33bedea5e0e76a484e01ce7f25513e.JPG


100_1236.thumb.JPG.d2b393536131de811bff0286a6955baa.JPG


This hull so far is very solidly built due to the numerous strengthing pieces required by the plans to install, and consequenly relatively heavy compared to a lot of models. The following two photos show those strength pieces installed on both port and starboard sides.

100_1237.thumb.JPG.c41a980ea4709074170d6e887a737015.JPG


100_1238.thumb.JPG.f04f75cc97f64210ac8f733da273abbf.JPG


Each frame required pieces along the false keel and bulkheads to add strength to the hull structure.

100_1239.thumb.JPG.c8282a953c5230b6de96d6932ae964df.JPG


The Starboard side moving the camera forward toward the bow, you see the Starboard stern, midship, and bow area.

100_1240.thumb.JPG.21b718c5cde25e35c8d426ed0cc1b667.JPG


100_1240.thumb.JPG.21b718c5cde25e35c8d426ed0cc1b667.JPG


100_1241.thumb.JPG.b969c2805b19e089e0c108a75ddd2121.JPG


100_1242.thumb.JPG.08669160e0c697ca904f156f365048f7.JPG


The upper bulkhead support frame detail is in the next three photos.

100_1243.thumb.JPG.d21cdcbcf057677e6a8f5d87b25ec69d.JPG


100_1244.thumb.JPG.b41aa6516f5f9cc72b6a5b9e618e9fdd.JPG


The stern section facing forward showing the bulkheads.

100_1248.thumb.JPG.faf1aef3a8573e9be419e2e71775c4e1.JPG


Looking aft toward the stern from about the midship section.

100_1249.thumb.JPG.6744769698f5669175ee5a646dce49be.JPG


Looking at the bow, facing aft.

100_1250.thumb.JPG.b534c129ac2fed71e5e8d960d1fb97c0.JPG


Looking toward the stern, upper deck frame supports.

100_1252.thumb.JPG.83a1126af96dac4487c8b6d0f91d8b07.JPG


More frame views.

100_1251.thumb.JPG.fdb3ac8beece3363befd9c76a36121cb.JPG


A closeup of the bow facing aft.

100_1253.thumb.JPG.c8bb7d5f0bc1741896b8313d6b5051af.JPG


Thanks for showing interest, I would like to thank piratepete007 for the instructions he wrote with other members of this site.
Would have loved to have owned this kit sadly never came upon one for sale.
Watching with anticipation!
 
Would have loved to have owned this kit sadly never came upon one for sale.
Watching with anticipation!
This is one of the eight or nine kits I purchased just after my wife of 28 years passed away in 2010. I went a little crazy with the credit cards and purchased this as a goal to be abel to build correctly it eventually. Although I am not much of a scratch builder, with this kit you have to scratch build a few parts and a several parts are labeled as ** NOT INCLUDED IN THE KIT. That is why I will not continue this log for sometime, after finishing the nine models I do have to build, I hope my skills are up to the task. The hull was fairly easy, but you had to saw the two battery decks shown ,(1st and 2nd batteries), in half to be able to fit them inside the frames. The amount of detail that is included in the ship plans are just MADE for scratch builders on SOS. The instructions are totally non-existant in English, so I have downloade all 17 of Pete's PDF files to assist me in the construction, plus found Keith Julier's first edition of Period Ship Handbook published in 1992 / 1993, in UK and waiting for its arrival in the mail. eBay has not helped much in finding where the kit is now, since it left the Global shipping place in Britain.
 
If you can find a second hand book my master model-maker Keith Juilier, he builds this model with great instructions.
That book that you suggested, FINALLY arrived from eBay UK today. It is in there a very LARGE chapter on the Royal William. I lost my first email verification of that order and the tracking number give to me by eBay Global so I couldn't track that order after it left Great Britain. A pity that I just ordered that same book from an online used bookseller in Seattle called ThriftBooks. Oh, well I can always return it for a couple more modeling books for my Ship Modeling Library.

BTW, I am seriously going to purchase that OcCre limited kit of the le Soleil Royale, (Royal Sun), the entire purchase shold cost around $3,000.00 or so, with all of the 'Extra's'. What do you think of that? Am I crazy or just being an idiot? Apparently they haven't sold out of the 669 kits that OcCre manufactured, at least it is in my shopping cart waiting for my submitting the order.
 
I would buy the Artesania Latina kit instead - I personally do not the "admiralty" approach Occre uses on these kits - its not accurate its not attractive. The AL kits sculptures look much better and its half the price I believe
 
What do you think of that?
You asked..... Is there something about SR that makes you want it in particular? If you are going to spend that kind of money, why not go with a high quality kit like those from MD or Vanguard?
I would buy the Artesania Latina kit instead

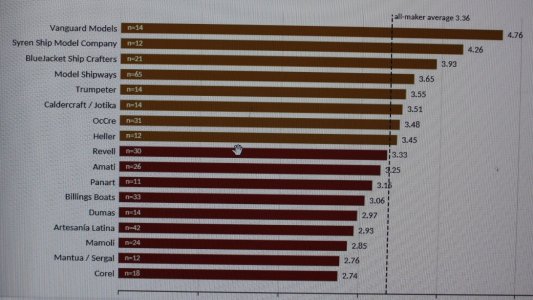
Yes the price is lower, but that usually means there is a consequence. The recent article and poll in Ships in Scale magazine may be worth a look. Sadly, a few of the best kit makers are absent like MD.

1789036640460.jpeg
 
The polling is interesting and agreed with you re Vanguard Models or MD - spending 3k on a kit is insane in my opinion. At least the AL kit gets the sculptures closer to reality which is why one would buy a kit like this in the first place. Occre is using the old "limited edition" to increase the price.
 
I like OcCre and the limited edition of this model is so fascinating to me, and I just love the challenge of this particular kit. I looked at the AL kit also, I may decide to get that one instead. It is, as you said, cheaper. I have built the AL Scottish Maid and enjoyed that kit.

What are MD and Vangaurd websites?
 
Modelship Dockyard is available from Zoltan's company, Dry Dock Models https://drydockmodelsandparts.com There are build logs of their models here at SoS. If you spend a little time studying them you will see how superior they are to those other brands. (I have no relation or interests in MD but I do know when the time comes to down size and quit scratch building, they are one of the very few brands I would tackle. By the same token, if your heart is set on SR and stuck with either OcCre or AL you can kit bash if you want.

Allan
 
Back
Top