Possible, madness of both?
Although the process of rigging a ship model becomes more and more a problem for me as a result of my fading eye-sight and shaky hands, my urge to keep on building models has no tin the least disappeared. So I went looking for 17th century ship types where no or almost no rigging was involved. After several try-outs with one-masted vessels with comparatively simple riggings my eye fell on the glorious models with which the English shipbuilders tried to seduce the king to commission them to build the full-size ship, the so-called Admiralty or Navy Board dockyard models. These models were usually not rigged at all, but they were lavishly decorated and showed much of their interior and construction. As a result they belong to the most beautiful and intriguing models man has ever made.
In my bookcase Gilbert McArdle's book:Building a Navy Board Model of HMS Sussex 1693, (published bySeawatchBooks in 2010) holds a prominent place.
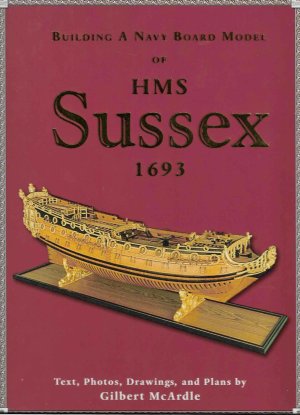
The book was written during and after McArdle built a flawless copy of the third rate Sussex model in the collection of the US Naval Academy Museum in Annapolis, Maryland. The book contains, apart from the heavily illustrated building report, also a pile of excellent drawings of the original model, containing not only the body plan, elevation plan, top views with decks, sections and various bulkheads, but also every one of the 70 frames in the model has been drawn, both in 1/48 and in 1/96 scale.
Building a paper model of a Navy Board model that still shows some of the beauty of its original example surely is a first grade challenge. Not only the method of building, but also the choice of card is crucial. As a coincidence a colleague at the Rijksmuseum, who knew I am always on the look-out for suitable sorts of card for my shipbuilding activities, collected a pile of beautiful left-over cardboard sheets, used for making pass-partouts for drawings, prints, photographs and whatever belongs to the RM Prentencabinet's collection. I think it is called ivory card. It is made out of textile fibers, has a soft-white color and comes in various thicknesses. My colleague was kind enough to provide me with a lot of 0.5, 1.1, 1.8 and 2.4 mm thick material.
As we all know card has, like every material, apart from a large number of advantages, also some limitations, one of which is that it usually can not be sanded. It will become fluffy and all the sharp edges will disappear. But sanding is precisely what you need when building a dockyard model if you want to show all the open frames in a convincing way. So I made a test piece, consisting of 24 layers (12 midschip frames) of 1.8 mm card and exactly as expected, sanding appeared to be a necessity, even if the cutting was done as precise as possible. I sanded and filed the blok and it appeared that sanding the sides of the card was no problem as long as all layers were as closely pressed to each other as possible, thus avoiding the chance to mess up.
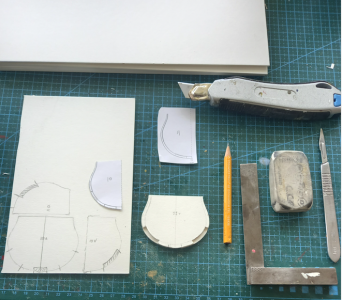
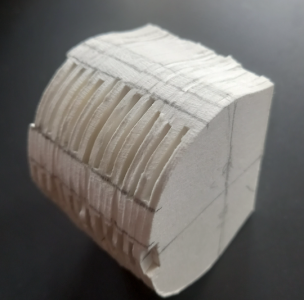
Scanning my card stock I calculated that if I chose the 1.8 mm thickness ivory card for the frames, Iwould end up with a 30 cm long model, which was about the maximum size I wanted. The scale would then be about 1/200, for me a most unusual number, because all my paper models so far were on a 1/77scale. As every frame consisted of two layers of card, no less than140 frames had to be cut to shape the hull.
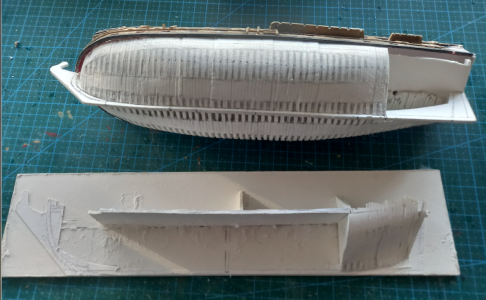
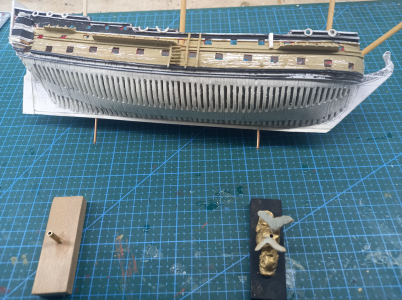
Now it was time to design a strategy.The block I made as a test clearly showed that at this scale making a hull out of complete card frames, like in full model size, was not possible because the tops of the frames would end up too narrow tosupply any strength and rigidity to survive the rest of the build, leave alone the expectation of a reasonable life span. So I divided the hull into two horizontal parts, separated by the lower deck, which was, like the frames, cut from 1.8 mm card. Below the deck I vertically divided the hull into two parts, a left and a right one. In separate temporary mountings quarters of frames were to be fitted until both halves were filled with frames, only partly glued together. Indeed it appeared to be possible to sand and file these blocks into shape, almost as if they were made out of wood.

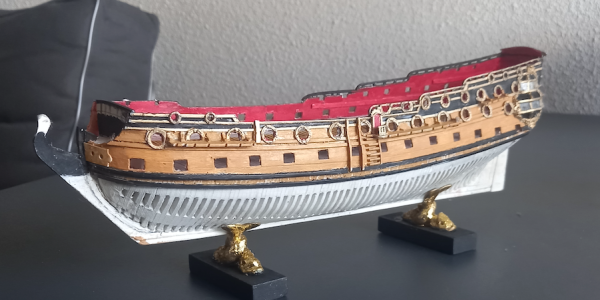
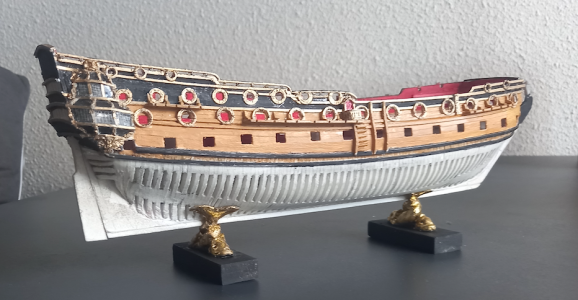
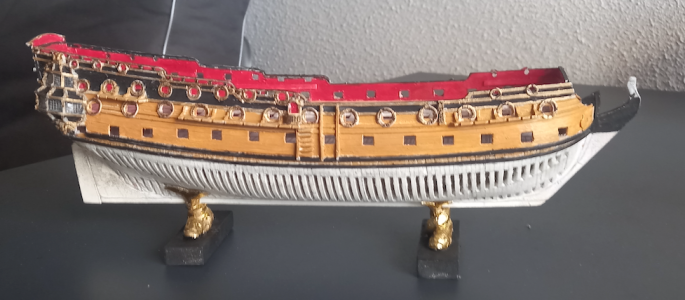
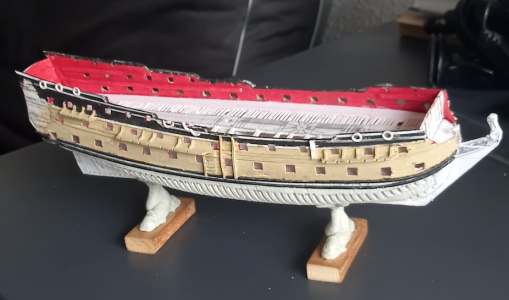
The part above the lower deck was easy to cut. Both the ship's sides were made out of 0,5 mm card, copied from the side view on McArdles' draught. I cut the port holes, shaped the sides by hand into an S-shaped curve as much as possible, provided them with wales, channels and stairs, laid the basic provisions for the decorations, planked them with latex strips and painted them.
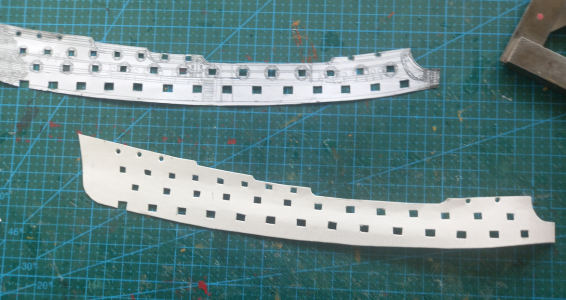
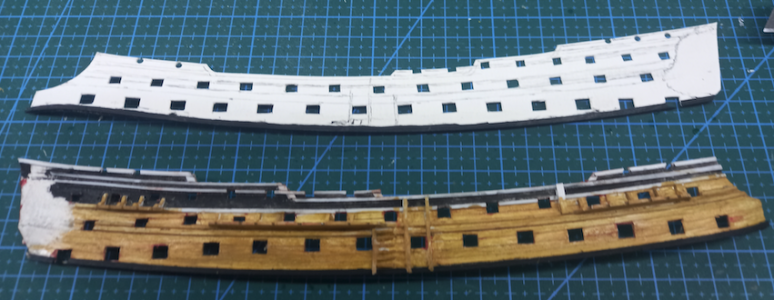
Though the lower deck was draughted in the book, the upper deck could not precisely be copied from the drawings. I'm afraid I made it too wide, which had a clear effect on the width of the ship between the bulwarks. The model is too wide on top.
It belongs to this style of modeling to show open decks like can be seen in the original model, but the lower deck of my model will be closed, because I need the strength of the 2.4 thick lower deck for the overall rigidity of the model. Besides, practically nothing of it will be visible in the end result.
The deck clamps on the inside of the ship's sides were glued in to fit both the decks on the correct height. The masts could provide sufficient orientation and enough stability to get everything temporarily in place.
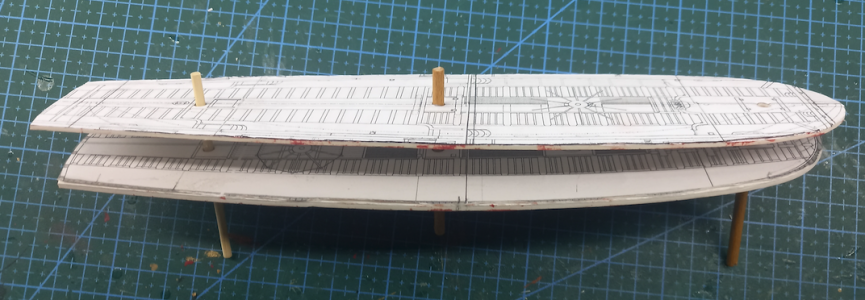
Then keel, stem and stern were cut from1.8 mm card and the whole upper works could carefully be glued together.
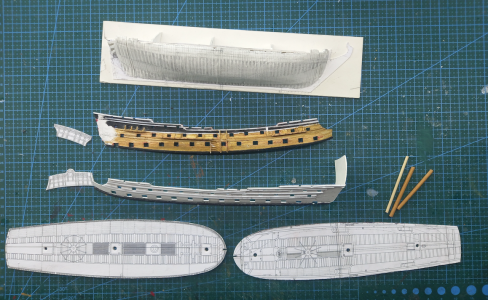
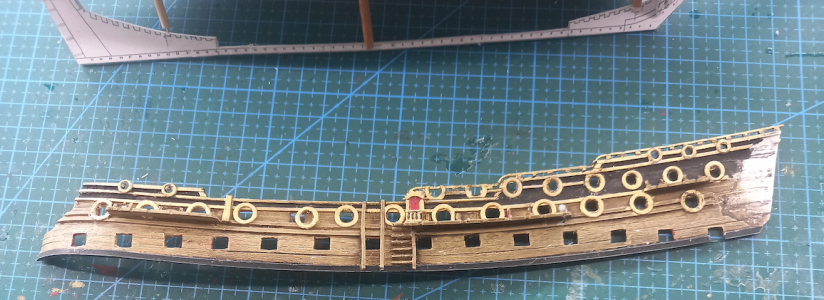

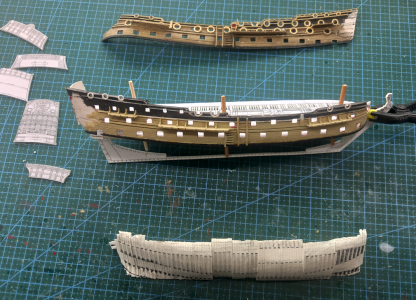
In the mean time the frames-block belowdeck were completed, and sanded into shape. After precisely marking the locations of the interruptions between the frame parts, all frames were separated to cut the inside to shape, taking care that the horizontal top sides were maintained to be glued to the underside of the lower deck in order to get everything back in place.
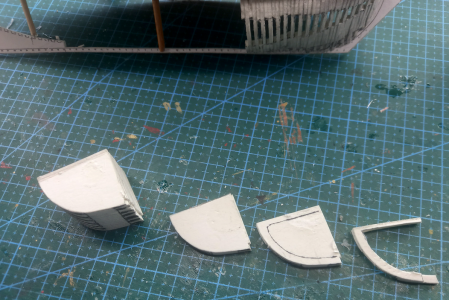
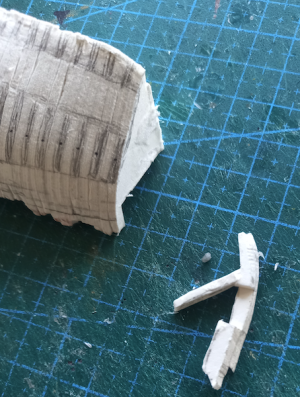
Even the sanded block had to be sanded again after all frames were glued in place, but no real problems showed up. It went better than I expected. The next problem to be solved was the lining of the openings between the frames. However precise I tried to be, small deviations from the markings showed up and had to be filed to keep the lines fair. Therefore I modified an old lock file in a way that the thickness was diminished to 1.5 mm and the narrow sides still held their filing profile. A drop of AC glue brought the necessary sharpness back to the joints.
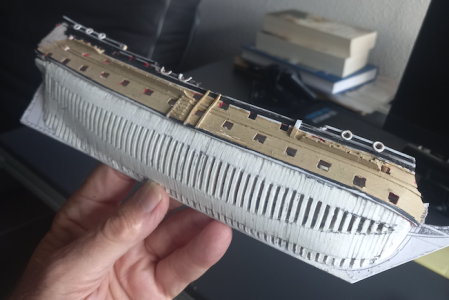
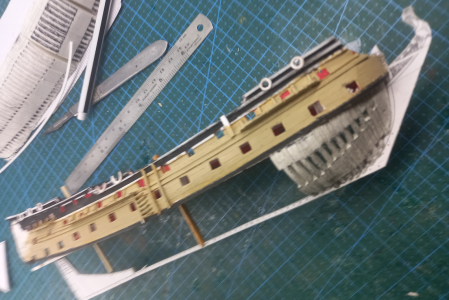
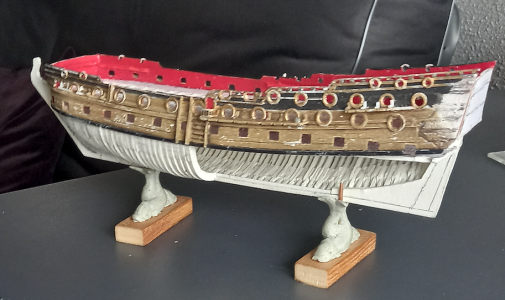
A real problem is painting the model. I like to build models of ships that are, let's say, halfway or at the end of their career, so wear and tear show up. Therefore I use plastic strips with wood imprint (c-d-fix) for planking and treat it with Humbrol 63 and Van Dijks brown, which produces a nice 'used' look. But a dockyard model does not represent an old ship. On the contrary, the model should look like an ornament, a thing of beauty, adorned with as much golden carvings as possible. I had to invent another way of painting.
On top of that I was stupid enough to forget to spray the plastic planking with primer before I hastily painted it, which caused the paint to wear off as soon as it is touched. I had to remove the paint as much as possible and invent another color to meet the demands.
Special attention had to be given to the stand of the model. Normally I make a very simple card stand, because it serves no other function than to keep the model up right. In this case the model was presented to the king as a thing of beauty and the stand had to meet the same purpose. So I kneaded some dolphins supporting the lower hull with their tails on both sides and gilded them. Inside was a brass tube and a fitting piece of brass wire made the connection. The first couple I made appeared to be too big, so I made a second pair, with a slightly better result.
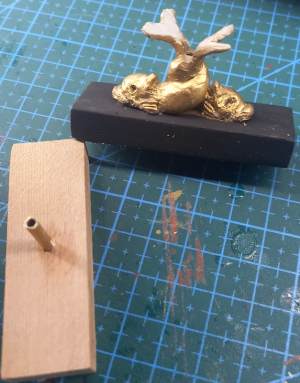
I don't know where this will end. Some real problems still have to be tackled. I'll keep you posted.
Although the process of rigging a ship model becomes more and more a problem for me as a result of my fading eye-sight and shaky hands, my urge to keep on building models has no tin the least disappeared. So I went looking for 17th century ship types where no or almost no rigging was involved. After several try-outs with one-masted vessels with comparatively simple riggings my eye fell on the glorious models with which the English shipbuilders tried to seduce the king to commission them to build the full-size ship, the so-called Admiralty or Navy Board dockyard models. These models were usually not rigged at all, but they were lavishly decorated and showed much of their interior and construction. As a result they belong to the most beautiful and intriguing models man has ever made.
In my bookcase Gilbert McArdle's book:Building a Navy Board Model of HMS Sussex 1693, (published bySeawatchBooks in 2010) holds a prominent place.

The book was written during and after McArdle built a flawless copy of the third rate Sussex model in the collection of the US Naval Academy Museum in Annapolis, Maryland. The book contains, apart from the heavily illustrated building report, also a pile of excellent drawings of the original model, containing not only the body plan, elevation plan, top views with decks, sections and various bulkheads, but also every one of the 70 frames in the model has been drawn, both in 1/48 and in 1/96 scale.
Building a paper model of a Navy Board model that still shows some of the beauty of its original example surely is a first grade challenge. Not only the method of building, but also the choice of card is crucial. As a coincidence a colleague at the Rijksmuseum, who knew I am always on the look-out for suitable sorts of card for my shipbuilding activities, collected a pile of beautiful left-over cardboard sheets, used for making pass-partouts for drawings, prints, photographs and whatever belongs to the RM Prentencabinet's collection. I think it is called ivory card. It is made out of textile fibers, has a soft-white color and comes in various thicknesses. My colleague was kind enough to provide me with a lot of 0.5, 1.1, 1.8 and 2.4 mm thick material.
As we all know card has, like every material, apart from a large number of advantages, also some limitations, one of which is that it usually can not be sanded. It will become fluffy and all the sharp edges will disappear. But sanding is precisely what you need when building a dockyard model if you want to show all the open frames in a convincing way. So I made a test piece, consisting of 24 layers (12 midschip frames) of 1.8 mm card and exactly as expected, sanding appeared to be a necessity, even if the cutting was done as precise as possible. I sanded and filed the blok and it appeared that sanding the sides of the card was no problem as long as all layers were as closely pressed to each other as possible, thus avoiding the chance to mess up.


Scanning my card stock I calculated that if I chose the 1.8 mm thickness ivory card for the frames, Iwould end up with a 30 cm long model, which was about the maximum size I wanted. The scale would then be about 1/200, for me a most unusual number, because all my paper models so far were on a 1/77scale. As every frame consisted of two layers of card, no less than140 frames had to be cut to shape the hull.
Now it was time to design a strategy.The block I made as a test clearly showed that at this scale making a hull out of complete card frames, like in full model size, was not possible because the tops of the frames would end up too narrow tosupply any strength and rigidity to survive the rest of the build, leave alone the expectation of a reasonable life span. So I divided the hull into two horizontal parts, separated by the lower deck, which was, like the frames, cut from 1.8 mm card. Below the deck I vertically divided the hull into two parts, a left and a right one. In separate temporary mountings quarters of frames were to be fitted until both halves were filled with frames, only partly glued together. Indeed it appeared to be possible to sand and file these blocks into shape, almost as if they were made out of wood.

The part above the lower deck was easy to cut. Both the ship's sides were made out of 0,5 mm card, copied from the side view on McArdles' draught. I cut the port holes, shaped the sides by hand into an S-shaped curve as much as possible, provided them with wales, channels and stairs, laid the basic provisions for the decorations, planked them with latex strips and painted them.


Though the lower deck was draughted in the book, the upper deck could not precisely be copied from the drawings. I'm afraid I made it too wide, which had a clear effect on the width of the ship between the bulwarks. The model is too wide on top.
It belongs to this style of modeling to show open decks like can be seen in the original model, but the lower deck of my model will be closed, because I need the strength of the 2.4 thick lower deck for the overall rigidity of the model. Besides, practically nothing of it will be visible in the end result.
The deck clamps on the inside of the ship's sides were glued in to fit both the decks on the correct height. The masts could provide sufficient orientation and enough stability to get everything temporarily in place.

Then keel, stem and stern were cut from1.8 mm card and the whole upper works could carefully be glued together.


In the mean time the frames-block belowdeck were completed, and sanded into shape. After precisely marking the locations of the interruptions between the frame parts, all frames were separated to cut the inside to shape, taking care that the horizontal top sides were maintained to be glued to the underside of the lower deck in order to get everything back in place.


Even the sanded block had to be sanded again after all frames were glued in place, but no real problems showed up. It went better than I expected. The next problem to be solved was the lining of the openings between the frames. However precise I tried to be, small deviations from the markings showed up and had to be filed to keep the lines fair. Therefore I modified an old lock file in a way that the thickness was diminished to 1.5 mm and the narrow sides still held their filing profile. A drop of AC glue brought the necessary sharpness back to the joints.


A real problem is painting the model. I like to build models of ships that are, let's say, halfway or at the end of their career, so wear and tear show up. Therefore I use plastic strips with wood imprint (c-d-fix) for planking and treat it with Humbrol 63 and Van Dijks brown, which produces a nice 'used' look. But a dockyard model does not represent an old ship. On the contrary, the model should look like an ornament, a thing of beauty, adorned with as much golden carvings as possible. I had to invent another way of painting.
On top of that I was stupid enough to forget to spray the plastic planking with primer before I hastily painted it, which caused the paint to wear off as soon as it is touched. I had to remove the paint as much as possible and invent another color to meet the demands.
Special attention had to be given to the stand of the model. Normally I make a very simple card stand, because it serves no other function than to keep the model up right. In this case the model was presented to the king as a thing of beauty and the stand had to meet the same purpose. So I kneaded some dolphins supporting the lower hull with their tails on both sides and gilded them. Inside was a brass tube and a fitting piece of brass wire made the connection. The first couple I made appeared to be too big, so I made a second pair, with a slightly better result.


I don't know where this will end. Some real problems still have to be tackled. I'll keep you posted.


