How to copy original mold

Joined
Jan 23, 2023
Messages
4
Points
3
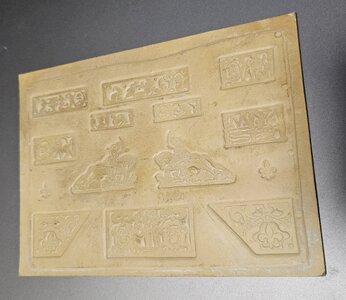
I have some molds used to create the carvings on a ship model (SOS), these were called craft mats and were made in the early 1930"s. They intended on people using a plastic wood to mold the carvings.

I am restoring my grandfather's model, the carvings were never added. The molds create a rounded casting, so I wanted to create a copy of the mold, use a rotary tool to square up the rounded edges in the new mold.

It's not clear to me how to make the copy of the mold, the casting examples I see are copying parts already made. Does anyone have suggestions on which casting materials to use ?

Regards,
Bob.
20240516_011618.jpg
 
Ok, so I can pour silicon into my 80 yr old mold, the use a material that dries hard, this would then be an exact copy of my original mold. I would then use a rotary tool to remove some of the rounded edges from the new mold and then cast parts. I'll assume I need a release material for the original mold. The Amazon link has a smaller quantity for $30, I'll try that.

The blue stuff is an interesting material.
Thanks
 
Blue Stuff is a good idea. People (including myself) have used Lego pieces to form a frame around the piece you want to cast. They are easy to assemble.
 
When I copy the mold, the first material can be flexible, the second step is the new mold, it needs to be a material that can be carved or modified with a rotary tool. I want to sharpen the rounded corners from the original mold. So this material needs to dry hard and be workable. I will then make my parts from the new mold. Will the above materials work ?
 
Would it be easier to add material to the parts that come out of the first mold and then square them up than to try to machine the second mold? I'm thinking the positive parts would be easier to work with than the limited depth of the negative cavities in the mold.
 
The mold above is one of several, one of the molds have pieces that go between the gun ports, and many are identical. So I was thinking of modifying the mold, then the replicated pieces would have the work already done. That was my only reason.
 
I would recommend comparing shrinkage rates of the silicones. Different types have different shrinkage tolerances. Plus you might want a denser silicone that will hold it’s shape and detail better.

What edges are you trying to straighten? The entire edge around the mold?
 
The mold above is one of several, one of the molds have pieces that go between the gun ports, and many are identical. So I was thinking of modifying the mold, then the replicated pieces would have the work already done. That was my only reason.
Gotcha but just square up one set of positive parts first, then make a second mold from those square edged parts and bang out as many as you need.

I think I'd try it with modelling clay. After it comes out of the mold make a frame around each part with a vertical face similar to a cookie cutter. Pack more clay in between the rounded edges and the frame to make the square edges you want. I'd try 3D printing the frame for the complex shaped parts after tracing them out but, the 3 bits in the bottom row could be done with square wooden dowels or other scraps as a test.
 
Last edited:
Gotcha but just square up one set of positive parts first, then make a second mold from those square edged parts and bang out as many as you need.

I think I'd try it with modelling clay. After it comes out of the mold make a frame around each part with a vertical face similar to a cookie cutter. Pack more clay in between the rounded edges and the frame to make the square edges you want. I'd try 3D printing the frame for the complex shaped parts after tracing them out but, the 3 bits in the bottom row could be done with square wooden dowels or other scraps as a test.
Recommend using a synthetic clay. Some silicones are inhibited from hardening with natural clay. IIRC it was the sulphur in the clay that caused the problem.
 
Ok, so I can pour silicon into my 80 yr old mold, the use a material that dries hard, this would then be an exact copy of my original mold. I would then use a rotary tool to remove some of the rounded edges from the new mold and then cast parts. I'll assume I need a release material for the original mold. The Amazon link has a smaller quantity for $30, I'll try that.

The blue stuff is an interesting material.
Thanks
no no no... you have to make all the parts with your original mold using whatever hard material you like.... blue stuff or wax.

then do all your repairs to the wax or blue stuff parts. glue the parts down, then the silicon is poured over the parts. coat the parts with any mold release or grease first. when the silicon has hardened, remove the parts and now you have a new mold.

your mold is a negative, the parts are the positives... got it?
 
Back
Top