I have made several ships in the past but have never used the rabbet and bearding line because i don't really understand what they are for , what i mean is ,as an example the rudder post on the corel kits i have made need to end up at 5mm to match up with the rudder , so what i usually do is to sand the keel down to about 3mm and then when the first layer of planking is done that gets sanded down to around 4mm and the final planking ends up being sanded down to 5mm, then i cover the false keel with 1mm wood strips and it all ends up at around 5 mm , when the false keel gets its covering it hides the edge of the hull planking and that's how i have been doing it , i'm thinking now that this method might not be correct as i see no need to cut a rabbet , so can some one please explain where i'm going wrong. and be nice
-
LUCZORAMA SHIPWRECK SCAVENGER HUNT GIVEAWAY. 4 Weeks of Fun • 1 Legendary Prize ((OcCre’s Fram Ship)) • Global Crew Welcome!
**VIEW THREAD HERE**
You are using an out of date browser. It may not display this or other websites correctly.
You should upgrade or use an alternative browser.
You should upgrade or use an alternative browser.
The rabbet is cut into the false keel to enable your planking to lie closer to the line of the ship making for a neater appearance. I have built some kits that do not call fo the rabbet, but do require a lot of sanding - of course on most of those kits the stem, keel and sternpost are all positioned after all the planking is done. If the kit calls for the rabbet, it might be a good idea to do it that way , as their instructions usually are based on that proceedure. Conversely, if you don't mind all the extra sanding, and the instructions do not specify the rabbet, do it the way you are most comfortable with.
- Joined
- Feb 18, 2019
- Messages
- 712
- Points
- 353

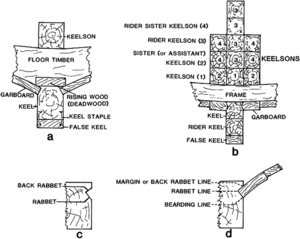
The rabbet is cut along the keel, along the forward curve and up the stem, and up the sternpost.
The rabbet is a cut to facilitate a clean and secure joint between the stem, the keel and the sternpost with the planking.
Basically, the rabbet is cut to receive:
- The lower edge of the bottom plank (garboard plank): it runs horizontally.
- At the bow, it fairly quickly turns into receiving the end of all subsequent individual planks: quickly but progressively the rabbet runs vertically.
- At the sternpost, it receives the end of every plank: this rabbet runs vertically, including the end of the bottom plank (garboard plank).
From the stem, the keel and the sternpost, the rabbet actually extends into the lower edge of the wing-transom (at the stern), to receive the extremity of the planks ending there.
Understanding and visualizing the shape of the rabbet is actually quite simple; one has to look at the shape of the hull to see where the planks end, and one can realize that the shape of the cut (the rabbet) evolves along its path.
The complicated part is explaining its geometrical shape in words.
To simplify the description: it begins as, more or less, a “V” shape at the center of the ship.
From there, it travels towards the stem, where it quickly become a wide “V” at the curve to progress into a “U” or "L" shape on the vertical section.
As far as the area towards the stern: the rabbet cut into the keel section slowly/progressively becomes a very wide “V”, as to end up as an “L” at and along the sternpost.
As for whether it should be included or not in the construction of a kit, well ....
G
- Joined
- Feb 18, 2019
- Messages
- 712
- Points
- 353

Anyone have a pic of how this works.
the kit I’m on, the stem and false key was put on after planking. Wasn’t fun, ut planking up to if wouldn’t be either. With the bow being almost a perfect 1/2 circle radius. (Cat)
In theory,
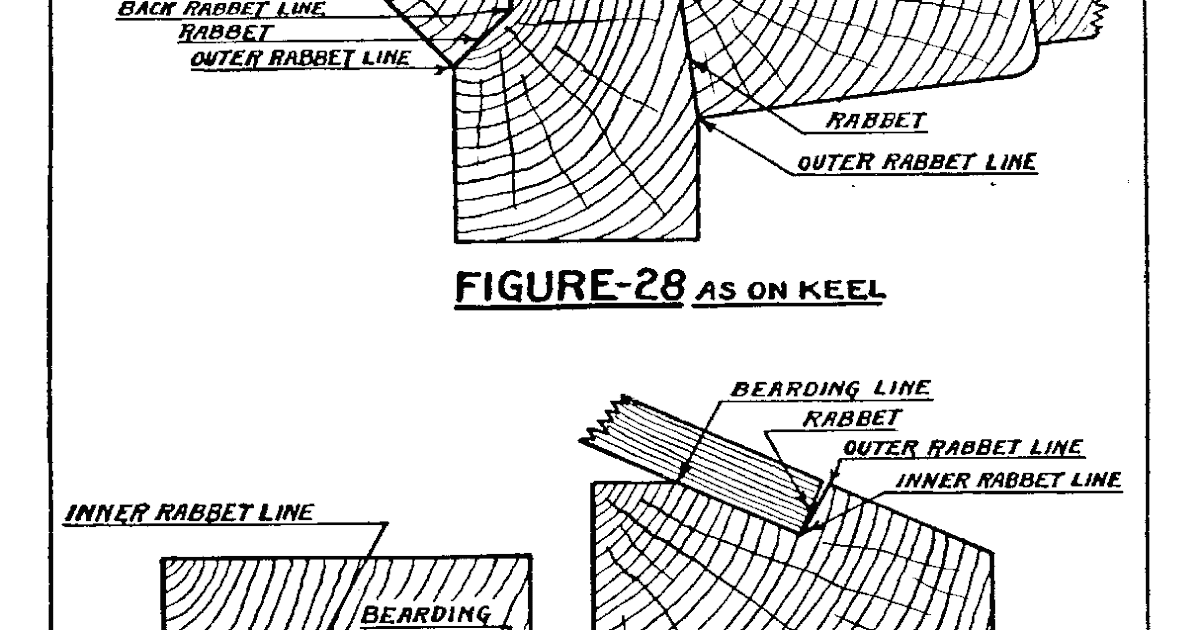
All you have to do is to visualize the way the planks are connected to the stem, keel and sternpost, to figure out the shape of the rabbet: knowing that the edge of the planks to be connected to these areas should not be beveled. The rabbet is used to avoid that, as beveling the edges would weaken the joint. This is usually true for the long edge of the plank (along the keel) as well as the end of the planks (at the stem and sternpost): again, and in general, the edge and the extremities of the planks should be square when they are fitted into the rabbet.
This said:
Except for a geometrical sketch, cannot illustrate the progression of the rabbet in just one image. What you can do to visualize the rabbet along its path, is to look at the bottom of the frames or bulkheads on the vessel you are building, and you should be able to figure out how the rabbet shout be cut throughout its path. The rabbet on the keel, stem and sternpost should be cut before the framing is assembled (frames or bulkheads) onto the keel.
G.
- Joined
- Feb 18, 2019
- Messages
- 712
- Points
- 353

so does it have to be the thickness of the double planking?say about 2 mm deep on each side , that would only leave about 1mm of thickness for the keel
The explanations I wrote in my previous posts were related to what you said in your original question: understanding what the rabbet is for and how it works. My few words relate to general information about the rabbet, mostly its description.
And you can come to your own conclusion as to including it or not.
As I understand, in your case, the bulkheads are installed onto a center piece of wood that may be referred to as the "keel". Then you apply 2 layers of planking and then you cover the sides of what is called the "keel" with a "false keel": this last step will get the keel to look like a nice keel? and hide the connection with the planking. Now, this is OK for the keel, but how do you hide the connection of the planking at the stem and the stern?
Never built a kit so I am not sure how other people may do this. Logically, the reason why kit manufacturer do not include the rabbet anywhere is that it becomes unpractical because you have too many layers, so it becomes too complicated. You may be able to apply the first layer, sand it down smooth then, cut some sort of a rabbet, and then apply the 2nd layer of planking to fit in that rabbet. The last step would be to apply that extra strip (the false keel) to cover the keel. But that would also be unpractical, as the piece added to the sides of the keel become the rabbet.
So in the end, you may just as well forget about a true rabbet all together.
If the instructions do not call for a rabbet..... forget about the rabbet ...... unless you are willing to modify the kit.
that would only leave about 1mm of thickness for the keel
That is right: because the extra thickness of the keel is in the strips you add to hide the edge of the planking.
Furthermore, I would think the keel is made of plywood. so any rabbet may not be a good idea in the first place.
G.
Last edited:
the keel and stern post all get a false covering so its probably not needed , but thank you for the explanation it helped me understand the process a bit more, i'm assuming that your more of a scratch builder , this is one area that i would like to explore but don't have the required knowledge for yet , maybe in the future. thanks again
This is a very often used sketch showing the rabbet - the false keel is not covering the planking


 www.oxfordhandbooks.com

 themodelshipwright.blogspot.com


Illustrated Glossary of Ship and Boat Terms
"Illustrated Glossary of Ship and Boat Terms" published on by Oxford University Press.

Shipbuilding Terms and Phrases "R"
Shipbuilding Terms and Phrases The following definitions are from United States Shipping Board Emergency Fleet Corporation publication ...
- Joined
- Apr 28, 2020
- Messages
- 124
- Points
- 88

I'm glad someone asked about the mysterious rabbet because I've been wondering about it. I have a Pride Of Baltimore II kit sitting in drydock until I finish my USS Constitution cross section,which didn't require a rabbet.
I bought the kit second hand and partially completed on eBay at a price I couldn't refuse,especially since I live in Maryland .
.
The keel has been assembled and the bulwarks installed. So far, they look OK to my inexperienced eye. It looks like a rabbet has been cut. How deep does the rabbet need to be? Basically the thickness of the planks? This kit is single planked.
I bought the kit second hand and partially completed on eBay at a price I couldn't refuse,especially since I live in Maryland
The keel has been assembled and the bulwarks installed. So far, they look OK to my inexperienced eye. It looks like a rabbet has been cut. How deep does the rabbet need to be? Basically the thickness of the planks? This kit is single planked.
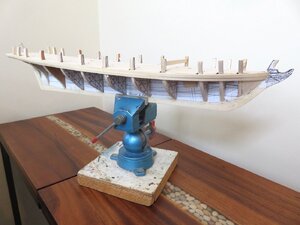
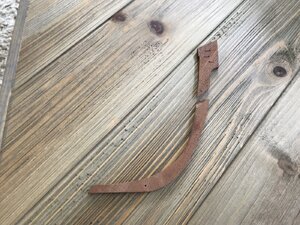
Here is what I do for rabbets. At the stern scoop out some material in the deadwood area (see photo below) under the last couple of bulkheads so the planking there will lie flush with the keel piece when installed. Do not extend the first planking in this area all the way to the stem, and and sand the ends to be flush with the keel piece. That way you only have to remove the thickness of the second planking, usually about 1/32". Continue the rabbet all the way up the stern. You can see my stem rabbet line in the photo. I cut along this line plank by plank as they are installed to get a tight fit so I know the plank ends will not spring free. I don't cut a rabbet for the garboard at the bottom. It meets the keel piece at an angle and the seam, it it exists, can't be seen when the model is mounted.


