Kingfisher 1770 1:48 POF

Hello friends!

I learned a few things fabricating the waterway on the lower deck that I was able to apply to the (more complex) waterway of the upper deck. First, I discovered a way to make a quick and accurate pattern... In the image below the cardstock (4 overlapping pieces - one for each of the waterway segments) has only been quickly trimmed to approximate the flow of the inner hull:

View attachment 459224

I then used a washer to trace a precise line...

View attachment 459223

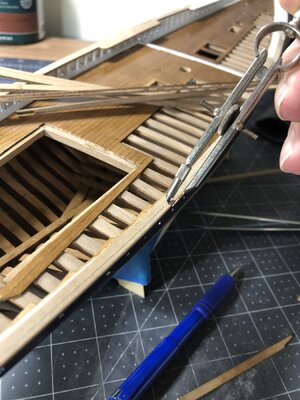
Once I had cut out the cardstock template, I traced that shape onto suitable stock and cut out strips to match. In order to mark the width of the waterway I used a compass:

View attachment 459225

Anyone ever done this???

View attachment 459226

Yes, I am cutting on the wrong side of the line :rolleyes:.

Anyway, I then shaped the waterway to the final profile:

View attachment 459227

Fitted and installed:

View attachment 459228

View attachment 459230

Oh, and somewhere along the way I added this iron knee:

View attachment 459229

On the next post you will see the final installation of the bitts...
This is genius Paul. So simple yet so effective. Thanks for guiding the rest of us.
I have bookmarked this for future reference.

Michael
 
This is great... thanks a lot for taking the time... Very useful to me (and I'm sure, many others). I like the bonus approach... will practice on this.

Your woodwork is simply amazing... will take me few years to catch-up.... if ever. However, we all need a great reference log, if we are even to improve. Thanks for that... this brings a whole new dimension to modeling ships. I'm committed to get there one of those days.
 
Last edited:
Hello friends!

I learned a few things fabricating the waterway on the lower deck that I was able to apply to the (more complex) waterway of the upper deck. First, I discovered a way to make a quick and accurate pattern... In the image below the cardstock (4 overlapping pieces - one for each of the waterway segments) has only been quickly trimmed to approximate the flow of the inner hull:

View attachment 459224

I then used a washer to trace a precise line...

View attachment 459223

Once I had cut out the cardstock template, I traced that shape onto suitable stock and cut out strips to match. In order to mark the width of the waterway I used a compass:

View attachment 459225

Anyone ever done this???

View attachment 459226

Yes, I am cutting on the wrong side of the line :rolleyes:.

Anyway, I then shaped the waterway to the final profile:

View attachment 459227

Fitted and installed:

View attachment 459228

View attachment 459230

Oh, and somewhere along the way I added this iron knee:

View attachment 459229

On the next post you will see the final installation of the bitts...
Nice to see your manual for marking and making the waterways, Paul. Very effective!
And great progress with the build and nice ‘structure look-through pictures.
Regards, Peter
 
Hope you get some "Catching" in, while "Fishing"!!

Be well and good luck!!
Hey Brad,

I noted that you are also comfortable with a fishing pole in your hand. Since I mostly fish with my children/their spouses I actually rarely catch fish anymore. It's more of a guide service and I point out the promising spots to them while personally fishing 'away' so they can't quite detect my modus operandi ROTF (letting them catch all the fish). I have caught enough fish in my life - but to hear "I got one" from someone I love is the best sound ever!
And even that pales in comparison to fishing with my little grandkids.
 
Last edited:
Hey Brad,

I noted that you are also comfortable with a fishing pole in your hand. Since I mostly fish with my children/their spouses I actually rarely catch fish anymore. It's more of a guide service and I point out the promising spots to them while personally fishing 'away' so they can't quite detect my modus operandi ROTF (letting them catch all the fish). I have caught enough fish in my life - but to hear "I got one" from someone I love is the best sound ever!

And even that pales in comparison to fishing with my little grandkids.
Amen! Same with my daughters when they were young!

Just waiting for the four grandkids to have the patience for a little boat ride with a shot at some fish!!! The smiles will be Nirvana....
 
Thanks, once again, for all the likes on my previous posting!

On the Kingfisher there are posts that support the centerline of the beams of the lower deck as well as the beams of the upper deck. The posts for the lower deck are a simple affair which would have been quite suitable for the hold:

View attachment 451934

But I wanted to make something more 'elegant' for the upper deck beams. A few years ago I had purchased a mini-lathe which I never used. Would it work to turn posts from square stock? Let's find out...

First, some blanks with layout lines:

View attachment 451926

A back-cut to prevent any tear-out:

View attachment 451927

And a preliminary beveling of the sacrificial end that would go in the chuck as well as the center turned portion:

View attachment 451928

I purchased this mini-lathe for around $30 USD:

View attachment 451929

View attachment 451930

Here we go!

View attachment 451931

Just for fun I recorded the turning of one of the posts. As you will see I just used needle files. I guess someone who knows how to properly use a lathe would use a carbide cutting tip and a pattern jig but that's above my pay grade. The video is about 10 minutes long and will show the steps I went through to make a single post. I suggest you 'fast-forward' as it's not exactly a big budget action-adventure film:


Here is a photo of the finished product:

View attachment 451932

And now the total run.

View attachment 451933

Of course, no two are exactly the same, but I believe these will work! Add another 'skill' to my model-building repertoire ROTF.

Wow thats a cracker of a lathe, and a cracker of an Operator, to make one by hand is Fantastic but to make multiples is amazing, I take my hat off to you, and as for no two being the same, I really had to look hard, I thought you had used some kind of steel plate cut out to the shape, thank you for posting this,

best regards John.
Thank you very much John. Coming from a top-notch fabricator like yourself your post is very kind. For the record I did try to create a scraping plate but that did not work for me. In my inexperience I do tend to imagineer solutions that probably come across as unconventional to people who know what they are doing.
 
I'm done reading this behemoth although I have to admit I skipped some of the nearly 2600 posts Redface
It was, and I'm sure, will be a very entertaining abd useful build log for many of us. I have to borrow Loracs' comment here: ...
I'm reading your log with great interest and using your work as "gold" reference... <- this is exactly what I thought while reading.

This is amazing.
And in the words of Grant Tyler:

"True story" ... a comment which gives this log a Vonnegut-esque character besides the teasing to hack away with japanese tools and dentist/orthodontist jokes. So it goes
 
I've actually been moving from the lower deck to the upper deck for nearly three months now. I fabricated the bitts along the way to get a break from walls, doors, beams, carlings, etc... They were shown previously, but have received their final installation.

First, this is the riding bitts (the stove actually sits in between the 'standards' that run on the deck beams):

View attachment 459231

View attachment 459232

View attachment 459233

And a few details:

View attachment 459234

View attachment 459235

View attachment 459238

View attachment 459239

Next, this is the main topsail sheet bitts:

View attachment 459236

View attachment 459237

I have also fabricated the main jeer bitts which sit one beam away from the sheet bitts - but something isn't fitting right so I need to make up some of the quarter deck beams and figure out what is going on.

This build log will go silent now for a few weeks. I'm hanging out the 'gone fishing' sign...

Thanks for stopping by!
Incredible work Paul. I don't know how I missed it. Real work of art and show of great skill. So much to learn from you
 
The trick with thw washer (for tracing a shape against a surface at 90 deg has a name in old school English cabinetmaking - it is known as 'mousing' and the washer is the mouse. I guess the term comes from the way that mice will run around the edges of a room, rather than venture into the middle.
 
Back
Top