You know... I did use pear veneer on some plywood Vasa parts when they were too large to rebuild out of solid wood (though I didn't get my veneer for free from a cabinetmaker - looks like I need to expand my social circle).Ha Paul- you could make my walnut veneer laminate perfect…..
-

Win a Free Custom Engraved Brass Coin!!!
As a way to introduce our brass coins to the community, we will raffle off a free coin during the month of August. Follow link ABOVE for instructions for entering.
-

PRE-ORDER SHIPS IN SCALE TODAY!
The beloved Ships in Scale Magazine is back and charting a new course for 2026!
Discover new skills, new techniques, and new inspirations in every issue.
NOTE THAT OUR FIRST ISSUE WILL BE JAN/FEB 2026
You are using an out of date browser. It may not display this or other websites correctly.
You should upgrade or use an alternative browser.
You should upgrade or use an alternative browser.
Kingfisher 1770 1:48 POF [COMPLETED BUILD]
- Thread starter dockattner
- Start date
- Watchers 146
DittoAs to the age of those posting I'm afraid I take the average up.
So is the case for half of us.....Ditto
- Joined
- Mar 22, 2024
- Messages
- 396
- Points
- 168

Having - at various times in my life - been a railway modeller, radio ham, materials scientist, and now novice ship-destroyer I I have heard the 'we're all too old, this hobby will die'. many times. No it will not
Truth is it will transform, that is already visible - the old school manual skills are replaced with new printing and CNC machining skills, the drawing board gets dumped for Autocad and so on. The Swiss writer Max Frisch once described our species as 'homo faber' very loosely translatable as 'hominids who make stuff' - the stuff we make might change, but the motivation and underlying dreams are deep in our gene-pool.
Truth is it will transform, that is already visible - the old school manual skills are replaced with new printing and CNC machining skills, the drawing board gets dumped for Autocad and so on. The Swiss writer Max Frisch once described our species as 'homo faber' very loosely translatable as 'hominids who make stuff' - the stuff we make might change, but the motivation and underlying dreams are deep in our gene-pool.
yes, we still hear that in ham radio.Having - at various times in my life - been a railway modeller, radio ham, materials scientist, and now novice ship-destroyer I I have heard the 'we're all too old, this hobby will die'. many times. No it will not
Truth is it will transform, that is already visible - the old school manual skills are replaced with new printing and CNC machining skills, the drawing board gets dumped for Autocad and so on. The Swiss writer Max Frisch once described our species as 'homo faber' very loosely translatable as 'hominids who make stuff' - the stuff we make might change, but the motivation and underlying dreams are deep in our gene-pool.
W9CE
Hello Paul,
incredibly beautiful work on the grilles, even the incomplete grilles turned out very well. It helps me a lot for my Le Rochefort, here I have three grilles on the aft deck that I don't want to show in full. I look forward to further updates.
incredibly beautiful work on the grilles, even the incomplete grilles turned out very well. It helps me a lot for my Le Rochefort, here I have three grilles on the aft deck that I don't want to show in full. I look forward to further updates.
Hello Friends,
Work continues outfitting the upper deck and the forecastle deck...
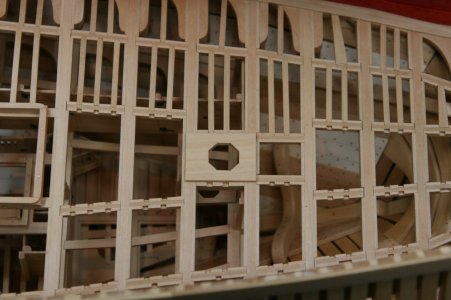
First up, the simple mizzen mast partner (though cutting an octagon was harder than I thought it was going to be):
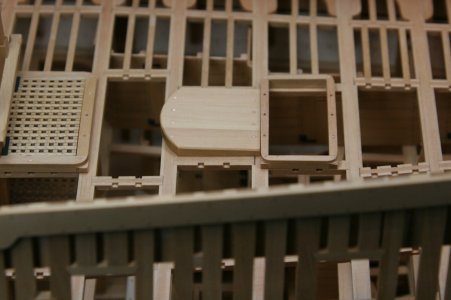
Next, the capstan step (not installed - just sitting loosely at this point because I haven't done any research on the capstan itself):

Notice the capstan step is not parallel with the deck (weird)...
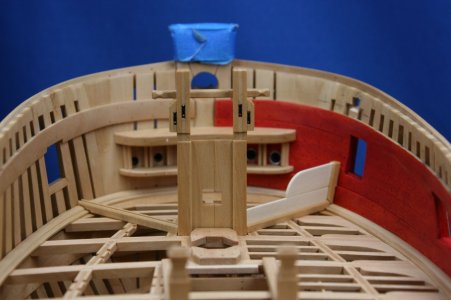
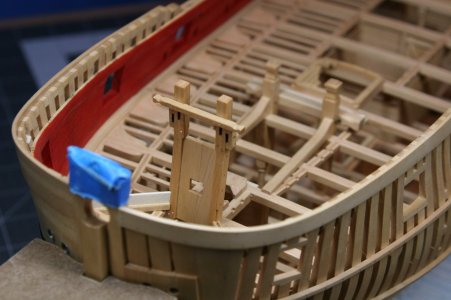
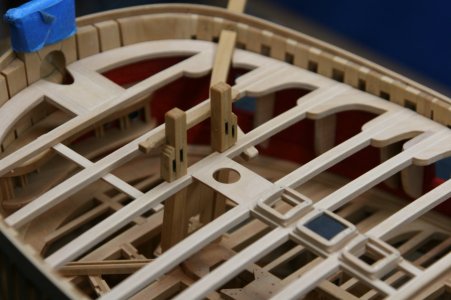
Next up - the rather complicated bowsprit step (the panel with the square in it) and the topsail bitts that sit on top of bowsprit step:
In the image below you can see the fixed channels for the manger (the starboard side has panels installed - the port side will be left as is):
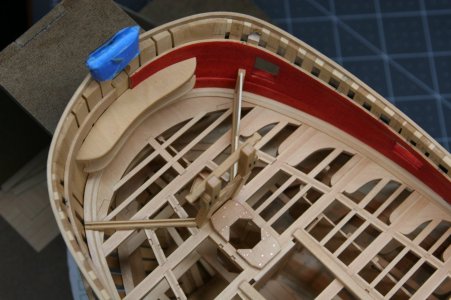
The manger panels on the starboard:
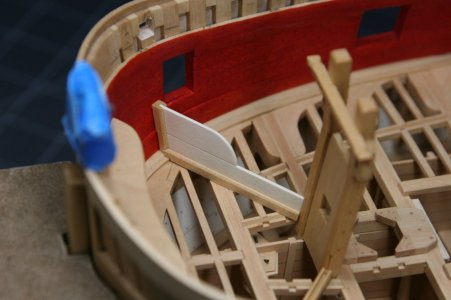
And now the fore deck has been temporarily installed showing the relationship of the bowsprit step and topsail bitts to this higher deck:
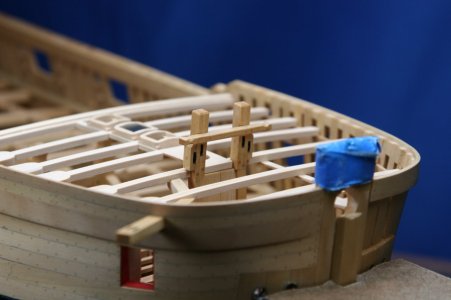
And finally, the cathead on the starboard side:
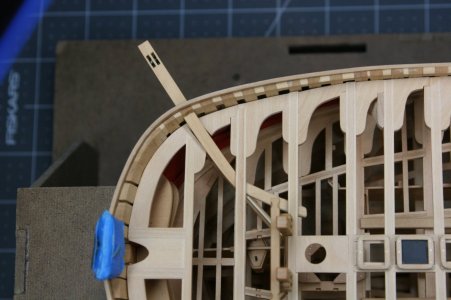
Installing the cathead required the unnerving obligation to cut a hole in the bulwark (and through my completed hull planking):
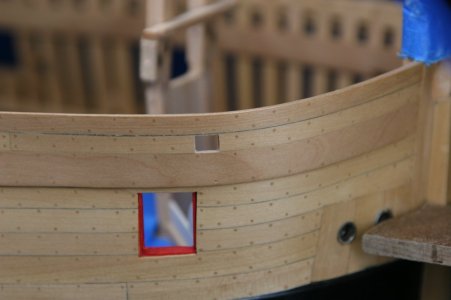
Considering the frightening places my imagination took me when planning this step, I'm not unhappy with this result:
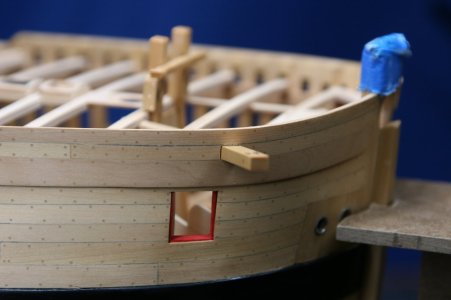
But I was unhappy when I did this to the first (actually, the second) cathead :
:
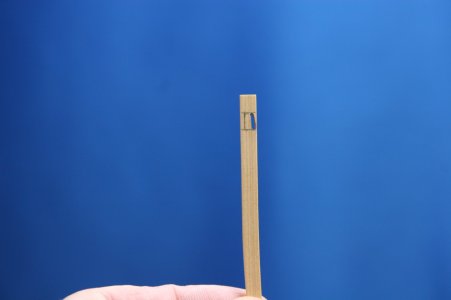
The cathead will get some sort of carved decoration on its end face - but I need to do some practicing first.
You are very kind to take some time away from your own builds to visit.
Work continues outfitting the upper deck and the forecastle deck...
First up, the simple mizzen mast partner (though cutting an octagon was harder than I thought it was going to be):

Next, the capstan step (not installed - just sitting loosely at this point because I haven't done any research on the capstan itself):

Notice the capstan step is not parallel with the deck (weird)...

Next up - the rather complicated bowsprit step (the panel with the square in it) and the topsail bitts that sit on top of bowsprit step:


In the image below you can see the fixed channels for the manger (the starboard side has panels installed - the port side will be left as is):

The manger panels on the starboard:

And now the fore deck has been temporarily installed showing the relationship of the bowsprit step and topsail bitts to this higher deck:


And finally, the cathead on the starboard side:

Installing the cathead required the unnerving obligation to cut a hole in the bulwark (and through my completed hull planking):

Considering the frightening places my imagination took me when planning this step, I'm not unhappy with this result:

But I was unhappy when I did this to the first (actually, the second) cathead

The cathead will get some sort of carved decoration on its end face - but I need to do some practicing first.
You are very kind to take some time away from your own builds to visit.
Last edited:
Beautiful, ALL! The Bowsprit Step, Topsail Bitts and all the different/non-perpendicular angles (even on the capstan platform) look perfectly executed.
Thanks for showing your mortality with the miss-drill (or wandering bit??) on the Cathead. That gives us envious observers some small glimmer of hope.
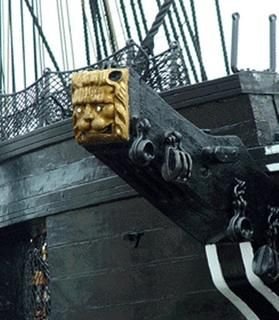
Below are some pictures of carved catheads I found while working on the HMS Serapis Catheads:
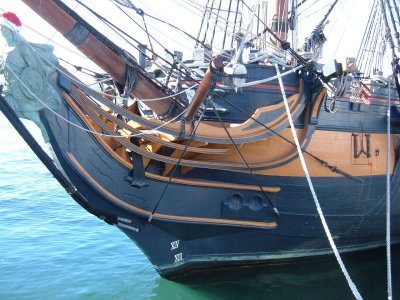
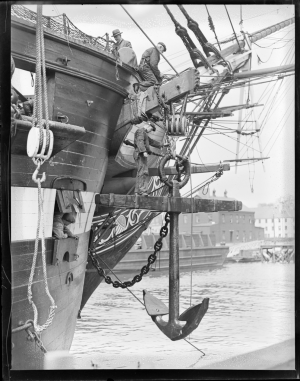
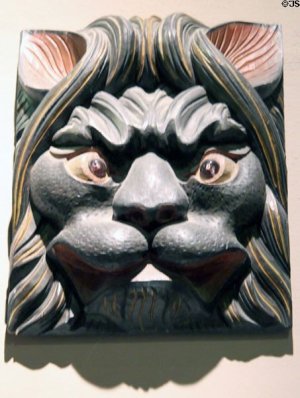
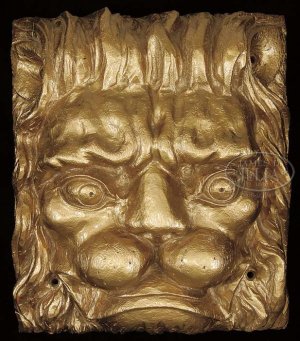
What I eventually settled on:
Good Luck, they are a wonderful detail and something the layman observer will find interesting, while they don't even see the detailed angles and joints of your master-modeling-skills!!
Thanks for showing your mortality with the miss-drill (or wandering bit??) on the Cathead. That gives us envious observers some small glimmer of hope.
Below are some pictures of carved catheads I found while working on the HMS Serapis Catheads:


What I eventually settled on:

Good Luck, they are a wonderful detail and something the layman observer will find interesting, while they don't even see the detailed angles and joints of your master-modeling-skills!!

Thanks Brad. You did a lovely carving! Most of the time we see cats and lions as seen in your images. Antscherl has his doubts for this ship and her sisters.Beautiful, ALL! The Bowsprit Step, Topsail Bitts and all the different/non-perpendicular angles (even on the capstan platform) look perfectly executed.
Thanks for showing your mortality with the miss-drill (or wandering bit??) on the Cathead. That gives us envious observers some small glimmer of hope.
Below are some pictures of carved catheads I found while working on the HMS Serapis Catheads:
View attachment 467012View attachment 467015 View attachment 467007View attachment 467008
What I eventually settled on:
View attachment 467006
Good Luck, they are a wonderful detail and something the layman observer will find interesting, while they don't even see the detailed angles and joints of your master-modeling-skills!!
View attachment 467014
The end of the cathead is quite small so I’m tempering my expectations. I have some micro carving chisels from MicroMark but they are (expensive) junk (I believe I might have just summarized the entire MicroMark catalog - but I digress). I would love the set once made by the Russian gentleman but those days are gone. I might have to try to make my own as others have done but that requires man-skills that I seldom display. I have some chisels coming from a specialty house and we’ll see what I get. In the mean time there are many other things to occupy my time.
Last edited:
Paul,
I've been searching for a new adjective for your work. I think I found it
supercalifragilisticexpialidocious !!!
I've been searching for a new adjective for your work. I think I found it
supercalifragilisticexpialidocious !!!
Also consider jewelers files. Not cheap but they were responsible for 90% of my cathead and figurehead.
A small chisel and a surgical blade did major shaping but 90% was careful filing with the below jewelry files.
Search for Nicholson 37029 files or just click on the link to find them on e-bay.
A small chisel and a surgical blade did major shaping but 90% was careful filing with the below jewelry files.
Search for Nicholson 37029 files or just click on the link to find them on e-bay.
Good morning Paul. You must have cross eyes after all those angles from the perpendicular. You seriously have to trust your measurements for the bowsprit step square or did you dummy test the bowsprit itself? It runs a quite an acute angle. I have always been in awe of your ability to get the exact measurement/sizing on your work- E.g. the cathead square through the hull- fits perfectly. Kudos.Hello Friends,
Work continues outfitting the upper deck and the forecastle deck...
First up, the simple mizzen mast partner (though cutting an octagon was harder than I thought it was going to be):
View attachment 466978
Next, the capstan step (not installed - just sitting loosely at this point because I haven't done any research on the capstan itself):
View attachment 466979
Notice the capstan step is not parallel with the deck (weird)...
View attachment 466980
Next up - the rather complicated bowsprit step (the panel with the square in it) and the topsail bitts that sit on top of bowsprit step:
View attachment 466981
View attachment 466982
In the image below you can see the fixed channels for the manger (the starboard side has panels installed - the port side will be left as is):
View attachment 466984
The manger panels on the starboard:
View attachment 466983
And now the fore deck has been temporarily installed showing the relationship of the bowsprit step and topsail bitts to this higher deck:
View attachment 466985
View attachment 466989
And finally, the cathead on the starboard side:
View attachment 466986
Installing the cathead required the unnerving obligation to cut a hole in the bulwark (and through my completed hull planking):
View attachment 466977
Considering the frightening places my imagination took me when planning this step, I'm not unhappy with this result:
View attachment 466988
But I was unhappy when I did this to the first (actually, the second) cathead:
View attachment 466987
The cathead will get some sort of carved decoration on its end face - but I need to do some practicing first.
You are very kind to take some time away from your own builds to visit.
True storyThanks for showing your mortality with the miss-drill (or wandering bit??) on the Cathead.
Cheers Grant
All your measurements and pre installed parts are paying off now, Paul. That bowsprit step with side panels and the topsail bitts with all those angles are very very nice. Also in combination with the fitted foredeck.Hello Friends,
Work continues outfitting the upper deck and the forecastle deck...
First up, the simple mizzen mast partner (though cutting an octagon was harder than I thought it was going to be):
View attachment 466978
Next, the capstan step (not installed - just sitting loosely at this point because I haven't done any research on the capstan itself):
View attachment 466979
Notice the capstan step is not parallel with the deck (weird)...
View attachment 466980
Next up - the rather complicated bowsprit step (the panel with the square in it) and the topsail bitts that sit on top of bowsprit step:
View attachment 466981
View attachment 466982
In the image below you can see the fixed channels for the manger (the starboard side has panels installed - the port side will be left as is):
View attachment 466984
The manger panels on the starboard:
View attachment 466983
And now the fore deck has been temporarily installed showing the relationship of the bowsprit step and topsail bitts to this higher deck:
View attachment 466985
View attachment 466989
And finally, the cathead on the starboard side:
View attachment 466986
Installing the cathead required the unnerving obligation to cut a hole in the bulwark (and through my completed hull planking):
View attachment 466977
Considering the frightening places my imagination took me when planning this step, I'm not unhappy with this result:
View attachment 466988
But I was unhappy when I did this to the first (actually, the second) cathead:
View attachment 466987
The cathead will get some sort of carved decoration on its end face - but I need to do some practicing first.
You are very kind to take some time away from your own builds to visit.
And about this quote:
I would have said it a little more strongly myself.Considering the frightening places my imagination took me when planning this step, I'm not unhappy with this result:
Regards, Peter
- Joined
- Aug 8, 2019
- Messages
- 5,523
- Points
- 738

I agree with that statement. I bought a set, new, on marketplace. The first use on the first cut the chisel broke!!I have some micro carving chisels from MicroMark but they are (expensive) junk
Junk.
Making a few handy chisels is not difficult to do.
Thanks Grant! The bowsprit angle is surprisingly good. I just need to open up the place where it passes through the fore deck. That said, I'm not sure if you will see a bowsprit on this model...Good morning Paul. You must have cross eyes after all those angles from the perpendicular. You seriously have to trust your measurements for the bowsprit step square or did you dummy test the bowsprit itself? It runs a quite an acute angle. I have always been in awe of your ability to get the exact measurement/sizing on your work- E.g. the cathead square through the hull- fits perfectly. Kudos.
True story- whew he is human after all.
Cheers Grant
All your measurements and pre installed parts are paying off now, Paul. That bowsprit step with side panels and the topsail bitts with all those angles are very very nice. Also in combination with the fitted foredeck.
Thanks Peter! The angle of the bowsprit step was off slightly as the beam it corresponds to is marginally too far forward. But that's quibbling over a minor offence...and was hidden in a slightly too deep notch on the upper beam. Hiding mistakes is part of the hobby
And about this quote:
I would have said it a little more strongly myself.
I was trying to be polite
 . My sphincter was rather squeezed. That little square took me most of an hour.
I take no credit. But I also cannot provide an attribution - where I first saw this is lost to the ravages of too much wine...The ferrules look great. I have used foil with the dull side showing and grey tubed artist paint as it is very viscous, both of which can look good, but if ferrules can be found in the right size, these look like a better choice.
Allan
- Joined
- Dec 9, 2019
- Messages
- 952
- Points
- 403

WitajDzięki Grant! Kąt bukszprytu jest zaskakująco dobry. Muszę tylko otworzyć miejsce, w którym przechodzi przez przedni pokład. Powiedziawszy to, nie jestem pewien, czy zobaczysz bukszpryt w tym modelu...
Pawle będzie to model bez takiegolunku zrobionego przez część bukszprytu, ale to tylko moja sugestia ty podążaj własną drogą. Pozdrawiam Mirka
PS Pawle będzie taka pusta dziura bez bukszprytu
Welcome
Paweł, it will be a model without such a bowsprit made by part of the bowsprit, but this is only my suggestion, you follow your own way. Greetings Mirek
PS Paweł, there will be such an empty hole without bowsprit
A nice suggestion Mirek. Perhaps a bowsprit stub would be an appropriate solution.


