Kingfisher 1770 1:48 POF

I've been absent, here, for a wile, but - Man - did I have some catching-up to do. Your work, as always Paul, is fabulous beyond measure. I really love your cut-away choices; especially the gratings, which remind me of Marsalv's brilliant Le Gros Ventre.

As for the capstan base, I believe that the taper you see, relative to the deck sheer, has to do with the fact that the capstan barrel runs from the main deck down to the deck below at an angle to the deck sheer. That's all well and good, however, the capstan ribs need to terminate upon a flush base, in order for the pawl system to work. I'm not sure if what I am describing is intelligible, or not.
Thanks, Marc. That makes perfect sense. I'll see if reality works out as nicely. The capstan is on my 'to do' list - but the list is long.
 
Attention now turned to the chain pumps. These are a fairly complicated affair with pump tubes, cisterns, winches (with support posts), sprocket wheels, and the chain itself.

The tubes were previously fabricated and have now been installed. The cistern is a box that sits on the deck over the top of the tubes:

View attachment 468373

In the end I only made up one of the cisterns along with a hood that will sit alongside it on the deck:

View attachment 468374

View attachment 468375

View attachment 468376

The sprocket and chain parts came from a photoetched sheet included with the kit. I tricked them out a bit, but then got careless while painting and lost some of the detail (a previous attempt to use blackening solution was a failure). The 'axle' rides in a pair of rhodings - and these were cut/filed from brass bar and successfully blackened.

Here is the cistern sitting temporarily in place on the ship:

View attachment 468377

View attachment 468378

Now I need to figure out the winch system and the posts that support the cranking bars...
I could be wrong here, but I believe the axel for your chain pump is too long. If you look in Antscherl's books, Vol 2......
Just kidding Your work, as always, is exemplary !
 
Continuing with the chain pumps...

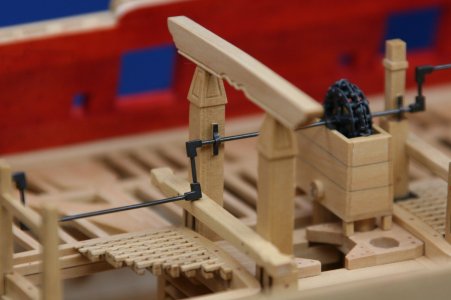
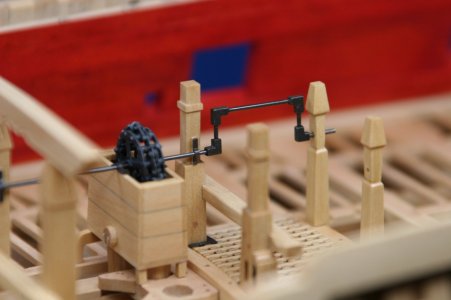
The pump is operated by a crank system (or at least that's the way I understand it to work). To that end I needed to fabricate that system along with some posts at the fore and aft ends of the cranks to control their rotation.

The easiest thing to do would be to simply bend some brass rod - but I need to continue developing my metal working skills, and this seemed like a nice opportunity.

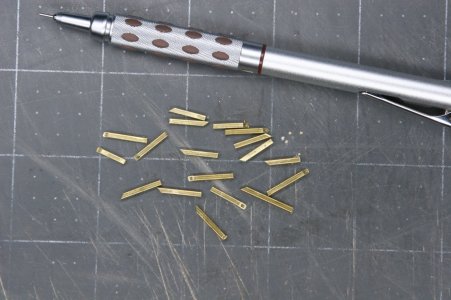
First, I wanted to create some square corners to receive the bars of the cranks (stick with me here - it will all make sense by the end...):

Square tubing cut at 45 degrees:

IMG_1018.JPG

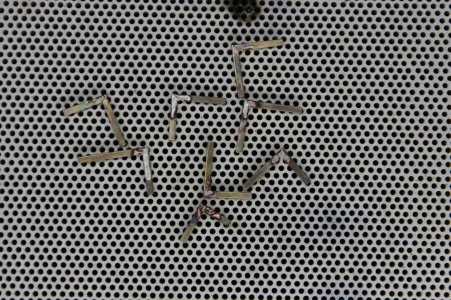
Soldered corners:

IMG_1019.JPG

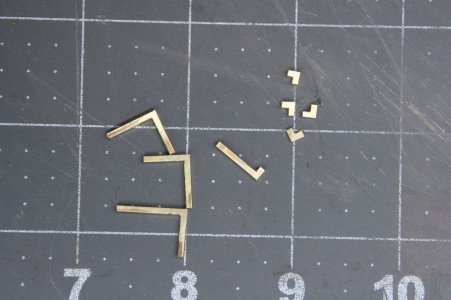
Cleaned up and cutting the corners to length:

IMG_1020.JPG

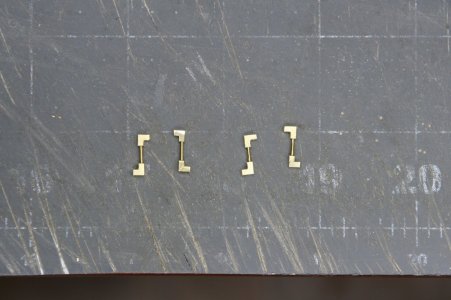
The short vertical segments:

IMG_1022.JPG

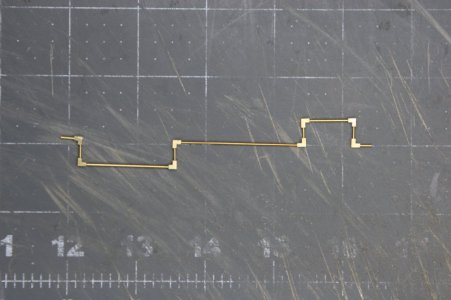
And now the horizontal segments (just dry fit at this point):

IMG_1023.JPG

My first attempt at burnishing/blackening these brass bits was a failure. So, I cleaned them up much more carefully, managed to lose one of the parts (well, the entire sub-construction on the right side of the above photo) when it was flung away to that place where socks go, spent a long hour searching, and a longer hour making the replacement part....

The second attempt at burnishing/blackening was much more successful.

IMG_1028.JPG

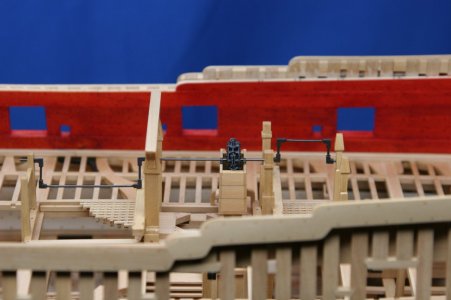
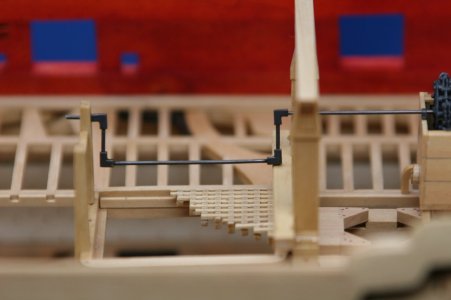
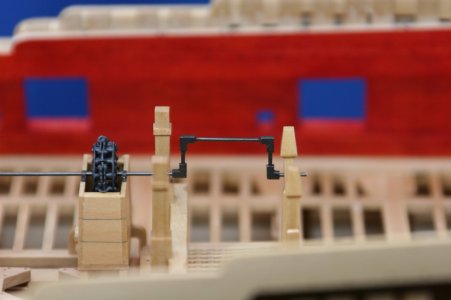
Notice the new posts at the far left and far right (above photo) providing rotational points for the cranking system...

IMG_1027.JPG

IMG_1026.JPG

IMG_1029.JPG

IMG_1030.JPG

I then removed all of these parts from the model. I'll keep them safe until closer to the end of the build.

And it was at this very moment that I looked at the place where the cistern was sitting and wondered where all the water was going to drain to. Scuppers! I forgot the &^%$%^&* (translation: %!@#$(*&^%) scuppers...
 
Last edited:
Continuing with the chain pumps...

The pump is operated by a crank system (or at least that's the way I understand it to work). To that end I needed to fabricate that system along with some posts at the fore and aft ends of the cranks to control their rotation.

The easiest thing to do would be to simply bend some brass rod - but I need to continue developing my metal working skills, and this seemed like a nice opportunity.

First, I wanted to create some square corners to receive the bars of the cranks (stick with me here - it will all make sense by the end...):

Square tubing cut at 45 degrees:

View attachment 468637

Soldered corners:

View attachment 468638

Cleaned up and cutting the corners to length:

View attachment 468639

The short vertical segments:

View attachment 468640

And now the horizontal segments (just dry fit at this point):

View attachment 468641

My first attempt at burnishing/blackening these brass bits was a failure. So, I cleaned them up much more carefully, managed to lose one of the parts (well, the entire sub-construction on the right side of the above photo) when it was flung away to that place where socks go, spent a long hour searching, and a longer hour making the replacement part....

The second attempt at burnishing/blackening was much more successful.

View attachment 468644

Notice the new posts at the far left and far right (above photo) providing rotational points for the cranking system...

View attachment 468643

View attachment 468642

View attachment 468645

View attachment 468646

I then removed all of these parts from the model. I'll keep them safe until closer to the end of the build.

And it was at this very moment that I looked at the place where the cistern was sitting and wondered where all the water was going to drain to. Scuppers! I forgot the &^%$%^&* scuppers...
Good morning Paul. I have come to expect something special from you so I don’t know why I still go WOW….but this is wow. Scuppers….I’m sure you will make a plan. Cheers Grant
 
Continuing with the chain pumps...

The pump is operated by a crank system (or at least that's the way I understand it to work). To that end I needed to fabricate that system along with some posts at the fore and aft ends of the cranks to control their rotation.

The easiest thing to do would be to simply bend some brass rod - but I need to continue developing my metal working skills, and this seemed like a nice opportunity.

First, I wanted to create some square corners to receive the bars of the cranks (stick with me here - it will all make sense by the end...):

Square tubing cut at 45 degrees:

View attachment 468637

Soldered corners:

View attachment 468638

Cleaned up and cutting the corners to length:

View attachment 468639

The short vertical segments:

View attachment 468640

And now the horizontal segments (just dry fit at this point):

View attachment 468641

My first attempt at burnishing/blackening these brass bits was a failure. So, I cleaned them up much more carefully, managed to lose one of the parts (well, the entire sub-construction on the right side of the above photo) when it was flung away to that place where socks go, spent a long hour searching, and a longer hour making the replacement part....

The second attempt at burnishing/blackening was much more successful.

View attachment 468644

Notice the new posts at the far left and far right (above photo) providing rotational points for the cranking system...

View attachment 468643

View attachment 468642

View attachment 468645

View attachment 468646

I then removed all of these parts from the model. I'll keep them safe until closer to the end of the build.

And it was at this very moment that I looked at the place where the cistern was sitting and wondered where all the water was going to drain to. Scuppers! I forgot the &^%$%^&* scuppers...
What a delicate manufactured crankshaft is that, Paul! Again with fine details as the ‘2x45 dgr square tubing corners’ and rotating points. For sure you will find a solution for the scuppers ……
Regards, Peter.
 
Looks amazing Paul.

Can you elaborate on the challenges you had with the burnishing.
I am about to do some metal work with brass and solder for the rings and metal work on the yards, and would greatly appreciate your insights on how to cleanup the metal piece and burnish and blacken it when finished.
Thanks for your sharing and skill.

Michael
Hello Michael.

I'll start with my 'best practices' for burnishing and then explain my recent challenges. Here is a copy of an email I sent to another forum member when he asked me for my approach...

Here are some best practices to try:

1. I always pre-clean the parts. If you can sand them with very, very fine sandpaper then do that. There are also some polishing brushes you can use in a rotary tool. But sometimes the parts are too small for that sort of treatment so the best you can do is clean them in some sort of chemical. I tend to avoid caustic stuff so I pre-clean most everything in household (white) vinegar. It is a mild organic acid so I leave the parts in the vinegar at least 30 minutes - sometimes 60 minutes.

2. Rinse off in water.

3. The problem with Brass Black is it is very aggressive (of course that's why everyone likes it - it blackens/burnishes extremely well). But its aggressive nature is also its downfall and you see this all the time on the forum. If you use the Brass Black full-strength (and without properly cleaning the parts) a thick dust-like compound builds up on the surface that just flakes off. No joy. No blackening.

The solution is to dilute the Brass Black with water. I would start with 1:10 (or even 1:20) and adjust from there. If you dilute enough the blackening will take quite a long time. Well, 60 seconds rather than instantaneous. The longer it takes the better the result. You want the brass to be blackened (it's actually more of a gun-metal type finish that looks very authentic at scale) without getting the dusty surface.

4. Anyway, once it is blackened, remove the piece and rinse it off in water and allow it to air dry on a paper towel. I use a Q Tip or similar to wipe off the part (it will still get a faint dust on it). Upon inspection the part is usually fine to use. But if you want it darker then just return it to the diluted solution for a second round.

It is surprising to me that I can re-use the same diluted solution over and over again - like 10 times or more. That doesn't make sense as I would have thought whatever is in the Brass Black that causes the blackening reaction would be used up but apparently that takes a rather long time. I keep the diluted solution in a small glass covered jar and use it until it doesn't work anymore.


So, that's how I normally go about burnishing metals. But I had gotten lazy. Over the past month I had burnished a few bits made of copper and copper blackens very easily. If you think dark thoughts about copper next to a closed bottle of Brass Black it turns dark. Blackening copper makes you think you don't really need to follow the 'best practices.'

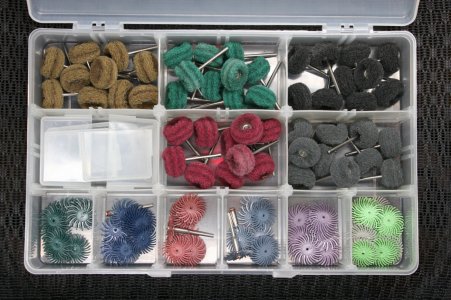
When it came time to blacken the brass cranking mechanism for the chain pumps, I cleaned the metal with a file and then some time in the vinegar - but I had failed to REALLY clean the brass so it turned out blotchy. I had to go back with a brush in a rotary tool and that provides a much cleaner surface. Success.

Here is my metal cleaning toolbox:

IMG_1034.JPG

Hope this helps!
 
You never fail to impress Paul, outstanding work.

In my absence and drift into the Model Engineering side of the hobby, I have discovered proper pickling solutions used to clean silver soldered parts. I have yet to purchase some and try for myself but the results I have seen are spotlessly clean however the process does dull the metal as these are an Acid , be it Brass or Copper. Subsequent polishing would destroy the clean surface.

I will post my findings when I come to try it out.
 
Hello Michael.

I'll start with my 'best practices' for burnishing and then explain my recent challenges. Here is a copy of an email I sent to another forum member when he asked me for my approach...

Here are some best practices to try:

1. I always pre-clean the parts. If you can sand them with very, very fine sandpaper then do that. There are also some polishing brushes you can use in a rotary tool. But sometimes the parts are too small for that sort of treatment so the best you can do is clean them in some sort of chemical. I tend to avoid caustic stuff so I pre-clean most everything in household (white) vinegar. It is a mild organic acid so I leave the parts in the vinegar at least 30 minutes - sometimes 60 minutes.

2. Rinse off in water.

3. The problem with Brass Black is it is very aggressive (of course that's why everyone likes it - it blackens/burnishes extremely well). But its aggressive nature is also its downfall and you see this all the time on the forum. If you use the Brass Black full-strength (and without properly cleaning the parts) a thick dust-like compound builds up on the surface that just flakes off. No joy. No blackening.

The solution is to dilute the Brass Black with water. I would start with 1:10 (or even 1:20) and adjust from there. If you dilute enough the blackening will take quite a long time. Well, 60 seconds rather than instantaneous. The longer it takes the better the result. You want the brass to be blackened (it's actually more of a gun-metal type finish that looks very authentic at scale) without getting the dusty surface.

4. Anyway, once it is blackened, remove the piece and rinse it off in water and allow it to air dry on a paper towel. I use a Q Tip or similar to wipe off the part (it will still get a faint dust on it). Upon inspection the part is usually fine to use. But if you want it darker then just return it to the diluted solution for a second round.

It is surprising to me that I can re-use the same diluted solution over and over again - like 10 times or more. That doesn't make sense as I would have thought whatever is in the Brass Black that causes the blackening reaction would be used up but apparently that takes a rather long time. I keep the diluted solution in a small glass covered jar and use it until it doesn't work anymore.


So, that's how I normally go about burnishing metals. But I had gotten lazy. Over the past month I had burnished a few bits made of copper and copper blackens very easily. If you think dark thoughts about copper next to a closed bottle of Brass Black it turns dark. Blackening copper makes you think you don't really need to follow the 'best practices.'

When it came time to blacken the brass cranking mechanism for the chain pumps, I cleaned the metal with a file and then some time in the vinegar - but I had failed to REALLY clean the brass so it turned out blotchy. I had to go back with a brush in a rotary tool and that provides a much cleaner surface. Success.

Here is my metal cleaning toolbox:

View attachment 468945

Hope this helps!

Thanks Paul that is perfect.

Can I get confirmation on how the soldered joints respond to the burnishing process, do they need to treated differently?
 
Back
Top