Capped off nicely 
-

Win a Free Custom Engraved Brass Coin!!!
As a way to introduce our brass coins to the community, we will raffle off a free coin during the month of August. Follow link ABOVE for instructions for entering.
You are using an out of date browser. It may not display this or other websites correctly.
You should upgrade or use an alternative browser.
You should upgrade or use an alternative browser.
Kingfisher 1770 1:48 POF [COMPLETED BUILD]
- Thread starter dockattner
- Start date
- Watchers 146
Fascinating, that is incredible fiddly work.
Jan
Jan
Good morning Paul. I enjoyed this- complicated = motivation. True story however the corresponding skill set is required- perhaps why I have avoided the complicated thus far in my ship building career.The motivation to do this on the 'frames' side is complicated
Maybe it’s just me however the inclusion of this rail makes a noticeable visual difference to model, as does staining the starboard one black. So very good! If I don’t chat to you before Wednesday have a wonderful Christmas with your family and friends Paul. Cheers GrantNow moving on from the quarter badge (for now, or forever, remains to be seen).
Some time ago I committed to installing a cap rail (planksheer) on both sides of the ship. That is the natural choice for the 'finished' side but unusual for the side left in frames. The motivation to do this on the 'frames' side is complicated - but suffice it to say that I reasoned this would give a better result than leaving the over-faired top timbers.
One of the challenges in creating the cap rails is that there are 10 places (5 per side) where there is a curved vertical step in the rail. I doubted I could steam and bend these steps, so I created patterns and made them from thicker stock.
Patterns:
View attachment 490893
Traced onto leftover boxwood stock:
View attachment 490895
The concave face was then sanded on an oscillating spindle sander:
View attachment 490896
And then the upper face was sanded to shape on a disc sander:
View attachment 490897
Obviously, these are still 'rough' pending final fit and adjustment for final thickness (1.4 mm rails).
On the 'finished' side I tinted the cap rails black. They were left natural on the 'frames' side.
View attachment 490905
View attachment 490906
View attachment 490907
View attachment 490908
View attachment 490909
View attachment 490910
View attachment 490911
View attachment 490912
View attachment 490913
View attachment 490914
I will be adding unshaped timberheads to the 'frames' side and shaped timberheads on the 'finished' side. These will obviously be faux timberheads since I cut off the top timbers more than a year ago...
Thanks for the visit!
It will not come as a surprise that I am very happy with the 2 different halves of your model, Paul.Now moving on from the quarter badge (for now, or forever, remains to be seen).
Some time ago I committed to installing a cap rail (planksheer) on both sides of the ship. That is the natural choice for the 'finished' side but unusual for the side left in frames. The motivation to do this on the 'frames' side is complicated - but suffice it to say that I reasoned this would give a better result than leaving the over-faired top timbers.
One of the challenges in creating the cap rails is that there are 10 places (5 per side) where there is a curved vertical step in the rail. I doubted I could steam and bend these steps, so I created patterns and made them from thicker stock.
Patterns:
View attachment 490893
Traced onto leftover boxwood stock:
View attachment 490895
The concave face was then sanded on an oscillating spindle sander:
View attachment 490896
And then the upper face was sanded to shape on a disc sander:
View attachment 490897
Obviously, these are still 'rough' pending final fit and adjustment for final thickness (1.4 mm rails).
On the 'finished' side I tinted the cap rails black. They were left natural on the 'frames' side.
View attachment 490905
View attachment 490906
View attachment 490907
View attachment 490908
View attachment 490909
View attachment 490910
View attachment 490911
View attachment 490912
View attachment 490913
View attachment 490914
I will be adding unshaped timberheads to the 'frames' side and shaped timberheads on the 'finished' side. These will obviously be faux timberheads since I cut off the top timbers more than a year ago...
Thanks for the visit!
Nice that the different sides are exactly the other way around on my model. But for that you live on the other side of the Ocean.
Regards, Peter
- Joined
- Jul 27, 2021
- Messages
- 395
- Points
- 323

What a beauty Paul ... it's really fun to look closely at each new post, the careful execution of the components and, above all, your critical faculties and enthusiasm.
best
Dirk
best
Dirk
Incredible Doc, So clean. Not a micro spec to be seen. It takes a lot of time and patience. That's what separates everyday ship modeling from Masterworks.
Це погоподібно 

it's godlike !!!!!!!!
it's godlike !!!!!!!!
That black cap rail adds yet another complimentary contrast which is tying into the overall theme beautifully.
Last edited:
What a beauty Paul ... it's really fun to look closely at each new post, the careful execution of the components and, above all, your critical faculties and enthusiasm.
best
Dirk
Totally agree.
You appeared to have nailed it at EVERY curved stepdown! I'm at this exact step, as I restart work on my cross section of the BHR. It's taken hours to get the SINGLE stepdown to fight tight. I admire your skill and patience!!
The Scarph joint is spot on too.
I love the profile shape you added to the rail edges. It looks like you left that edge profile off on the "naked" unpainted side? Or am I seeing the photos wrong?
The Scarph joint is spot on too.
I love the profile shape you added to the rail edges. It looks like you left that edge profile off on the "naked" unpainted side? Or am I seeing the photos wrong?
I see what you did thereCapped off nicely
 ...
...Thanks, Jan. Yes...fiddly work.Fascinating, that is incredible fiddly work.
Jan
Thanks, Grant. Merry Christmas to you and your bunch as well!Good morning Paul. I enjoyed this- complicated = motivation. True story however the corresponding skill set is required- perhaps why I have avoided the complicated thus far in my ship building career.
Maybe it’s just me however the inclusion of this rail makes a noticeable visual difference to model, as does staining the starboard one black. So very good! If I don’t chat to you before Wednesday have a wonderful Christmas with your family and friends Paul. Cheers Grant
Thank you, Peter. I'm feeling pretty good about the half and half thing at this point.It will not come as a surprise that I am very happy with the 2 different halves of your model, Paul.The 'blank construction' view on the port side and the 'fully installed' starboard side. The different colors looks great and gives very nice accents.
Nice that the different sides are exactly the other way around on my model. But for that you live on the other side of the Ocean.
Regards, Peter
Maybe we can take my starboard side and join it with your port side to create something unique!
Thank you kindly, Dirk.What a beauty Paul ... it's really fun to look closely at each new post, the careful execution of the components and, above all, your critical faculties and enthusiasm.
best
Dirk
Це погоподібно
it's godlike !!!!!!!!


Much appreciated, Tony. Patience is certainly part of it.Incredible Doc, So clean. Not a micro spec to be seen. It takes a lot of time and patience. That's what separates everyday ship modeling from Masterworks.
Thank you, Daniel. The black cap rail does pair nicely with the black band of the wale. Coming together...That black cap rail adds yet another complimentary contrast which is tying into the overall theme beautifully.
Thanks, Roger. The details are fun to do and fun to look at.Totally agree.
Ah ha. Someone who understands how hard that was to accomplish! Even with paper templates it still took quite a long time to get the fit just right.You appeared to have nailed it at EVERY curved stepdown! I'm at this exact step, as I restart work on my cross section of the BHR. It's taken hours to get the SINGLE stepdown to fight tight. I admire your skill and patience!!
The Scarph joint is spot on too.
I love the profile shape you added to the rail edges. It looks like you left that edge profile off on the "naked" unpainted side? Or am I seeing the photos wrong?
As for the scarph joints - I made several hundred on the Vasa hull so I have some pretty well-developed routines for those. They are actually rather easy once you figure out how you want to approach them.
And yes, apart from the waist rail I decided to leave off the rail profile on the 'frames' side. I felt like that honored the half-and-half theme appropriately, although...
- Joined
- Jun 17, 2021
- Messages
- 3,167
- Points
- 588

Too true!What a beauty Paul ... it's really fun to look closely at each new post, the careful execution of the components and, above all, your critical faculties and enthusiasm.
best
Dirk
Great result, it just looks perfect.
Thank you very much, Peter!Too true!
Much appreciated, Tobias. A very satisfying outcome.Great result, it just looks perfect.
Thanks, Maarten.Stunning work Paul.
PS why not adding the carved dolphins on the galleries.
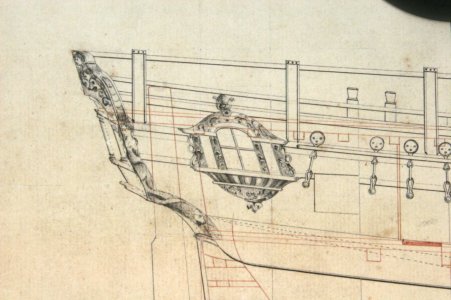
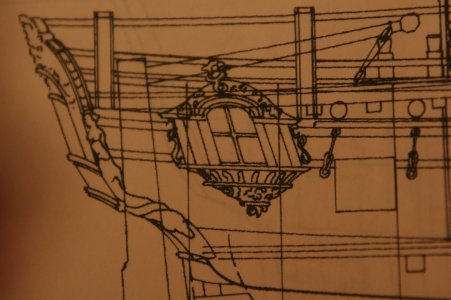
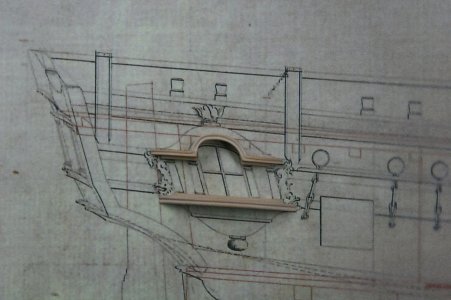
Are these drawings not from the Kingfisher?
View attachment 491099
Yes, this is one of the NMM drawings of the 1770 Kingfisher. Unfortunately, so is this:

And Harold Hahn shows this:

In any case, since my model has plenty of Pegasus features because of how closely I am following TFFM (Antscherl), I'm feeling like I have a certain amount of latitude. But to your point - something will definitely be carved to flank the quarter badge. But whatever goes there I will want to coordinate with the stern carvings so I'm holding off at present.
Merry Christmas to Paul and your whole family. And think of me when you go to your wine cellar to get a fine wine for the festive dinner.
I add my very best wishes to you and your family for Christmas Paul. Been a blast since we first started exchanging posts.
Thank you, Shota. Happy Hannukah to you - enjoy the holiday with family and friends - and may 2025 be your best year ever!merry Christmas and Happy new year my friend
Best wishes for a wonderful holiday season, Tobias!Merry Christmas to Paul and your whole family. And think of me when you go to your wine cellar to get a fine wine for the festive dinner.


