You are an evil temptress Maarten...There is a solution for this, build shell first.
-
LUCZORAMA SHIPWRECK SCAVENGER HUNT GIVEAWAY. 4 Weeks of Fun • 1 Legendary Prize ((OcCre’s Fram Ship)) • Global Crew Welcome!
**VIEW THREAD HERE**
You are using an out of date browser. It may not display this or other websites correctly.
You should upgrade or use an alternative browser.
You should upgrade or use an alternative browser.
Kingfisher 1770 1:48 POF [COMPLETED BUILD]
- Thread starter dockattner
- Start date
- Watchers 146
Outstanding work!
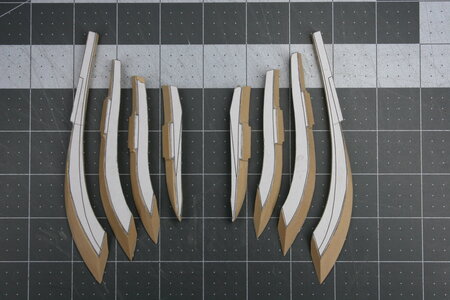
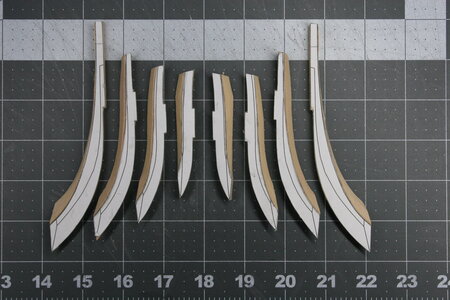
Work slowly continues on the pointy end. The first thing I needed to do was bevel the bollard timbers (as I understand it these are also referred to as knightheads but since they no longer have knight's heads, I'm going with bollard timbers) and the hawse timbers.
I left quite a lot of excess when I did these bevels - and since I didn't feel confident about the layout lines for the inner surfaces I left even more excess on the inside than I did on the outside. The instructions confidently tell me to just follow the patterns, but Antscherl (The Fully Framed Model) uses a somewhat different approach.
Anyway, here are the beveled bow pieces:
The instructions call for these pieces to be 'joined together' off the ship (and off the building jig) - and when I did that I could make them fit very nicely. But when I attempted to bring that construction to the ship it didn't fit at all...
I have now abandoned that approach and have installed the most forward of the cant frames and will now be working within the constraints established by the stem and the cant frame:
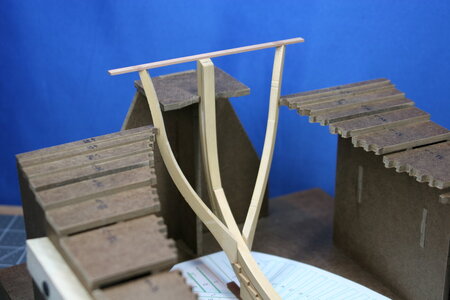
This is the way scratch builders are fabricating this area (at least some of them).
There is a curiosity on the swan class ships: an airspace between the hawse timbers. And there is a further curiosity on the first three ships of the swan class series: a thickened 'blocking' in the area of the hawseholes (later abandoned because of the waste of timber in fabricating this unique feature). Anyway, Kingfisher is the second ship in the series so I'm trying to replicate the blocking.
The important point is that there is not an airspace in the area of the blocking.
The hashed area represents where I need to reduce the thickness of the timber by 3/4" (real size) on each surface...
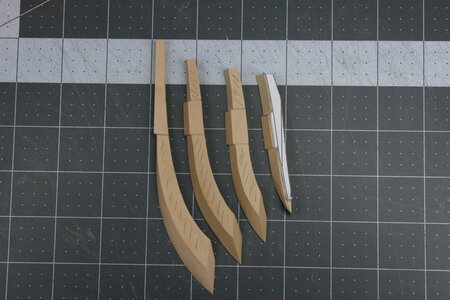
I'm sure a mill is the perfect tool for this. Allow me to introduce you to the poor-man's mill:
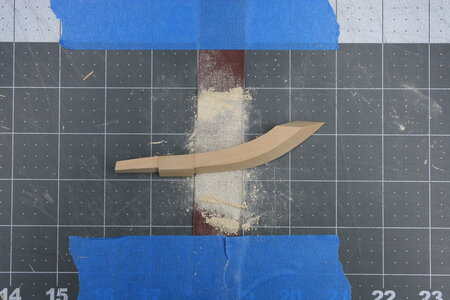
It turns out this strip of sandpaper is the perfect thickness...
Here is what it looks like (the smaller space on the top left (between the bollard timber and hawse #1 is correct):
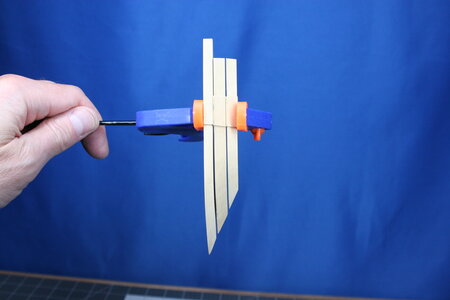
As far as I am concerned this is a tremendous about of work on pieces that I still don't know will fit. And the other side remains...
I left quite a lot of excess when I did these bevels - and since I didn't feel confident about the layout lines for the inner surfaces I left even more excess on the inside than I did on the outside. The instructions confidently tell me to just follow the patterns, but Antscherl (The Fully Framed Model) uses a somewhat different approach.
Anyway, here are the beveled bow pieces:


The instructions call for these pieces to be 'joined together' off the ship (and off the building jig) - and when I did that I could make them fit very nicely. But when I attempted to bring that construction to the ship it didn't fit at all...
I have now abandoned that approach and have installed the most forward of the cant frames and will now be working within the constraints established by the stem and the cant frame:

This is the way scratch builders are fabricating this area (at least some of them).
There is a curiosity on the swan class ships: an airspace between the hawse timbers. And there is a further curiosity on the first three ships of the swan class series: a thickened 'blocking' in the area of the hawseholes (later abandoned because of the waste of timber in fabricating this unique feature). Anyway, Kingfisher is the second ship in the series so I'm trying to replicate the blocking.
The important point is that there is not an airspace in the area of the blocking.
The hashed area represents where I need to reduce the thickness of the timber by 3/4" (real size) on each surface...

I'm sure a mill is the perfect tool for this. Allow me to introduce you to the poor-man's mill:

It turns out this strip of sandpaper is the perfect thickness...
Here is what it looks like (the smaller space on the top left (between the bollard timber and hawse #1 is correct):

As far as I am concerned this is a tremendous about of work on pieces that I still don't know will fit. And the other side remains...
- Joined
- Oct 23, 2018
- Messages
- 812
- Points
- 403

Paul,
if you have a mill, use a mill for the job. This will be much much easier. I am afraid that you have bevelled to much on your hawse pieces. It is easier to do the fine tuning after you have glued the parts together. Perhaps it helps to build a small jig. As far as I remember Tobias has show this in one of his two logs.
Thanks for the time you invest to write your log. It is really helpful and motivating for my own project - not to produce only another keel.
Last edited:
- Joined
- Sep 3, 2021
- Messages
- 5,029
- Points
- 738

That’s the beauty of it; you won't know if the individual parts go together until you join them. Even worse, you'll even have to wait until the last relevant part goes in, before you know if the fruit of your labor meets expectations. Enjoy the ride!Work slowly continues on the pointy end. The first thing I needed to do was bevel the bollard timbers (as I understand it these are also referred to as knightheads but since they no longer have knight's heads, I'm going with bollard timbers) and the hawse timbers.
I left quite a lot of excess when I did these bevels - and since I didn't feel confident about the layout lines for the inner surfaces I left even more excess on the inside than I did on the outside. The instructions confidently tell me to just follow the patterns, but Antscherl (The Fully Framed Model) uses a somewhat different approach.
Anyway, here are the beveled bow pieces:
View attachment 372010
View attachment 372011
The instructions call for these pieces to be 'joined together' off the ship (and off the building jig) - and when I did that I could make them fit very nicely. But when I attempted to bring that construction to the ship it didn't fit at all...
I have now abandoned that approach and have installed the most forward of the cant frames and will now be working within the constraints established by the stem and the cant frame:
View attachment 372015
This is the way scratch builders are fabricating this area (at least some of them).
There is a curiosity on the swan class ships: an airspace between the hawse timbers. And there is a further curiosity on the first three ships of the swan class series: a thickened 'blocking' in the area of the hawseholes (later abandoned because of the waste of timber in fabricating this unique feature). Anyway, Kingfisher is the second ship in the series so I'm trying to replicate the blocking.
The important point is that there is not an airspace in the area of the blocking.
The hashed area represents where I need to reduce the thickness of the timber by 3/4" (real size) on each surface...
View attachment 372012
I'm sure a mill is the perfect tool for this. Allow me to introduce you to the poor-man's mill:
View attachment 372013
It turns out this strip of sandpaper is the perfect thickness...
Here is what it looks like (the smaller space on the top left (between the bollard timber and hawse #1 is correct):
View attachment 372014
As far as I am concerned this is a tremendous about of work on pieces that I still don't know will fit. And the other side remains...
- Joined
- Oct 11, 2021
- Messages
- 738
- Points
- 403

This is some serously woodworking by hand I must say. Having a mill or not, you still need to learn how to operate a mill, same for a lathe.
Sometimes I see builders do the most easy things on those machines when you can also make them by hand. Tools are just a means to an end.
Those hawse timbers looks excellent Doc and please keep some meat on the bone for the finetuning later on.
Peter
Sometimes I see builders do the most easy things on those machines when you can also make them by hand. Tools are just a means to an end.
Those hawse timbers looks excellent Doc and please keep some meat on the bone for the finetuning later on.
Peter
You might be right about the over-beveling Christian. I left extra wood but since I don't know what these pieces should look like I have no sense of what looks right or wrong. And you are most certainly right about the mill - hand sanding a perfectly flat uniform surface is pure lunacyPaul,
if you have a mill, use a mill for the job. This will be much much easier. I am afraid that you have bevelled to much on your hawse pieces. It is easier to do the fine tuning after you have glued the parts together. Perhaps it helps to build a small jig. As far as I remember Tobias has show this in one of his two logs.
Thanks for the time you invest to write your log. It is really helpful and motivating for my own project - not to produce only another keel.
 .
.Thank you, Shota. I appreciate your kind words and for visiting my build report.Dear Paul
first of all, My condolences on the loss of your father in law (sorry for the delay)
your grandchild is very Beautiful and cutie, I wish you happiness and joy with your family
you are doing wonderful work and progress on the ship
I appreciate your encouraging words Mirek!Witaj Pawle
Podziwiam cię Pawle za odwagę .Wiem że sobie poradzisz z tym modelem trzymam za ciebie kciuki powodzenia .Czekam na dalsze postępy .Pozdrawiam Mirek
Are you saying I need to start overtime
 ? Probably true. We'll find out this week..
That's so true Johan. It seems our colleagues have their doubts so they must be seeing something to be concerned about... It's only wood so parts can be remade - I just don't know what I would do different at this point.That’s the beauty of it; you won't know if the individual parts go together until you join them. Even worse, you'll even have to wait until the last relevant part goes in, before you know if the fruit of your labor meets expectations. Enjoy the ride!
Wise words about tools. I've mentioned elsewhere that I have no background working with tools. When the real men were taking shop classes in school and hanging out in the workshop with their dads, I was dissecting tadpoles, memorizing muscle innervations, and trying to understand stoichiometry. As a result, I have a somewhat unhealthy fear of power tools that cut...This is some serously woodworking by hand I must say. Having a mill or not, you still need to learn how to operate a mill, same for a lathe.
Sometimes I see builders do the most easy things on those machines when you can also make them by hand. Tools are just a means to an end.
Those hawse timbers looks excellent Doc and please keep some meat on the bone for the finetuning later on.
Peter
Hmm. You're now the third guy to look at my hawse timbers with suspicion...
Then I complete the list that looks positively at the result.Hmm. You're now the third guy to look at my hawse timbers with suspicion...
Just wait until you have 'pre-processed' all the needed parts and then try to fit them. And perhaps should there be a re-do ... so what ......
Regards, Peter
Good day, Mon Ami. I think... I should say I believe, with this build you are losing the most important part of our hobby -the fun!! You are overconcern about this and that, and this leads you to worry too much! Why? Why substitute the process of having fun with the constant pressure of "Am I doing it wrong?" Mistakes are part of our hobby...they come in the package, sorry.
Your current skill set is far superior to what most of us can only dream of. Stop worrying about what others might say! If you are happy with the results, what else matters? You absolutely cannot make happy everyone. There will be critics every time... one like, another will not. Should this be the point of concern? Absolutely not, IMHO.
You are doing just great, it doesn't matter what tools you are using, and why it should matter. Work with the tools that make you happy, and apply your skills alone with those tools you are comfortable working with. I am confident that your Kings Fisher will be a great-looking model, and your grandchildren will proudly say - "This is my grandpa made"...and this will make you super happy because you building your models for them, not for us.
P.S. ...sorry I have to say that
Thanks Peter. I do have a supply of boxwood now in case I need to make replacement parts - I just don't have anything as large as these timbers so I'd need to layer up / glue up stock...Then I complete the list that looks positively at the result.The stern also turned out well.
Just wait until you have 'pre-processed' all the needed parts and then try to fit them. And perhaps should there be a re-do ... so what ......
Regards, Peter

