Le Coureur 1776, model 1:48 by muchi

Joined
Feb 3, 2021
Messages
75
Points
143

Happy new year!
Creation of this kit is already underway for 4-5 months.
I often referred to this group build when I didn't know how to make it.

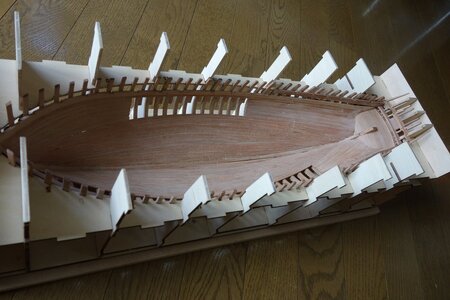
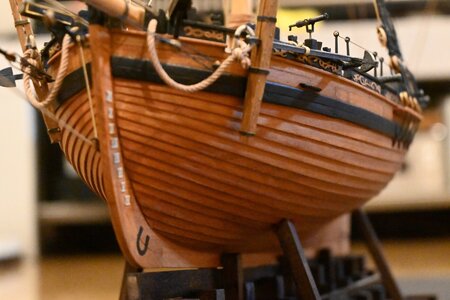
I recently made a boat.
DSC02587a.jpg
The frame was thin, delicate and fragile, and in fact, it broke in several places with a light sanding
Since the position of the third frame was too low, I made the insertion of the arrow part shallow by about 2 mm.

DSC02591.JPG
Glue a thin outer plate at the top.
There is no overall strength, but I will remove it from the jig here

DSC02595.JPG
After gluing the two outer panels from the top, I decided to glue the outer panels from the bottom of the ship to the top.

DSC02600.JPG
There was a slight gap at the end, but I glued the excess wood to fit the size.

DSC02603.JPG
Since the outer panel is thin and the light can be seen through, I glued 0.5X3mm walnut to make it a clinker.

DSC02621.JPG
The seating surface of the rowing has been changed to a tree with a width of 4 mm.
Is it a knee on the bow? Added reinforcement.
 
Hello, welcome and a happy new year, Vieli. Very nice your little dinghy. You write you are building about months ago, we can see more of Le Coureur.
 
Hallo @muchi
welcome to the group build of the CAF Le Coureur.
Very good result with the boat of the lugger, so I am looking forward to see also your work on the ship.
Great to have you on board
 
Thank you for all your likes and comments, and many thanks.
This is my current image of Le Coeurule.
DSC02627.JPG
The production log is a record of the next mistake after the mistake. If it helps, I will show you past records in poor English.

I made a stern today
DSC02642.JPG
Depending on the purpose of the kit, I decided to open a fake window as a glass window.


DSC02619.JPG
The pear tree part was first cleaned by sanding the surface.
The window holes were glued to the stern and opened with a utility knife because the window frame could be damaged.

DSC02620.JPG
The decorative parts were sanded from the back and separated.
 
Last edited:
Happy new year!
Creation of this kit is already underway for 4-5 months.
I often referred to this group build when I didn't know how to make it.

I recently made a boat.
View attachment 279749
The frame was thin, delicate and fragile, and in fact, it broke in several places with a light sanding
Since the position of the third frame was too low, I made the insertion of the arrow part shallow by about 2 mm.

View attachment 279755
Glue a thin outer plate at the top.
There is no overall strength, but I will remove it from the jig here

View attachment 279757
After gluing the two outer panels from the top, I decided to glue the outer panels from the bottom of the ship to the top.

View attachment 279758
There was a slight gap at the end, but I glued the excess wood to fit the size.

View attachment 279759
Since the outer panel is thin and the light can be seen through, I glued 0.5X3mm walnut to make it a clinker.

View attachment 279762
The seating surface of the rowing has been changed to a tree with a width of 4 mm.
Is it a knee on the bow? Added reinforcement.
Rather impressive build for a wee boat.
 
If it helps, I will show you past records in poor English.

all photos also from the past are very interesting to see, especially for othe rmodelers who will build this interesting model afterwards
Please show us also the work in the past....
 
I glued the stern. The seam could not be adjusted smoothly.
DSC02650.JPG

For some reason, the side of the stern is higher than the 2 to 3 mm drawing.
DSC02649.JPG

I noticed the studs fixed to the outer panel later, so I cut a 0.55mm brass wire and hit it straight.
DSC02648.JPG

I was planning to change the outer panel to pear wood, but the condition of the circular saw was not good and the lumber did not go well, so I stuck the cherry wood of the kit as it was. It is a little uneven and not beautiful.
DSC02651.JPG

I'm wondering whether to paint the inside of the gun port red or to make it look like the ground of BOUDRIOT.
Since the position of the frame is different from BOUDRIOT, some processing is required.
I didn't have a 4X4mm tree on hand for the waterway, so I will make it as specified by the CAF kit.
DSC02652.JPG
 
Half a year ago, I started with a month of soot removal training. 
It was a painful practice every day because my fingers hurt.

dsc02347-jpg.281515


After removing the soot, I removed the jaggedness of the jig and proceeded smoothly.
However, I did not know the exact position after 38 where the frame is divided into left and right.
DSC02345.JPG

I thought that a rod that accurately attaches the position of the deck clamp is a good system.
However, gluing this thick deck clamp is easier on the rod than under the rod.
Since the hull is drawn next to the jig, I think I should have made a hole by myself and matched it with a rod of about 3 mm.
DSC02354.JPG

1Q and R can be easily attached with a 1X5mm board.
1Q, R laser cut is strange.
DSC02369.JPG

DSC02347.JPG
 
You write that you might want to make the inside red. If I were you, I would leave it natural, but of course it's your decision. Very great and clean work so far on the Le Coureur.Thumbsup
 
I am a purist and do not paint in principle my models, I like the colours of wood to much.
But we have in the monograph by Jean Boudriot a description of the colour appearance of the Le Coureur
1614177399259.png
 
I am a purist and do not paint in principle my models, I like the colours of wood to much.
But we have in the monograph by Jean Boudriot a description of the colour appearance of the Le Coureur
View attachment 282499
Yes Uwe I almost agree with you. Except for the black, I personally like it very much.
 
Adi, Uwe and Tobias Thank you for your feedback and advice.
The inside of the gun port is not painted red
DSC02693.JPG

It is difficult for a model to become a toy due to painting, but I think that if you keep the balance, you can express the expression richly.
This is the painted alert I made last time.
DSC_0191.JPG

This is the first clinker built ship.

DSC_0193.JPG

My clinker build of Le Coureur didn't look beautiful.
Using my favorite pear material 1X5mm, I think I made a beautiful hull by adding a 1mm taper to the bow part of 15cm and slightly changing the step at the rear of the frame.
DSC_0377.JPG

The CAF model is my favorite builder and I bought Granado as well. The frame can be made of the current cherry wood, so I'd like only the outer panel to be made of pear.

DSC_0369.JPG

DSC_0370.JPG

DSC02695.JPG
It is an image of the inside of the ship.
Alignment plywood was used for the floor inside the ship. It is the same color as the upper deck. I drew a board-like line with a pencil and a utility knife.
 
Last edited:
Very good looking model - also your Alert - your clinker planking of her is very good - and I like also your painting chema
Thumbsup
 
Hello all production is slowly progressing.

DSC_0399.JPG
Fitting out is dry fit and not yet fully glued
DSC_0401.JPG
I embedded a toothpick, but it doesn't stand out because I haven't applied flaxseed oil to the deck yet.
DSC02805.JPG

DSC_0404.JPG
It seems that it will take some time to complete.
DSC_0405.JPG

DSC_0407.JPG

DSC_0408.JPG
I want to start making Granado early.
 
Last edited:
Uwe and Adi Thank you for your excessive comments.

Finishing outfitting and adhesive fixing.
DSC_0409.JPG


The door has been remade.
DSC_0410.JPG

You can open and close the door, but the hinges aren't accurate enough, so it's a little tricky to close.
DSC_0410a.JPG


DSC_0411.JPG

The cannon in my kit was a bit problematic.
DSC_0417.JPG

The barrel is slightly bent upwards, I tried to fix it by applying heat, but I gave up immediately.

There is a problem with the balance because the position of the Trunnion (gun ear) of the barrel is about 2 mm too far forward.
I think I should change the position of the Trunnion, but I don't have the tools and skills, so I changed the position of the Gun carriages receiver.
DSC_0414b.jpg

The train tackle block is small, isn't it?
It seems that it will disappear if the soot is scraped.
It is likely to go missing as it is.
DSC_0413.JPG

DSC_0420.JPG
 
Back
Top