Mantua HMS Victory 1:98 art.776. Hitting a wall!!!

Joined
Mar 14, 2023
Messages
4
Points
8
Hey guys I decided to build my first model kit.
Of course I'm finding out that I'm building one of the hardest models to start...

Mantua HMS Victory 1:98 art.776.

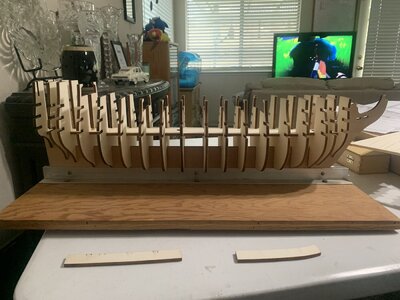
I do plan on starting a full build log but I need to recover parts that are missing from the kit.
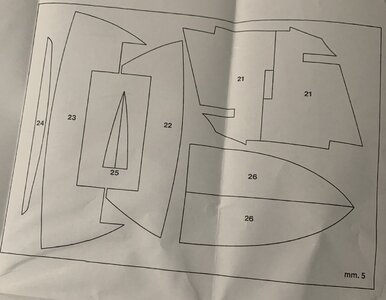
I noticed that Parts numbers 21 through 24 are missing.

I do have the plans that they gave but I think the scaling is not correct.

If anybody has these parts and can give me dimensions, then I can cut them out my self.

70053550850__CBEA9928-357D-4AEB-8879-8DBB7501A254.jpeg


So Far


IMG_7285.JPEG
IMG_7286.JPEG

IMG_7288.JPEG
 
Hi and welcome !
Just go slow and take your time. Trial fit a bunch of times before you glue it. Expect to get frustrated from time to time. Don't let it get to you. Just get away from it for a little bit.
Look in the logs here on the forums of previous builds. That will help a lot and if you still have a question, don't be afraid to ask. :)

Jeff
 
Hello and welcome, great project. The Victory may not be an entry-level model, but with a little skill and perseverance you can do it. As for the missing parts, ask the manufacturer. I wish you success.
 
You can figure out the dimensions of the missing parts yourself. Here's how:

If the drawings are out of scale, you need to determine the the percent in size which they are off-scale relative to the model. For that, you are going to use clues in the geometry to determine how much smaller or larger the drawings are. So, look for dimensions where these parts are going to fit, and measure the lengths on the model, then on the drawing, and calculate the percent size difference.

In the example below, you can locate where these two dimensions are on the model where part# 21 will be installed. take these two measurements and compare them to the same dimensions on the drawings. If you can take even more measurement comparisons between several parts on the drawing, and compare them to those on the model, then you will be able to calculate several numbers for the size difference as a percentage, average them out, and get the most accurate figure.

Take that percentage increase or decrease, then go to the copier, and change the scale on copy machine to match.

Make resized copies of the drawings, and there you are; accurate scale drawings you can work with. Now you can cut copies of the resized drawings, trace them on wood, and cut new parts. Small adjustments may need to be made for the part sizes, but at least you are very close.

1678863602487.png
 
also from my side a warm welcome here on board of our forum
 
I definitely thank you guys for the warm welcome.

I've got a hold of the manufactured this morning and have been going back and forth with them. Unfortunately they do not have CAD files but they're going to see about getting me some dimensions. I have been building custom model cars for the fun of it for many years and have always wanted to build a ship model. It's funny because I actually picked up a Le Hussard 1848 ship model at a estate sale and started to build it and then got my hands on the HMS Victory. I know by no means is it a starter build but I love the challenge. I'm an engineer by trade so I do things very meticulously.

@DARIVS ARCHITECTVS
I completely agree, I was thinking about it last night after I realized not only were Parts 21 through 24 missing but also 31 + 40. The plan sets are definitely not to scale, I have already compared parts. I am actually in the process as we speak of scanning them into my system and I am going to rescale them in AutoCAD. Once I have completed scaling, I'm going to print them out on carbon transfer paper and utilize the extra pieces of wood that I have for the pieces. Worse comes to worse, if I need wood, I have a HobbyTown within 20 mi of me that sells the planks of wood.

In general questions (just because I am OCD when it comes to things)

1) I was looking at the missing parts and it is the bow rib cage. I was thinking about getting blocks of Bolsa wood and shaping the bow in one solid piece on other side to allow for a better Advantage for adhering the planks, what do you guys think?

2) I've reviewed a lot of different builds that people have done of model ships and of this specific model, I've noticed when people are doing the Planks on the bottom of the ship that it shows the ribs through them, has anybody ever tried to use a filler foam or lightweight wood like Bolsa to fill between the ribs so that way the planks look like they are not sagging between the ribs even though they're pulled taut?

3) I've looked at the historical coloring scheme that is provided with the ship and and was more concerned about how the paint will absorb into the wood. I was thinking rather than painting if I was to get tinted stains instead to match. Has anybody had experience with this?

4) I was looking at getting the sale kit for the ship but didn't like the material and was thinking about making the sails out of a lightweight canvas. I just need to find the stencils. Has anybody done this?
 
Last edited:
I definitely thank you guys for the warm welcome.

I've got a hold of the manufactured this morning and have been going back and forth with them. Unfortunately they do not have CAD files but they're going to see about getting me some dimensions. I have been building custom model cars for the fun of it for many years and have always wanted to build a ship model. It's funny because I actually picked up a Le Hussard 1848 ship model at a estate sale and started to build it and then got my hands on the HMS Victory. I know by no means is it a starter build but I love the challenge. I'm an engineer by trade so I do things very meticulously.

@DARIVS ARCHITECTVS
I completely agree, I was thinking about it last night after I realized not only were Parts 21 through 24 missing but also 31 + 40. The plan sets are definitely not to scale, I have already compared parts. I am actually in the process as we speak of scanning them into my system and I am going to rescale them in AutoCAD. Once I have completed scaling, I'm going to print them out on carbon transfer paper and utilize the extra pieces of wood that I have for the pieces. Worse comes to worse, if I need wood, I have a HobbyTown within 20 mi of me that sells the planks of wood.

In general questions (just because I am OCD when it comes to things)

1) I was looking at the missing parts and it is the bow rib cage. I was thinking about getting blocks of Bolsa wood and shaping the bow in one solid piece on other side to allow for a better Advantage for adhering the planks, what do you guys think?

2) I've reviewed a lot of different builds that people have done of model ships and of this specific model, I've noticed when people are doing the Planks on the bottom of the ship that it shows the ribs through them, has anybody ever tried to use a filler foam or lightweight wood like Bolsa to fill between the ribs so that way the planks look like they are not sagging between the ribs even though they're pulled taut?

3) I've looked at the historical coloring scheme that is provided with the ship and and was more concerned about how the paint will absorb into the wood. I was thinking rather than painting if I was to get tinted stains instead to match. Has anybody had experience with this?

4) I was looking at getting the sale kit for the ship but didn't like the material and was thinking about making the sails out of a lightweight canvas. I just need to find the stencils. Has anybody done this?
1) I was looking at the missing parts and it is the bow rib cage. I was thinking about getting blocks of Bolsa wood and shaping the bow in one solid piece on other side to allow for a better Advantage for adhering the planks, what do you guys think?

Filling the bow with balsa or some other softwood like pine or even basswood is often done to ensure than planks form smooth curves without edges protruding relative to adjacent planks. My own model of HMS Sovereign of the Seas used balsa blocks throughout the entire hull to remove flat spots, hard bends, and bulkheads or frames from showing through like ribs. It's more work up front but does a thorough job of removing hull shape flaws later on.

2) I've reviewed a lot of different builds that people have done of model ships and of this specific model, I've noticed when people are doing the Planks on the bottom of the ship that it shows the ribs through them, has anybody ever tried to use a filler foam or lightweight wood like Bolsa to fill between the ribs so that way the planks look like they are not sagging between the ribs even though they're pulled taut?

A complete fill of balsa blocks between bulkheads removes the ribbed effect of bulkhead edges on planks, as well as the hard bends that occur where the side of the hull begin to curve in at the bow and stern.

3) I've looked at the historical coloring scheme that is provided with the ship and was more concerned about how the paint will absorb into the wood. I was thinking rather than painting if I was to get tinted stains instead to match. Has anybody had experience with this?

We call that "painting with wood". Some models use different wood tones to create shades of wood color and tecture in an artistic model. To create other colors, I prefer to use colored stains wherever possible because paint tends to mask the grain. Unless it is applied with an airbrush, this masking can be inconsistent, leaving the surface a mixture of glassy smooth areas mixed with wood grain texture, which destroys the illusion of the model appearing like the real ship at a distance. TrueTint makes the best wood color stains, mixable with alcohol or water, but they are a bit expensive $25.00 USD for a tiny bottle. Blue, Red, and Black look much better as stain than they do as painted surfaces.

4) I was looking at getting the sale kit for the ship but didn't like the material and was thinking about making the sails out of a lightweight canvas. I just need to find the stencils. Has anybody done this?

If you want the sails to look good, forget all about premade sails. The huge stitches on the edges of the sails look horrible on a model, and the sails are often the wrong size. Make your own sails using measurements taken right off the yards of your own model. Search this forum for sail making threads. Sails scare new model builders, but are easier than you think, and ALWAYS look better than mass produced sail sets. The best cloth available for sails is Navare White Lawn, only available from a UK supplier. An off-white cream color what you want. You cand stain and weather the sails to taste from there. On my first model, I used 97% cotton 3% spandex fabric, which was starched and stretched to form deep bellied 17th century sails that hold their shape well. Sails on HMS Victory were not as deeply bellied, being a 19th century ship. See my build log for La Couronne for the sail making method I used. Others do sails differently, and there are many methods.
 
1) I was looking at the missing parts and it is the bow rib cage. I was thinking about getting blocks of Bolsa wood and shaping the bow in one solid piece on other side to allow for a better Advantage for adhering the planks, what do you guys think?

Filling the bow with balsa or some other softwood like pine or even basswood is often done to ensure than planks form smooth curves without edges protruding relative to adjacent planks. My own model of HMS Sovereign of the Seas used balsa blocks throughout the entire hull to remove flat spots, hard bends, and bulkheads or frames from showing through like ribs. It's more work up front but does a thorough job of removing hull shape flaws later on.

2) I've reviewed a lot of different builds that people have done of model ships and of this specific model, I've noticed when people are doing the Planks on the bottom of the ship that it shows the ribs through them, has anybody ever tried to use a filler foam or lightweight wood like Bolsa to fill between the ribs so that way the planks look like they are not sagging between the ribs even though they're pulled taut?

A complete fill of balsa blocks between bulkheads removes the ribbed effect of bulkhead edges on planks, as well as the hard bends that occur where the side of the hull begin to curve in at the bow and stern.

3) I've looked at the historical coloring scheme that is provided with the ship and was more concerned about how the paint will absorb into the wood. I was thinking rather than painting if I was to get tinted stains instead to match. Has anybody had experience with this?

We call that "painting with wood". Some models use different wood tones to create shades of wood color and tecture in an artistic model. To create other colors, I prefer to use colored stains wherever possible because paint tends to mask the grain. Unless it is applied with an airbrush, this masking can be inconsistent, leaving the surface a mixture of glassy smooth areas mixed with wood grain texture, which destroys the illusion of the model appearing like the real ship at a distance. TrueTint makes the best wood color stains, mixable with alcohol or water, but they are a bit expensive $25.00 USD for a tiny bottle. Blue, Red, and Black look much better as stain than they do as painted surfaces.

4) I was looking at getting the sale kit for the ship but didn't like the material and was thinking about making the sails out of a lightweight canvas. I just need to find the stencils. Has anybody done this?

If you want the sails to look good, forget all about premade sails. The huge stitches on the edges of the sails look horrible on a model, and the sails are often the wrong size. Make your own sails using measurements taken right off the yards of your own model. Search this forum for sail making threads. Sails scare new model builders, but are easier than you think, and ALWAYS look better than mass produced sail sets. The best cloth available for sails is Navare White Lawn, only available from a UK supplier. An off-white cream color what you want. You cand stain and weather the sails to taste from there. On my first model, I used 97% cotton 3% spandex fabric, which was starched and stretched to form deep bellied 17th century sails that hold their shape well. Sails on HMS Victory were not as deeply bellied, being a 19th century ship. See my build log for La Couronne for the sail making method I used. Others do sails differently, and there are many methods.


Thank you for the information on this, it will be extremely helpful. I will be starting a new thread, in which I will post the thread in here for any future individuals that come upon this thread of my build.

And also just because I’m OCD, I’m looking at the row boats that come with it and I’m thinking about building those from scratch out of wood as well.
 
Hey guys I decided to build my first model kit.
Of course I'm finding out that I'm building one of the hardest models to start...

Mantua HMS Victory 1:98 art.776.

I do plan on starting a full build log but I need to recover parts that are missing from the kit.
I noticed that Parts numbers 21 through 24 are missing.

I do have the plans that they gave but I think the scaling is not correct.

If anybody has these parts and can give me dimensions, then I can cut them out my self.

So Far
Hallo @SpydrMonkey
we wish you all the BEST and a HAPPY BIRTHDAY
Birthday-Cake
 
Back
Top