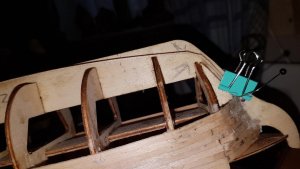
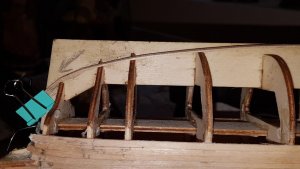
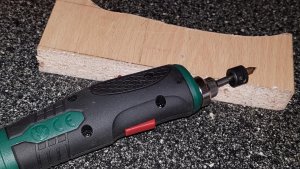
Hi- would love some help as i stated this is my First wooden Model i have started planking top half of Build now after looking on line i think i go from the bottom to the top now. But were do i start from do i start from the arrow's then down to meet the rest or from the green clip,s, ( They seem to miss this bit out it suddenly is planked so i can,t make out how it,s done from here ) please help also how about my homemade electric planker, i made it from a normal Soldering iron and a Drill stop i got from Wish.
-

Win a Free Custom Engraved Brass Coin!!!
As a way to introduce our brass coins to the community, we will raffle off a free coin during the month of August. Follow link ABOVE for instructions for entering.
You are using an out of date browser. It may not display this or other websites correctly.
You should upgrade or use an alternative browser.
You should upgrade or use an alternative browser.
Hi Bazzg,
I assume this is a double planked. for first planking It does not matter if you start at the top or bottom. The idea is to get a good hull shape to put the second layer on. I suggest that for ease you start at the bottom and plank along the keel first. Take your time doing one plank a time either side of the hull. You wll need to bend & cut the planks into position. They do not need to go the entire lenght of the ship in one go. You can cut them mid bulkheads. It is easier to do smaller sections and shape the smaller the planks to fit. Tying to do multiple bends in a single plank is not easy.
The planks will bend if soaked in hot water for about 20 min. Shape them, bend into place and pin. Do not glue, wait till the planks dry and then refit and glue them. The should keep their shape when they dry. Planking IS the hardest part and takes time to learn. Do worry if its not perfect. As long the shape is there is filler and sanding will fix the rest.
It took me 5 ships to get in the swing of it. Take your time, My santa ana took 6 months to plank.
- Joined
- Nov 26, 2018
- Messages
- 546
- Points
- 343

Hi Bazzg,
Look at my build log of the Royal William. I outlined a good way to plank a hull. There are many ways to do it, but this method has served me well. I got it out of a ship building magazine which published a 3 part practicum on how to plank a hull.
I use an ammonia and water mixture to soak the planks and then use a roller or an electric plank bender to curve the planks. One part household ammonia and 9 parts water for about 2 hours.
Vince P.

Many thanks for your reply as far as i can see it is just single planked but i still can not see were to start from i think it's better if i go from the arrow in small bits the manual is not helpful at allHi Bazzg,
I assume this is a double planked. for first planking It does not matter if you start at the top or bottom. The idea is to get a good hull shape to put the second layer on. I suggest that for ease you start at the bottom and plank along the keel first. Take your time doing one plank a time either side of the hull. You wll need to bend & cut the planks into position. They do not need to go the entire lenght of the ship in one go. You can cut them mid bulkheads. It is easier to do smaller sections and shape the smaller the planks to fit. Tying to do multiple bends in a single plank is not easy.
The planks will bend if soaked in hot water for about 20 min. Shape them, bend into place and pin. Do not glue, wait till the planks dry and then refit and glue them. The should keep their shape when they dry. Planking IS the hardest part and takes time to learn. Do worry if its not perfect. As long the shape is there is filler and sanding will fix the rest.
It took me 5 ships to get in the swing of it. Take your time, My santa ana took 6 months to plank.
Hi Bazzg
Its definitely double planked. see step 8 of your manual.
Assembly Instructions: Victory Art. 738
Mantua Model Group
October 2001 Page 9
STEP 8: Planking the Hull – Outer layer
The second (outer) layer of planks is made from 1x6x900 Walnut planks using the same technique as
the first layer. Start 2mm above the first planks so that the joints are staggered for added strength (see
Photo.13
and
Photo.14
overleaf). When completed, remove all pins, fill any splits or pinholes and
scrape and sand the hull smooth.
Do not use nails to hold second planking in place as shown. I suggest Contact Adhesive ! ( NOT CA super glue)
Hi Bazzg
My Bad, wrong manual, however if you skip through to section 26 of the right manual, it is indeed double planked & copper covered. They use templates to cover the first planking. So it does not matter where you start from, as long has the shape is correct.


My Bad, wrong manual, however if you skip through to section 26 of the right manual, it is indeed double planked & copper covered. They use templates to cover the first planking. So it does not matter where you start from, as long has the shape is correct.


Sorry but I am still confused about the double planking for the Mantua Victory 1:200. Having completed the first layer of planking, I definitely do not have enough left for a second layer. I presume if you go for the optional copper bottom, this will act as the second layer, but what if you don’t? This is my first build so help please!
- Joined
- Nov 26, 2018
- Messages
- 546
- Points
- 343

The second layer of planks is with thinner wood. It is usually walnut or some other finish wood. You should have a bunch of the thinner wood for planking. The metal plates can go over the first layer which will save you having to plank the bottom twice. The second layer in much easier than the first because you are planking on a surface and using thinner wood.
Vince P.
Vince P.
- Joined
- Nov 26, 2018
- Messages
- 546
- Points
- 343

Hi Glowworm,Having been away, on getting back I checked and it seems that I only have about 3 strips of the walnut. Is that right?
If you referring to the second planking lumber, it is usually 4 to 5mm wide and 0.5 to 1mm thick. It may be walnut but could be something else. You should have a quantity of strips equal to or close to the first planking strips. If you do not, I recommend getting some walnut 4.0mm x 0.5mm. This is not expensive and can be bought from any of the on-line suppliers. Measure the hull from the waterline up to the poop deck in millimeters. Decide that by 4 and that should tell you how many strips to get.
I built the Mamoli kit at a scale of 1:98 and it came with enough lumber to plank both layers. I am not familiar with your kit. Make sure it didn't come with pre-cut templates. Some kits use these for some of the second planking layer, especially around the lower gunport lines. This would reduce the amount of second layer planking needed.
Vince P.


