Model Shipways Bluenose MS2130 from Model Expo - Help with bearding line and bulkheads

Joined
Jul 2, 2020
Messages
4,110
Points
588

Location
Eugene, Oregon
In carefully laying out the Rabbit and Bearding lines from plan sheet 1, and then carefully removing the laser cut keel parts and bulkheads, when cry fitted some bulkheads on the keel end do not match the plan lines. Aft bulkheads K & M are slightly above the bearding line in pencil below the red actual ends line but not that much;

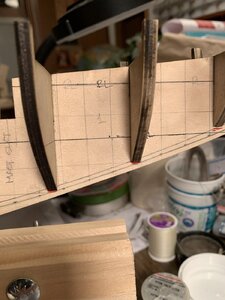
However forward bulkheads C - F are well below (see read bearding line below the plan line in pencil, and almost onto the Rabbit line resulting in a much shorter, vertically, keel. Photos attached for Bulkheads C & D and the plan sheet lines for the same ones with the compass point and lead pointing to the same locations on the plan.

Before trying to modify the profile of the forward bulkheads to bring the bottom bulkhead points up to the plan pencil bearding line, with wales laid across midships to the bow stem bulkhead A along several wales progressing upwards for a fair hull, I want to ask for advice on how to best proceed.

I have read posts that most builds depart from the plans at some point but I did not expect this at the layout stage as it controls everything to follow. I don't want to create future problems which will only get worse in the planking phase.

Being new, except for one solid wood hull plot boat and a just completed 19 inch strip canoe (first "planking" but actually all same size strips) Bluenose will be my first planking build. Recommendations appreciated. PT-2 I apologize for accidently duplicating the photos somehow in posting.Bluenose Aft Bulkheads.jpgBluenose Blukeheads C & D.jpgBluenose Bulkheads C & D Plan.jpgBluenose Aft Bulkheads.jpgBluenose Blukeheads C & D.jpgBluenose Bulkheads C & D Plan.jpg
 

Attachments

  • Bluenose Blukeheads C & D.jpg
    Bluenose Blukeheads C & D.jpg
    211.9 KB · Views: 3
Don't worry too much about it! You are in pretty good shape. In other Bluenose builds I've seen, the bulkheads aft just come to the bearding line, while the bulkheads forward dip below. Looking at yours, there are a couple that might need shimming, but I'd hold off until after the hull is faired. Don't forget: You need to fit 2 layers of planking between the bulkhead and the bearding line. If you're a little high, no big deal. Also, at the extreme fore end and aft end the hull narrows and curves up, leaving the very bottom of the bulkheads angled after fairing. You're on the right track. Maybe some Bluenose builders can chime in! A lot of this will resolve with fairing. You're getting an important lesson early: Build to the model!


aft.jpgfore.jpg
 
Don't worry too much about it! You are in pretty good shape. In other Bluenose builds I've seen, the bulkheads aft just come to the bearding line, while the bulkheads forward dip below. Looking at yours, there are a couple that might need shimming, but I'd hold off until after the hull is faired. Don't forget: You need to fit 2 layers of planking between the bulkhead and the bearding line. If you're a little high, no big deal. Also, at the extreme fore end and aft end the hull narrows and curves up, leaving the very bottom of the bulkheads angled after fairing. You're on the right track. Maybe some Bluenose builders can chime in! A lot of this will resolve with fairing. You're getting an important lesson early: Build to the model!


View attachment 178167View attachment 178168
You answered by question so you can disregard my message reply back on this. Thanks, PT-2
 
Great advise to "Build To The Model". All to often a modeler is discouraged while chasing a set of plans with precut parts that don't fit. I find that as you see problems developing, as you have here, understand the procedure to make it true. Never make the decision to correct a problem with a gob of filler later. The use of shims or remade parts to correct errors is a good beginning to scratch building.
 
Great advise to "Build To The Model". All to often a modeler is discouraged while chasing a set of plans with precut parts that don't fit. I find that as you see problems developing, as you have here, understand the procedure to make it true. Never make the decision to correct a problem with a gob of filler later. The use of shims or remade parts to correct errors is a good beginning to scratch building.
Thank you for your guidance. Being new I am trying to sort out the best sequence of things. I am still doing some layout on both bulkheads and the keel where I can best do some preliminary fairing (toward the plan lines) flat on the work bench surface for best support and least damage before once again dry fitting them to minimize fairing when glued in place and the stress that is placed, even with a light rasping/sanding touch. I will also install optional braces between the bulkheads to maintain their positions and facilitate planking.
Toward the planking process I am going to mark out the number of planks in each band onto the bulkheads' sides to hopefully maintain symmetry, even if that begins to vary in plank widths during the process. I want to maintain as much symmetry port and starboard as I am able.
Doing the canoe build was a good starter in some of these procedures and I will do a second one to apply what I learned from the first canoe. Then with some of the preparatory work done on Bluenose I should be able to take it up again to begin the planking with those added experiences. Slow and careful will be the order of the day. . . as best as I can bridle myself.
I am still trying to figure out, and follow some steps provided by Doc to get a build log started. That is another challenge for my understanding and compliance. :)) PT-2
 
Hi PT-2,
Looks like you are off to a great start on your build log and build, looking forward to seeing more progress.
Not that I know anything about building this sort of kit so this is just a suggestion as far as other reference points are concerned, how true does the deck look if you lay a batten along it to see any high or low spots, maybe even run a batten over the hull formers and see how it looks.
Cheers,
Stephen.
All of the bulkheads align very precisely with the reference lines on the keel as well as being true to the top of the solid keel piece so there is no offsetting variation on what will be the deck. I will be setting some temporary battens along some of the belt lines to check the overall curvature. Some of the forward problem may be reduced when I fair those bulkheads toward their final form. The aft bulkheads may be resolved in shimming if needed without the additional carving down for the wider bearding line. It will be slow ahead.
 
All of the bulkheads align very precisely with the reference lines on the keel as well as being true to the top of the solid keel piece so there is no offsetting variation on what will be the deck. I will be setting some temporary battens along some of the belt lines to check the overall curvature. Some of the forward problem may be reduced when I fair those bulkheads toward their final form. The aft bulkheads may be resolved in shimming if needed without the additional carving down for the wider bearding line. It will be slow ahead.

Might be a bit slow, but take your time. It will work out. You'll be amazed at the changes fairing the hull will produce!
 
To Admins: Is there a tutorial to explain how to set up account signatures to link to build logs? One with photos/screen shots?
Yes Doc, there is a tutorial as I was working on it. Now only to find it !! I will report back if I find it.
 
Yes Doc, there is a tutorial as I was working on it. Now only to find it !! I will report back if I find it.
Thank you for your search for the logs tutorial. Old shipmates sometimes need visuals to slowly guide them along, not being as familiar with the right "buttons" to push and what to then do. With your assistance I can get out of irons and sailing again. PT-2
 
To Admins: Is there a tutorial to explain how to set up account signatures to link to build logs? One with photos/screen shots?

Here what you will need to do. I will be using my account in the screenshots and explanations.

1. Navigate to your current build log (the very first page) and copy the address. In the upper-left portion of your browser highlight and 'copy' the text. This should include all the text and numbers see below. Highlighted yellow is the full address of this web page (This is just an example, your address will be different).

1599948582559.png

2. Navigate to your profile (upper right area) and click on your name (nickname) Here, I click on Jimsky. It will open the new window (see below). Click on the Signature.

1599948840082.png

3. This is the area for your signature. You can type your signature the way you want. You can use the tools to change the font size\style, color, and much more

1599949272610.png

Take a look at the area where I say 'Current build logs( blue color). One of my current builds is The Naval Cuter Alert 1777. Type the name of your build log, the way you would like to appear in the signature. Highlight the entire name, In the toolbar click the chainlink (highlighted yellow), it will be opened another dialog box: The first area is URL. This is where you have to paste the address copied in step 1. The second field will be populated with the name you have provided. Click the 'Save' button and guess what...? You just linked your signature to your build log. We call this link a 'Hyperlink'. If you hover the mouse pointer ower the name, you will see it will be 'underlined'. By clicking on it, it will activate the link.

1599950537609.png

Hope this will help.
 
Back
Top