Wheels are done and painted. I’ll do some detailing with a fine sharpie at a later point. I’m still debating whether to leave the iron ring black or perhaps add some “dirty copper” like color to similulate wear and tear on the iron. 


 |
The beloved Ships in Scale Magazine is back and charting a new course for 2026! Discover new skills, new techniques, and new inspirations in every issue. NOTE THAT OUR NEXT ISSUE WILL BE MARCH/APRIL 2026 |
|
 |
As a way to introduce our brass coins to the community, we will raffle off a free coin during the month of August. Follow link ABOVE for instructions for entering. |
|
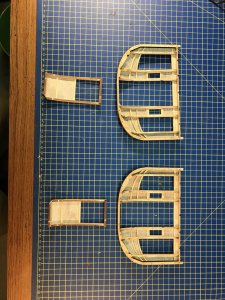
It really is. The kit is well done. As I mentioned earlier the plans and instruction book are both top notch. Clearly written by a modeler.Great looking work. This looks like an nice project for a change in pace.


The B&O museum also has some good wagons on display. One from Adams Express, which was based in Baltimore. I have enjoyed this build so much I convinced myself that the stage coach needs a friend so next build is likely to be a wagon of some type. Might be Spring before I’m back in the shipyard.Outstanding Work, I would really love to build one. I think the wife would like these, she likes the old carriages and coaches. We go to see this type of stuff in Pennsylvania she loves horses and horse drawn vehicles.