• LUCZORAMA SHIPWRECK SCAVENGER HUNT GIVEAWAY. 4 Weeks of Fun • 1 Legendary Prize ((OcCre’s Fram Ship)) • Global Crew Welcome!
    **VIEW THREAD HERE**

My new rigging tool

Joined
Jul 10, 2021
Messages
1,718
Points
438

Location
Vancouver Island
I was having much trouble belaying on belaying pins and cleats and I came up with this. It's a piece of a syringe tube soldered on a wire and stuck in a chopstick. I just thread the rope through through the tube and reach the tube back and forth around the cleat or pin. It works better than I had hoped.
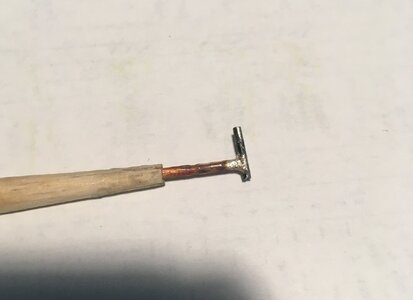
IMG_0381.JPG
 
Sweet! That’s what I love about modelers. There is no problem that you cannot find a solution or work-around to. I’m impressed and going to get the supplies to make my own. Thanks!
 
Necessity is the Mother of invention, yes?

Don, I can sort of visualize it's use. Can you help an old fella out and post a pic of it in action?
 
I was having much trouble belaying on belaying pins and cleats and I came up with this. It's a piece of a syringe tube soldered on a wire and stuck in a chopstick. I just thread the rope through through the tube and reach the tube back and forth around the cleat or pin. It works better than I had hoped.

View attachment 453773
Great idea Don! Can you share what size needle you used? And perhaps some rough dimensions?
 
Sorry guys, I've been sick for a week. When I'm better I'll post a few pics if it in use. No vid though, don't have a clue in the world how to do that. It was dead easy to make, my only concern was that I wouldn't be able to silver solder stainless steel, It went well so either you can s. solder stainless or the syringe wasn't stainless. Dunno
 
Sorry it took so long. Colds lay a beating on me, always wind up in my lungs. probably what will take me. :)
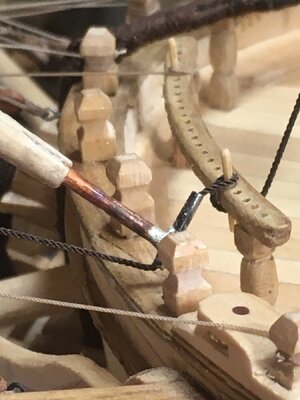
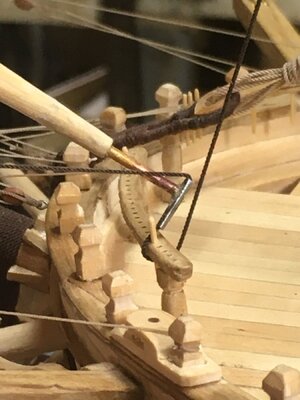
The syringe I used is .050". It has to be small enough to fit between two belaying pins. Pictures for what they are worth. I can take more pictures if it will help. I decided to just use bamboo pieces for belaying pins. I have some turned wooden ones but they break just looking at them. These are not shaped at all but once the rope is belayed and the hank is hung on them you wouldn't be able to see the turning anyway. Oh, i just used black rope so you could see it better.

IMG_0382.JPGIMG_0383.JPG
 
Last edited:
Dear Don,
I hope you recover completely, but in the meantime I want to thank you for publishing the photos, which are very useful for understanding the use of the tool.
Now it seems clear to me that it is a very useful tool and I will immediately start trying to produce one!
Many sincere compliments for having found a solution to a small but annoying problem.
Many thanks indeed
 
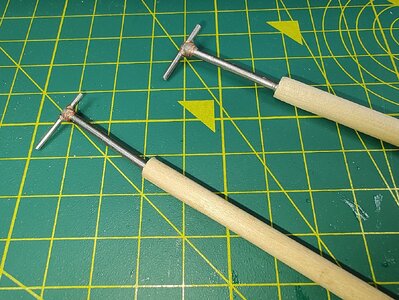
I tried making two tools, for thinner and thicker threads. Not being able to weld at all, I used glue bottle tips and glued them to a sturdy nail with cyanoacrylic glue. Then I tied the joint with copper wire and applied more glue. The tools seem strong, at least for the use for which they are intended. I've tried them and they work very well, I'm sure they will be very useful to me in a few months, when I start equipping the Victory I'm building. Thanks again to Don for the brilliant idea!

IMG_20240629_181241215.jpg
 
PB100068.JPG

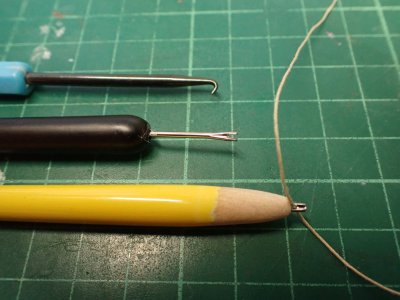
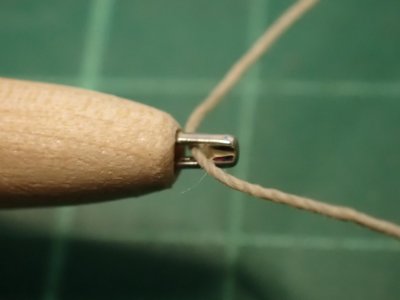
I already had a hook for pulling thread and a pusher made from a large sewing needle with the top ground away but until I read this thread I hadn't thought of a push AND pull tool.

PB100069.JPG

It's not as handy for working around corners as the hypo version but it was easier to make. (Just a ten minute job if you have a big needle handy. :))

Once I've tried it in action I may remove more of the wood from the handle.
 
Back
Top