• Win a Free Custom Engraved Brass Coin!!!
    As a way to introduce our brass coins to the community, we will raffle off a free coin during the month of August. Follow link ABOVE for instructions for entering.

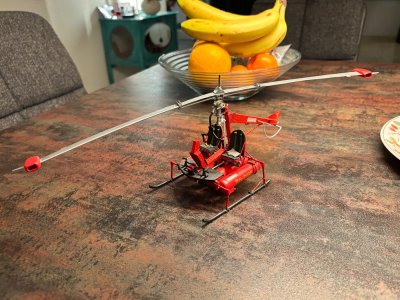
NHI Kolibri N-3, scale 1:48, scratch build

That is looking wonderful, Johan. Each material has its pros and cons and in scale with an extra challenge. The little bit of sagging looks very realistic.
Now is already a spider-chopper.:)
Regards, Peter
True statement, selecting the right materials is a process in itself.
Scratch building inherently requires quite some testing (or redos).
 
Bravo Johan. Baai baai mooi. Cheers Grant
Dankjewel Grant

At each stage of construction, you continue to add realistic detail. This machine is shaping up to be one of the finest scratch builds in this category I've seen yet!
Thanks for the compliments Dan. I think this build is the most challenging build I undertook so far.

Oh yes, the little bird is coming to life!
Most definitely.

Very nice Johan!
Thanks Dean!
Oh yeah! Pffff ... well done.
Thanks!
 
What an amazing build Johan! The mechanics of the rotor head are already complex enough, but this craft adds fuel delivery to the mix! That, I assume, must come up through the very center of the shafts and must then split to each engine at the apex. Throttle must be from a single fuel control valve as I can't see how you could have two lines in a rotating mast (perhaps it is possible, I don't know.) I also can't see how there could be any electrical feedback to the instrument panel, so engine speed must have been controlled "by ear". Daring men in those days!
Hello Russ,

You're absolutely right, the rotorhead is a very complex piece of machinery. It does have two fuel lines running through the hollow main shaft, together with the high voltage electrical wiring for fuel ignition, one for each engine.
As far as engine throttles go, until now I haven't found unambiguous information on how that was accomplished.
Based on the knowledge I have accumulated sofar, I have to come to the conclusion that helicopters, together with submarines, belong to the most dangerous contraptions invented by mankind.
 
Based on the knowledge I have accumulated sofar, I have to come to the conclusion that helicopters, together with submarines, belong to the most dangerous contraptions invented by mankind.

... and a chainsaw.

The rotorhead of a conventional copter is relatively easy to figure out. The central (powered) rotating shaft passes up through the non-rotating portion and the two are connected by the swashplate.

This thing is an entirely different animal. I've looked over the drawing you posted and I'm having a hard time differentiating what rotates from what doesn't! Some things match up perfectly in the two views, and others seem to appear or disappear in one or the other views. Wow! My hat is off to you, my friend, if you can figure it out!
 
.. and a chainsaw.
ROTF
This thing is an entirely different animal. I've looked over the drawing you posted and I'm having a hard time differentiating what rotates from what doesn't! Some things match up perfectly in the two views, and others seem to appear or disappear in one or the other views.
The rotating parts of the drive system consist of the main outer shaft and the inner shaft, which governs the collective pitch. This inner shaft slides up and down in the main shaft. Both shafts are interlocked by internal toothing on the main shaft and external tooting on the inner shaft. The inner shaft passes through the gearbox, driving the tail rotor, and is moved up and down by the collective pitch control system. The inner shaft also accomodaties the fuel lines and the electrical harnesses. The hole system is loaded with bearings, seals, washers, locking rings, etc.
One of the challenges is to break down the complexity of the rotorhead to manageable bits and pieces, meaning I have to understand, to a certain extent, what is shown in the various sketches and drawings.
 
A quick update on the Kolibrie:
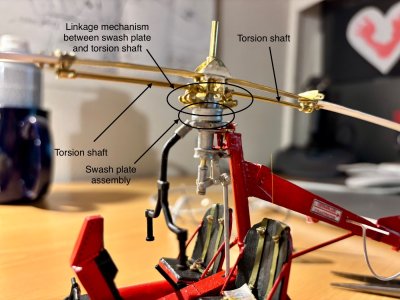
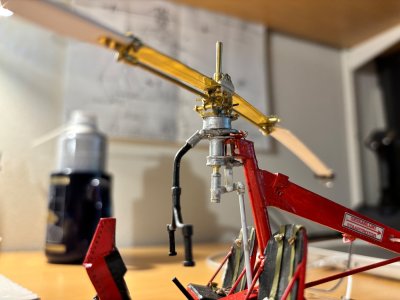
The mechanism between the swash plate and the torsion shafts fabricated and temporarily installed.
IMG_1420.jpeg

IMG_1421.jpeg

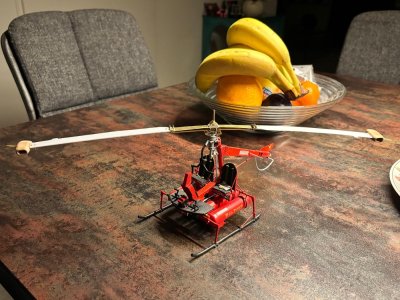
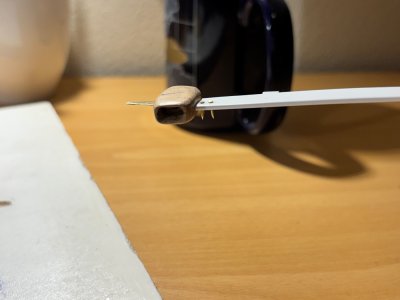
The two Ramjets were also fabricated using some leftovers from the Bluenose kit. Those are now also temporarily installed to the rotor blades. It's finally starting to look like a helicopter.

General view with engines attached:
bd95f69f-d98e-461b-8267-9e7bae6a8b2f.jpeg

Detail of the (temporary) engine installation:
IMG_1429.jpeg
 
A quick update on the Kolibrie:
The mechanism between the swash plate and the torsion shafts fabricated and temporarily installed.
View attachment 552299

View attachment 552294

The two Ramjets were also fabricated using some leftovers from the Bluenose kit. Those are now also temporarily installed to the rotor blades. It's finally starting to look like a helicopter.

General view with engines attached:
View attachment 552298

Detail of the (temporary) engine installation:
View attachment 552296
That’s a very nice up-date, Johan. The RamJets looks very nice and the rotor blades hang down in a nice natural way.
Regards, Peter
 
A quick update on the Kolibrie:
The mechanism between the swash plate and the torsion shafts fabricated and temporarily installed.
View attachment 552299

View attachment 552294

The two Ramjets were also fabricated using some leftovers from the Bluenose kit. Those are now also temporarily installed to the rotor blades. It's finally starting to look like a helicopter.

General view with engines attached:
View attachment 552298

Detail of the (temporary) engine installation:
View attachment 552296
First class Johan. Get those rotors going and you could make a banana smoothie ROTF. Cheers Grant
 
Absolutely stunning. And nice to see it to scale on that table.
Thanks Marco. Wrt the scale: a while ago I responded to a post from our dear friend @Heinrich about a Russian artist, who makes "caricaturestic" models, by exaggerating some of the ships' dimensions. I now have to come to the conclusion that I'm treating the model of the Kolibrie the same way this artist treats his models: I don't have enough dimensioned drawings and sketches to be sure about anything I'm building, maybe apart from some main dimensions.
At best I could say is that the scale is about 1:24-ish.
That’s a very nice up-date, Johan. The RamJets looks very nice and the rotor blades hang down in a nice natural way.
Regards, Peter
Thanks Peter. Your idea to use a stack of wooden blocks and file that to the required shape certainly payed its dividends.
I might still try and see how the use of thin copperfoil turns out; TBC.
The detail in the linkage mechanism and torsion shaft is next level stuff Johan. You're a mechanical artist with brass.
Thanks so much for your compliments Dan. Working with thin brass sheets is remarkably easy; it's possible to use scissors to cut to size, drilling is no issue and using some files and sanding paper works like a breeze.
(And I'm not showing the scrap I'm producing... ;))
I don't have the foggiest notion what you're doing - but it looks like it could fly...
Neither do I, but I try to convince everybody otherwise. The flying bit? Ain't gonna happen.
Incredible build. Awesome details.
Thanks Rebus.
First class Johan. Get those rotors going and you could make a banana smoothie ROTF. Cheers Grant
Thanks Grant.
Banana smoothie? That would be a waste of a bunch of good bananas (and of my waist line)...
 
Yesterday and today saw some paint work on the rotor and engines of the Kolibrie.
Before I got to this step, I thought long and hard about which colors to use. As far as I know there is no overview available on which colors were originally used, the only references now being the NH-3 at Texel Airport and the restored example in Israël.
Very risky and not very scientific, but the rotor blades of both seam to have a bare metal finish. The engines: on the Dutch Kolibrie they are painted green, whereas the Israeli example shows the engines with a metallic finish.
I could live with the metallic finish of the rotor blades, the engines however were a different story. Painting them green didn't seem very attractive to me, a metallic finish didn't appeal either. After juggling the options for a while I decided to paint the engines the same color as the rest of the airframe: red.
I'm very much aware of the fact that my decision is not supported by any evidence, either pictorial or in writing, so I invoke AL-FI.
Below the results of some airbrush activities on the rotor and the engines. The learning curve for airbrush is steeper than I thought... Sick

IMG_1436.jpeg
 
Yesterday and today saw some paint work on the rotor and engines of the Kolibrie.
Before I got to this step, I thought long and hard about which colors to use. As far as I know there is no overview available on which colors were originally used, the only references now being the NH-3 at Texel Airport and the restored example in Israël.
Very risky and not very scientific, but the rotor blades of both seam to have a bare metal finish. The engines: on the Dutch Kolibrie they are painted green, whereas the Israeli example shows the engines with a metallic finish.
I could live with the metallic finish of the rotor blades, the engines however were a different story. Painting them green didn't seem very attractive to me, a metallic finish didn't appeal either. After juggling the options for a while I decided to paint the engines the same color as the rest of the airframe: red.
I'm very much aware of the fact that my decision is not supported by any evidence, either pictorial or in writing, so I invoke AL-FI.
Below the results of some airbrush activities on the rotor and the engines. The learning curve for airbrush is steeper than I thought... Sick

View attachment 553535
When there is no 'convincing evidence' then AL-FI is a good advisor, Johan. It looks GREAT! A nice overall nice color combination.
Regards, Peter
 
Back
Top