Norwegian Sailing Pram from Model Shipways Building Log

The pram is complete.
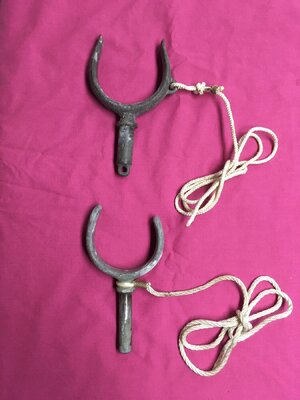
Very nice! One niggling observation: No waterman would have horns (oarlocks) in their sockets except when rowing. Otherwise, they are apt to foul loose lines or body parts. Horns would have lanyards made fast somewhere near the sockets so that they were secure but could easily be put into or taken out of the sockets. See pic below showing two ways of seizing lanyards. Fair winds.

oarlocks.jpg
 
Very nice! One niggling observation: No waterman would have horns (oarlocks) in their sockets except when rowing. Otherwise, they are apt to foul loose lines or body parts. Horns would have lanyards made fast somewhere near the sockets so that they were secure but could easily be put into or taken out of the sockets. See pic below showing two ways of seizing lanyards. Fair winds.

View attachment 427726
Thank you for the insight. I am not a sailor by any means and it is interesting to see how things are really done!
 
Very nice. What's your next project
It will probably be the model expo Midwest Main Peapod lobster boat, which is on sale at half price on Amazon. One of my sons also got me a Model expo 18th century long boat for a birthday gift which looks quite a bit more complex. Whatever it is I will do a build log on it.
 
Last edited:
As has been noted by others the mast step gave me a bit of trouble. According to the instructions there are two pieces, one with a hole for the mast, one without. In actuality both pieces have holes for the mast and are very flimsy. I immediately broke one of the pieces and glued it together. I decided to glue both parts together and used a piece of sturdier scrap beneath them to make a 3 layer sandwich, which worked quite well,

View attachment 427230
re- fabricated mine with a thicker piece of scrap I had. Cut in with the grain lengthwise for better strength.
 
On reflection it seems nit picking points When I and I feel many Readers enjoyed your model and build process. I do not have knowledge of this boat but maybe the top hull side could be fitted 1st and then tapered. Allowing for second side. I do feel the keel side needs to be fitted. Then gaps can be eliminated / templates used (card). Of course there must be a well seasoned person in the Forum, who could suggest a better way, than me. But several ideas along the Dory line is in my head for curvature to shape. If I am way off please say. I’m more of an internal frame then strake build person. Good article as it made me think .
 
" Then gaps can be eliminated / templates used (card). "


Actually I did fill in any gaps with Elmers wood filler which you can place easily, sands nicely and takes paint or stain like wood. I should have mentioned that.
 
Last edited:
Slow steady work I am finding. I am at the Garboard and second Strake plank section on my current build. (your post #7) Thank you for the clear photos.
 
This is my first building log. This is the second wooden ship I have built. I have done plastic models for many years. I found the Ship of Scales site and decided to dip my toe in after reading for a few months. My first build was the Grand Banks Dory, which I found to be a lot of fun. My sailing pram arrived in a well packed box with no missing parts. The instruction manual is very detailed, as it was for the Dory.

I first started with the transom pieces for the bow and stern, which were easy to assemble after reading the description in the building manual. While the stern transom, which is two pieces was drying I made the building board.


View attachment 427087
This is a big help, Thanks! I did the Dory, now doing the Pram. I too was a plastic and paper modeler,Revell Constitution is a work in progress, also did the HMS Alert in card stock. This is the first attempt at real wood.
 
This is a big help, Thanks! I did the Dory, now doing the Pram. I too was a plastic and paper modeler,Revell Constitution is a work in progress, also did the HMS Alert in card stock. This is the first attempt at real wood.
I am glad you find this build log to be of help! Building with wood is so different than with plastic. I am glad you are enjoying it!
 
I snapped the two bottom planks, glued them together, waiting 48 hours for that glue to set. Working with wood IS different from paper and plastic. I soaked them in tap hot water for 20 minutes, I think when the boss is out, I'll fire up her tea kettle and try steaming them to soften them up. I don't think they were soaked long enough, or that tap water hot may not be hot enough.
Would steaming them break the PVA glue bond?
 
Steam and heat can break the Glue bond.
You can try using a plank bending tool, soldering iron or hair dryer. The wood will probably bend to the correct shape prior to the glue dissolving. If not shape the pieces and glue again
 
Thanks, I'll try again. Not used to working with wood, it's not as durable as plastic and card stock. It is repairable though, that's a saving grace!
 
Steam and heat can break the Glue bond.
You can try using a plank bending tool, soldering iron or hair dryer. The wood will probably bend to the correct shape prior to the glue dissolving. If not shape the pieces and glue again
Repair was successful, I boiled a cup of water and painted the boiled water on the planks, several times but did not put any of the hot water directly over the break and waited a few minutes, the planks bent right into shape along with the keel board, so after that dries I will be ready to proceed. I think from here on in, I will use boiled water.
 
Back
Top