Plank bender

Joined
Jan 18, 2024
Messages
178
Points
78

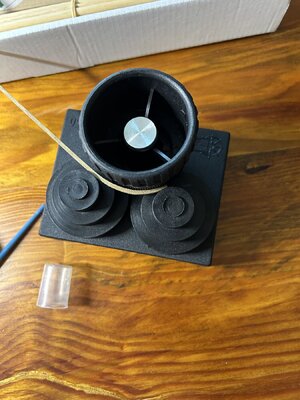
I have been using the mantua wheel type plank bender. Every review I have read has been negative. I pretty much like it and have been using it every day on the extreme bends of my current build. Someone should use this concept and create the best bender ever .you should be able to put straight planks in, roll them back and forth gradually adding more curve. Then leave them to dry in the tool.1722765583708.jpeg1722765583708.jpeg
 
I have been using the mantua wheel type plank bender
Bob,
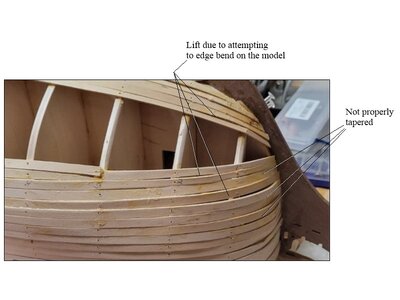
Your plank bender is great for bending in the flat axis but does nothing for lateral bending to avoid edge bending which lifts the planks even once the planks are properly tapered in width between the dead flat and rabbet at the bow. If you have not already done so studying the Passaro four part video should be a help to properly plank your hull.
The only change I made to this method was going to a hot air gun instead of an iron as it covers the plank better with heat and easier to control the temperature and prevent scorching the wood.
Allan

The example below shows edge bending at its worst.
Edge bending.jpg
 
In full-scale planking practice, the radical "edge-bending" advocated by some kit model manufacturers is never attempted because God never made wood intended to bend in more than one plane. In actual planking practice, plank stock is bent against the horizontal fore and aft curve of the shape of the hull and never in the vertical curve of the shape of the hull because God didn't make wood that will do that. Edge-bending a small piece (e.g. 1/4" x 1/32") of strip stock across its wider dimension is possible only by torturing the wood which creates stresses in the grain of the piece that then makes attempting to bend it simultaneously in a direction 90 degrees to another direction a very difficult exercise. This is why planking edge-set plank at the large curves of "apple" bows in period hull shapes is so difficult. The long, "flat" runs of planking on large wooden vessels does involve many long runs of planking that is, for all practical purposes, of uniform widths, but the devil is in the details when the slab-sided areas of the hull must transition to the horizontal twisting curves at the bow and the run aft to a transom or stern post of a double-ended hull.

In full-scale planking practice, each plank is individually spiled to define the plank shape required when cut from a flat plank which when bent in one plane will fit exactly into the space required by the horizontal curve of the hull shape. A picture is worth a thousand words:

Picking up the shape of the plank edge from the adjacent plank edge:

1722993565575.png

Transferring points to the planking stock:

1722993449072.png

Plank shape pattern laid out on the planking stock by connecting the points in fair curves with a sprung batten:

(Plank lengths are shortened for illustrative purposes.)
1722993475869.png

As can be seen from the illustration, a properly shaped plank must be cut from a larger flat piece of plank stock. Now, kit manufacturers commonly provide planking stock in the form of 24" lengths of 1/4" strip wood for reasons of economy and expect builders to make do with this uniform "planking" by making that wood bend in two directions. While it is possible to "torture" a strip of wood to bend across its width and then again bend in a second direction 90 degrees or so from the first, the wood is going to fight against this within the limits of its strength, thereby occasioning a multitude of posts on ship modeling forums by frustrated modelers. (The illustration of the sheer strake above demonstrates the shape the "edge-setters" attempt to achieve by bending, rather than by cutting.)

In short, the problems encountered in planking models, particularly in the areas of the bows and stern, is the result of trying to make the material do something that just isn't in its repertoire. Now, a skilled experienced modeler can turn out a very nice-looking planking job using uniform strip wood, but, for those who are concerned by such details, such a planking job is not an accurate depiction of the prototype, but rather, at best, a close "impression" of the real thing which varies depending upon the scale of the model. For one thing, depending upon the size of the hull, the planking widths will vary to one degree or another. Garboard planks are often the widest. Planks below the turn of the bilge will often be wider than planks above the turn of the bilge (and so are called the "broads,") and the topside planking generally narrower. (Determining the width and run of the planking is one purpose of the "diagonals" on a lines drawing.) Large wooden ships will have a lot of "flat" topside area amidships (e.g. the classic "clipper" hull form) that are easily planked with uniform width planks. Keep in mind, however, that even at 1/4" scale, a 24" length of strip wood represents a 96' long plank and there are few species from which a 96' long plank might be obtained, and even where such might exist, getting it out of the log and to the boatyard, not to mention offering it up to the hull for fitting, is impractical, if not impossible, particularly with contemporary technology! In real life, planks are rarely more than 25 or 30 feel long and butted end to end, connected with butt blocks inboard, or (modernly scarfed and glued with epoxy adhesive.)

In difficult planking situations, a modeler might be well-served by acquiring a familiarity with full-scale practice as a way to overcome the challenges of planking major compound-curved hull shapes. (In modeling sizes, card stock can easily be cut to fit and serve as a pattern for scale planks.) There are many tutorials about lining off, taking up plank shapes, and hanging plank online. The above illustrations are from https://skills.woodenboat.com/articles/planking-an-introduction-to-methods-techniques/ one of a series of basic instructional articles by WoodenBoat magazine.
 
Last edited:
In full-scale planking practice, each plank is individually spiled to define the plank shape required when cut from a flat plank which when bent in one plane will fit exactly into the space required by the horizontal curve of the hull shape.
I was always wondering if ship builders did this in real life on 17-18 centuries wood ships. In my understanding it is not even possible as such wide wood planks do not exist. If existed it would be huge waste of material and effort.
 
In full-scale planking practice, the radical "edge-bending" advocated by some kit model manufacturers is never attempted because God never made wood intended to bend in more than one plane. In actual planking practice, plank stock is bent against the horizontal fore and aft curve of the shape of the hull and never in the vertical curve of the shape of the hull because God didn't make wood that will do that. Edge-bending a small piece (e.g. 1/4" x 1/32") of strip stock across its wider dimension is possible only by torturing the wood which creates stresses in the grain of the piece that then makes attempting to bend it simultaneously in a direction 90 degrees to another direction a very difficult exercise. This is why planking edge-set plank at the large curves of "apple" bows in period hull shapes is so difficult. The long, "flat" runs of planking on large wooden vessels does involve many long runs of planking that is, for all practical purposes, of uniform widths, but the devil is in the details when the slab-sided areas of the hull must transition to the horizontal twisting curves at the bow and the run aft to a transom or stern post of a double-ended hull.

In full-scale planking practice, each plank is individually spiled to define the plank shape required when cut from a flat plank which when bent in one plane will fit exactly into the space required by the horizontal curve of the hull shape. A picture is worth a thousand words:

Picking up the shape of the plank edge from the adjacent plank edge:

View attachment 463295

Transferring points to the planking stock:

View attachment 463293

Plank shape pattern laid out on the planking stock by connecting the points in fair curves with a sprung batten:

(Plank lengths are shortened for illustrative purposes.)
View attachment 463294

As can be seen from the illustration, a properly shaped plank must be cut from a larger flat piece of plank stock. Now, kit manufacturers commonly provide planking stock in the form of 24" lengths of 1/4" strip wood for reasons of economy and expect builders to make do with this uniform "planking" by making that wood bend in two directions. While it is possible to "torture" a strip of wood to bend across its width and then again bend in a second direction 90 degrees or so from the first, the wood is going to fight against this within the limits of its strength, thereby occasioning a multitude of posts on ship modeling forums by frustrated modelers. (The illustration of the sheer strake above demonstrates the shape the "edge-setters" attempt to achieve by bending, rather than by cutting.)

In short, the problems encountered in planking models, particularly in the areas of the bows and stern, is the result of trying to make the material do something that just isn't in its repertoire. Now, a skilled experienced modeler can turn out a very nice-looking planking job using uniform strip wood, but, for those who are concerned by such details, such a planking job is not an accurate depiction of the prototype, but rather, at best, a close "impression" of the real thing which varies depending upon the scale of the model. For one thing, depending upon the size of the hull, the planking widths will vary to one degree or another. Garboard planks are often the widest. Planks below the turn of the bilge will often be wider than planks above the turn of the bilge (and so are called the "broads,") and the topside planking generally narrower. (Determining the width and run of the planking is one purpose of the "diagonals" on a lines drawing.) Large wooden ships will have a lot of "flat" topside area amidships (e.g. the classic "clipper" hull form) that are easily planked with uniform width planks. Keep in mind, however, that even at 1/4" scale, a 24" length of strip wood represents a 96' long plank and there are few species from which a 96' long plank might be obtained, and even where such might exist, getting it out of the log and to the boatyard, not to mention offering it up to the hull for fitting, is impractical, if not impossible, particularly with contemporary technology! In real life, planks are rarely more than 25 or 30 feel long and butted end to end, connected with butt blocks inboard, or (modernly scarfed and glued with epoxy adhesive.)

In difficult planking situations, a modeler might be well-served by acquiring a familiarity with full-scale practice as a way to overcome the challenges of planking major compound-curved hull shapes. (In modeling sizes, card stock can easily be cut to fit and serve as a pattern for scale planks.) There are many tutorials about lining off, taking up plank shapes, and hanging plank online. The above illustrations are from https://skills.woodenboat.com/articles/planking-an-introduction-to-methods-techniques/ one of a series of basic instructional articles by WoodenBoat magazine.
Thanks for this. I also have no use for edge bending. While rebuilding my wood sailboat (with a professional shipwright) I saw how planking is done. Never tortured into place
 
I was always wondering if ship builders did this in real life on 17-18 centuries wood ships. In my understanding it is not even possible as such wide wood planks do not exist. If existed it would be huge waste of material and effort.
Of course they did! There's no other way to do it if you want a hull that's going to be watertight. There's no way anybody is going to be able to steam-bend a six or eight, or even a three-inch-wide plank across its face in the first place. Planking is customarily gotten out of "live edge" (AKA: "flitch cut") planking stock, i.e. a slab sawn from the log with the bark left on the edges, or if barked, not squared on the sides. By slabbing plank stock from curved logs, or in smaller sizes by using "compass timber," i.e., curved logs or branches, it was possible to select a raw slab plank that would yield the desired fitted plank with the least amount of waste. The width of the available planking stock dictated the width of the planking runs. Long curved planks would be made up of shorter lengths of planking stock butted end to end and joined with butt blocks fitted inboard. Modernly, wide planking stock from old growth, large, logs of tightly grained wood is often only obtainable at a premium charge. Don't look for it at your "big box" store lumber department though! It's available on special order from specialty lumber yards or direct from the mills, custom sawn for boat and shipbuilding use, the latter source being the least expensive way to buy boatbuilding wood if you live where the big trees grow, and shipping costs can be minimized. Wide slabs of Douglas fir, spruce, Alaskan yellow cedar, and white oak is readily available in the California, Oregon, Washington, British Columbia, and Alaska. Compass timber for knees, stems, and frame futtocks is another specialty item. It is milled from curved and forked branches and roots so that the tight curve of finished piece matches the natural grown curve of the annular rings. Some suppliers will have you supply a pattern, and they'll cut it out of the compass timber they keep on hand in their yard. The U.S. Navy maintains a managed 53,000-acre white oak plantation in Indiana solely to supply straight white oak planking stock for U.S.S. Constitution maintenance and restoration as well as another reserve of live oak on National Park Service Land in Florida to supply compass timber for the same purpose.

Sturgeon's Mill in Sebastopol, CA, a steam-driven circular saw mill a few miles from my place operates as a living history exhibit and they'll mill old growth clear vertical grain Doug fir plank and keel stock to order for boatbuilding. See:
Hull Oakes Lumber up in Oregon, also steam-driven but much bigger and with more sophisticated band sawing machinery will mill clear Doug fir, Alaskan yellow cedar, and spruce in extreme lengths and widths to order, including solid spar stock. As I recall, Hull Oakes milled and turned the masts for the lumber schooner, C. A. Thayer, at the National Maritime Museum in San Francisco. See:

The wood to build wooden ships is still available as long as the trees grow, but at a price!
 
Last edited:
I read how for the uss constitution they sent teams with templates of the curved pieces down to the swamps of the low country. This was fatal for many because of the disease
 
. Edge-bending a small piece (e.g. 1/4" x 1/32") of strip stock across its wider dimension is possible only by torturing the wood which creates stresses in the grain of the piece that then makes attempting to bend it simultaneously in a direction 90 degrees to another direction a very difficult exercise.
Hi Bob,
Four or five years ago I would have totally agreed that edge bending was difficult, but not now. Not including the open grain brittle species found in some kits, a tighter grained species of wood can be worked quite easily using the soak and heat method shown in the videos above. I agree that spiling is the best way to go if cutting planking material from broad stock, but as the majority of model builders are stuck with the strips that come in kits, an alternative method is needed and this one can yield excellent results with a little patience, scrap wood and a cheap hot air gun or iron.

The photo below is of edge bent planking that was first tapered in width per the tick marks on the bulkheads then bent with heat. The way it has been explained to me is the water wood softens the lignin than the heat hardens it while held around a form so it holds the shape. The piece is held with its natural bend to determine the curve needed on the forming piece.
Allan
1723051426079.png
 
They (the builders) however, narrowed the plank ends to very small. Apparently they had some minimum end plank width limit which they did not cross.
Yes. It's necessary to leave enough width to a plank end to permit proper fastening into the rabbet. At a minimum, there'd be two fasteners at each faying surface encountered by the plank. A single fastener in a narrow plank end wouldn't do at all!

In the case of the vessel pictured, which appears to be Victory, the apparently narrower planks below the topsides may actually be wider than they appear and only appear to some extent less wide due to the optical illusion created by their being farther from the "eye" and emphasized by the new white stopping in the seams. It seems odd that they would put thinner planking where it appears to be in the photo, although there are any number of reasons possible, including the most likely: that it's not "real" planking we're seeing at all.

It may simply be they used a different species of wood that was harder to work with, or not available in the widths permitting a wider plank. It may just be that sourcing less wide, and thus less costly, plank stock was economically preferable and so they used the cheaper stock below the waterline where nobody would see it. This hull would normally be copper sheathed below the waterline, but as Victory hasn't been in the water in the last hundred years (she was drydocked in 1925,) and has been extensively rebuilt with varying degrees of accuracy (she's got iron pipe masts, for Pete's sake!) the planking pictured was quite likely a cosmetic replacement never intended to be servicable as a real ship's bottom. I have no idea how it's fastened at this point. The planking we're looking at in the picture may well be fastened with modern metal fasteners. It could also be the case that the narrower planks are of teak or iroko, which was used to replace much of the original oak in her during the 1950's restoration on account of a deathwatch beetle infestation that had destroyed many of her timbers. Neither teak nor iroko were available in particularly wide plank widths compared to the original English oak with which she was originally built. Throughout her exceptionally long life, Victory was rebuilt extensively on a number of occasions and I'm afraid Victory in her present state as a "dry exhibit" is hardly a reliably accurate replica of her former self in every detail, albeit a magnificent symbol of the days when Britania ruled the seas nonetheless.
 
Last edited:
So I assume that with treenail diameter of 1/2", the minimum plank end thickness would be 3". This is a minimum to install two treenails.
 
Hi Bob,
Four or five years ago I would have totally agreed that edge bending was difficult, but not now. Not including the open grain brittle species found in some kits, a tighter grained species of wood can be worked quite easily using the soak and heat method shown in the videos above. I agree that spiling is the best way to go if cutting planking material from broad stock, but as the majority of model builders are stuck with the strips that come in kits, an alternative method is needed and this one can yield excellent results with a little patience, scrap wood and a cheap hot air gun or iron.

The photo below is of edge bent planking that was first tapered in width per the tick marks on the bulkheads then bent with heat. The way it has been explained to me is the water wood softens the lignin than the heat hardens it while held around a form so it holds the shape. The piece is held with its natural bend to determine the curve needed on the forming piece.
Allan
View attachment 463515
I agree... sort of. I believe I qualified my observation by saying that edge-setting plank on a model "makes attempting to bend it simultaneously in a direction 90 degrees to another direction a very difficult exercise." That isn't to say it becomes impossible and, with the more cooperative wood species and some practice, it can be done quite effectively. Importantly, such "radical" edge-setting still requires a perfectly spiled plank shape to both edges of the curving-tapered plank, so the savings in labor is somewhat illusory. If you are going to have to spile the plank shape, it's a lot easier to spile it as needed in the first instance than to spile and then bend in the edge-set, although reasonable minds may differ on this point. The wood in the picture is probably either Alaskan yellow cedar or Costello boxwood. Strip wood of those species is available only in the highest quality (and priced) kits, or as optional after-market upgrades to such kits. I don't think that the low-quality walnut and (faux?) mahoganies that are commonly encountered in kits would yield such impressive results.

This is another example of the truth of the maxim: "There's no free lunch." As you note, the problem arises from the kit manufacturers' desire to cut production materials and packaging and shipping costs. (e.g.: The shift to plank-on-bulkhead framing was likely motivated by the advantage it created in packaging over machine-shaped solid hull blanks, not because it produces an easier to build or "more authentic," model as some of their advertising suggests.) The customary 24" strip wood length also accommodates standard shipping rates. Longer lengths substantially increase the postal rates. These facts well illustrate the advantage of proper stock sourcing over taking what the kit gives you and trying to compensate for that, at which point one may as well scratch build the model from available plans in the first place. In that case, the work is greatly reduced by the availability of the "Byrnes trifecta," a highly accurate thin-kerf-bladed micro saw, thickness planer, and disk sander, although these aren't essential and can be replaced by decent hand tools and patience. A band saw and/or larger table saw and perhaps a jointer and larger-scale thickness planer (perhaps by occasionally accessing the same from a well-equipped woodworking friend or cabinet shop) will enable one to become entirely self-sufficient to mill their own stock from raw timber which may even sometimes be had for nothing from your friendly tree service. I mention this not because I own stock in Byrnes Model Machines, but because for anyone who intends to do any amount of ship modeling, the savings in wood material available by in-house milling not only provides the greatest flexibility in sizing one's stock material but provides savings in materials costs which quickly amortize the initial expense of the machinery involved. (And the machinery may well be worth more used than you paid for it, if recent used prices are any indication!)

The way (bending wood) was explained" to you is incorrect. I mention this just because it's a common misconception that bugs me whenever I encounter it. The water (or steam) does not "soften the lignin in the wood." It is the heat that softens the lignin, which hardens up again when it cools. This is why wood doesn't turn into a limp noodle when it rains. It's only that steam, or hot water, was, and is still, the best medium with which to transfer heat to the wood, which is why green wood with a higher moisture content is the best bending stock in "real life" sizes. Hence, the common use of steam boxes in full-scale boat and ship building. (And more so in boat building, since it takes a lot of steam to bend larger timbers (the rule of thumb being one hour of steaming for each inch of wood thickness) they are usually sawn to shape. Just "wetting" the piece won't do much good, though, because the moisture content of the wood has to be raised throughout to be effective, not just on the outside faces of the piece, if the heat transfer is to be even throughout the piece. So, for a modeler, placing a small piece of wood in a pot of boiling water will work fine to soften it, but then you've got a wet piece of wood that isn't going to glue up very well and so you've got to clamp it in place until it dries before you glue it, not to mention risk scalding your fingers with boiling water doing it! Just soaking the wood in water isn't going to do much of anything for bending it. (Not to mention that some species bend rather well and others nearly not at all.) All one needs is a suitable heat source and many approaches are available. A hot hair dryer or heat gun will work. So will bending wood over a heated former, such as a piece of metal pipe or an empty tin can with a propane torch applied to the inside of the metal tube. (But do not put a torch to galvanized metal pipe! The fumes from highly heated zinc are very poisonous.) A soldering, curling, or clothes iron will work well, too. The best of all is one of the no-longer-in-production Aeropiccola plank bending irons, if you can find one on eBay. It has a spring-loaded bail on the "French curve" shaped heated head that will hold the stock against the Fibonacci curve shaped head to work a tight curve of any shape desired right up to the end of the piece using but one hand holding the "cold" end of the stock. (While others' mileage may vary, I've found that the "crimping pliers" and "pinch wheels" now sold by some outfits for shaping bends are next to useless.)

1723086921296.png

1723087050783.png

There's now a similar bending iron on the market with a round head that's sold with a wooden block with a curve cut in it so the workpiece can be formed by pressing the round head into the curved shape cut in the block. It works, but not nearly as well as the Aeropiccola model. Why Aeropiccola quit making them is anyone's guess. It's a simple casting that could be attached to any cheap soldering iron.

It also bears noting that the curing of PVA adhesive can be greatly accelerated by applying heat to the joint. By placing a hot iron on the outside of a plank with PVA applied to the faying surfaces, the heat will cause the moisture in the PVA to evaporate quickly, causing the PVA to solidify. (Obviously, this technique works best on dry wood, not stuff that's soaking wet!) In this fashion, planks can be quickly "tacked" to frames or bulkheads, often without the need for any clamping at all. It goes without saying that care does have to be taken not to burn the surface of the wood with the heating source.
 
Last edited:
So I assume that with treenail diameter of 1/2", the minimum plank end thickness would be 3". This is a minimum to install two treenails.
The standard minimum diameter of a treenail is 1.25" to 1.5". This is the minimum surface area necessary to provide the friction necessary to hold a treenail fast in its hole. The required minimum plank width would be six or eight inches. Anything smaller would be nailed, riveted, bolted, or screw-fastened to frames or in the case of a rabbet fastening, possibly secured with iron drifts.
 
Last edited:
I read how for the uss constitution they sent teams with templates of the curved pieces down to the swamps of the low country. This was fatal for many because of the disease
Taking templates into the forest was (and to some extent still is) the standard practice. Live oak compass timber isn't commercially harvested anymore, although there's a lot available from windfalls after every major hurricane. Mystic Seaport sources much of their compass timber in that fashion these days. The Navy, however, finds it more convenient to also rely a lot on laminated white oak from their Indiana 53,000 acre forest reserve managed for the sole purpose of providing white oak for Constitution's restoration and maintenance. See: https://maritime.org/conf/conf-otton-mat.php
 
The way (bending wood) was explained" to you is incorrect. I mention this just because it's a common misconception that bugs me whenever I encounter it. The water (or steam) does not "soften the lignin in the wood." It is the heat that softens the lignin, which hardens up again when it cools.
I have no argument on this, but I will say that when I soak a piece of Castello boxwood overnight, it edge bends a lot easier than a dry piece and has far less danger of breaking in the process. Once I have it shaped around a forming piece shooting it with hot air for a few minutes dries the piece and the shape is fixed. I keep the air temp between the boiling point and ignition temperature of the wood.

I have left wet pieces in the forming jig forgetting about it for a day or more and without ever heating it yet the bend remains when taken out of the jig fixture. So two questions, why does the water make the wood softer and easier to bend and why does the bend remain even if air dried rather than being heated?
Thanks Bob
Allan
ANSWER ONE:
The Castello boxwood left soaking overnight bends more easily than a dry piece when either is heated because it's a small piece of wood that soaks up moisture evenly throughout and that increased moisture content "through and through" transfers the heat more efficiently to the center of the piece than it would travel in a piece with a lower moisture content. Here again, it's the heat that makes it easy to bend, not the moisture. The moisture is just a good way to transmit the heat. The moisture content has no effect on the lignin. Remember, trees don't bend any easier when it rains.

ANSWER TWO:
Any piece of sufficiently flexible wood if held in a flexed position for any length of time will naturally "take a set" and tend to hold it. This is why, for example, unseasoned milled wood is "stickered" with pieces of small stuff to separate the planks and promote air circulation while it's being dried. The sticks separating the planks must be spaced closely enough that the planks lay flat rather than sag between the sticks and "take a set" with a sag in it. There's a limit to this, of course. Without being heated, a piece of wood is going to reach its breaking point long before it will if bent while sufficiently hot.
 
Last edited:
I have tried using a few different types of plank benders but none have worked for me, so I finally decided to build a steam box, I can bend 1/4" x 1/4" square like butter, and can probably bend even thicker, works fantastic, I would definitely recommend taking the time to build one.

20230426_104504.jpg

20230430_143840.jpg

20230430_145442.jpg

20230430_151327.jpg

20230501_075301.jpg
 
Hi Bird
Nice steam box!!
Have you tried steaming and then edge bending a thinner piece such as a plank, say 1/4" X 1/16" (12" X 3" at 1:48) Sideways (edge) plank bending is where most builders run into difficulty due to lifting as seen above.
Thanks
Allan
 
Last edited:
I agree... sort of. I believe I qualified my observation by saying that edge-setting plank on a model "makes attempting to bend it simultaneously in a direction 90 degrees to another direction a very difficult exercise." That isn't to say it becomes impossible and, with the more cooperative wood species and some practice, it can be done quite effectively. Importantly, such "radical" edge-setting still requires a perfectly spiled plank shape to both edges of the curving-tapered plank, so the savings in labor is somewhat illusory. If you are going to have to spile the plank shape, it's a lot easier to spile it as needed in the first instance than to spile and then bend in the edge-set, although reasonable minds may differ on this point. The wood in the picture is probably either Alaskan yellow cedar or Costello boxwood. Strip wood of those species is available only in the highest quality (and priced) kits, or as optional after-market upgrades to such kits. I don't think that the low-quality walnut and (faux?) mahoganies that are commonly encountered in kits would yield such impressive results.

This is another example of the truth of the maxim: "There's no free lunch." As you note, the problem arises from the kit manufacturers' desire to cut production materials and packaging and shipping costs. (e.g.: The shift to plank-on-bulkhead framing was likely motivated by the advantage it created in packaging over machine-shaped solid hull blanks, not because it produces an easier to build or "more authentic," model as some of their advertising suggests.) The customary 24" strip wood length also accommodates standard shipping rates. Longer lengths substantially increase the postal rates. These facts well illustrate the advantage of proper stock sourcing over taking what the kit gives you and trying to compensate for that, at which point one may as well scratch build the model from available plans in the first place. In that case, the work is greatly reduced by the availability of the "Byrnes trifecta," a highly accurate thin-kerf-bladed micro saw, thickness planer, and disk sander, although these aren't essential and can be replaced by decent hand tools and patience. A band saw and/or larger table saw and perhaps a jointer and larger-scale thickness planer (perhaps by occasionally accessing the same from a well-equipped woodworking friend or cabinet shop) will enable one to become entirely self-sufficient to mill their own stock from raw timber which may even sometimes be had for nothing from your friendly tree service. I mention this not because I own stock in Byrnes Model Machines, but because for anyone who intends to do any amount of ship modeling, the savings in wood material available by in-house milling not only provides the greatest flexibility in sizing one's stock material but provides savings in materials costs which quickly amortize the initial expense of the machinery involved. (And the machinery may well be worth more used than you paid for it, if recent used prices are any indication!)

The way (bending wood) was explained" to you is incorrect. I mention this just because it's a common misconception that bugs me whenever I encounter it. The water (or steam) does not "soften the lignin in the wood." It is the heat that softens the lignin, which hardens up again when it cools. This is why wood doesn't turn into a limp noodle when it rains. It's only that steam, or hot water, was, and is still, the best medium with which to transfer heat to the wood, which is why green wood with a higher moisture content is the best bending stock in "real life" sizes. Hence, the common use of steam boxes in full-scale boat and ship building. (And more so in boat building, since it takes a lot of steam to bend larger timbers (the rule of thumb being one hour of steaming for each inch of wood thickness) they are usually sawn to shape. Just "wetting" the piece won't do much good, though, because the moisture content of the wood has to be raised throughout to be effective, not just on the outside faces of the piece, if the heat transfer is to be even throughout the piece. So, for a modeler, placing a small piece of wood in a pot of boiling water will work fine to soften it, but then you've got a wet piece of wood that isn't going to glue up very well and so you've got to clamp it in place until it dries before you glue it, not to mention risk scalding your fingers with boiling water doing it! Just soaking the wood in water isn't going to do much of anything for bending it. (Not to mention that some species bend rather well and others nearly not at all.) All one needs is a suitable heat source and many approaches are available. A hot hair dryer or heat gun will work. So will bending wood over a heated former, such as a piece of metal pipe or an empty tin can with a propane torch applied to the inside of the metal tube. (But do not put a torch to galvanized metal pipe! The fumes from highly heated zinc are very poisonous.) A soldering, curling, or clothes iron will work well, too. The best of all is one of the no-longer-in-production Aeropiccola plank bending irons, if you can find one on eBay. It has a spring-loaded bail on the "French curve" shaped heated head that will hold the stock against the Fibonacci curve shaped head to work a tight curve of any shape desired right up to the end of the piece using but one hand holding the "cold" end of the stock. (While others' mileage may vary, I've found that the "crimping pliers" and "pinch wheels" now sold by some outfits for shaping bends are next to useless.)

View attachment 463569

View attachment 463570

There's now a similar bending iron on the market with a round head that's sold with a wooden block with a curve cut in it so the workpiece can be formed by pressing the round head into the curved shape cut in the block. It works, but not nearly as well as the Aeropiccola model. Why Aeropiccola quit making them is anyone's guess. It's a simple casting that could be attached to any cheap soldering iron.

It also bears noting that the curing of PVA adhesive can be greatly accelerated by applying heat to the joint. By placing a hot iron on the outside of a plank with PVA applied to the faying surfaces, the heat will cause the moisture in the PVA to evaporate quickly, causing the PVA to solidify. (Obviously, this technique works best on dry wood, not stuff that's soaking wet!) In this fashion, planks can be quickly "tacked" to frames or bulkheads, often without the need for any clamping at all. It goes without saying that care does have to be taken not to burn the surface of the wood with the heating source.
I'm fortunate enough to own an aeropiccola, which I purchased longer ago that I want to admit. In my case, I tossed that spring loaded bit at the end, and have a thick piece of wood that I bandsawed a curve into. I use that on soaked strips and depending upon what I'm doing will either use the curved blank as a form to assist in getting an even curvature, or I'll just gently rock the curved head of the iron back and forth over the strip. while gently applying lifting force to the end of the strip to gradually introduce a curve into the strip. That way its quick to test against the hull and then go back to working the curve till you get it spot on. Great little iron, and its probably one of the most important tools I've got for kit building.
 
Back
Top