Planking issues

Tony P

Staff member
Le Rochefort Moderator
Joined
Mar 25, 2012
Messages
741
Points
343

Location
Whiting New Jersey
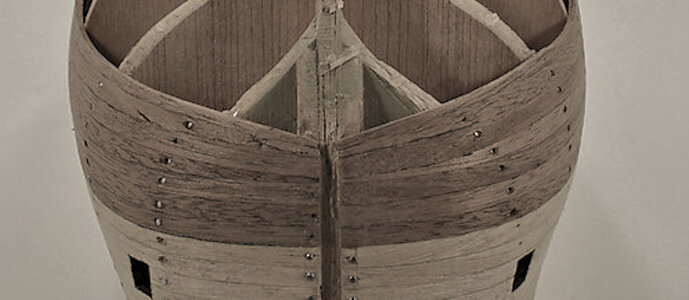
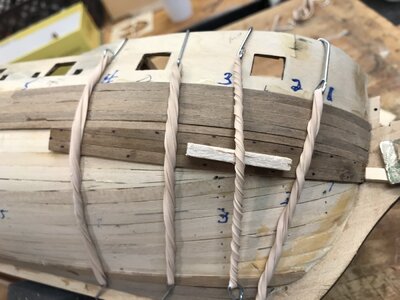
I made a template with the curve needed to eliminate the clinker effect towards the bow. The piece I have on the hull Is three planks glued together as a test. I see now how a severely curved plank does it’s job in this situation. My problem is how on earth am I supposed to make that curve with planks that are 4mm wide ? In many planking tutorials they give themselves the luxury of having wider planks available. I am stumped here. I’d like to keep the hull natural but soon I’m just going to plank it add daggers and paint it because I’m making no headway hour after hour. 1/64 Fly kit.
Thanks Tony
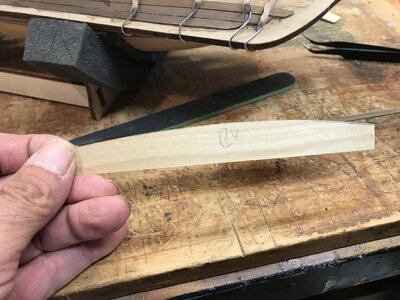
56E8F99A-7648-4697-AD94-0A594F88E2F0.jpeg

D6420BCF-9D57-42B5-A067-9B6F9821B6D7.jpeg
 
Last edited by a moderator:
I understand what you are saying. It is unfortunate that all the Planks given in the kit are a fixed width. The approach to planking in kit form just takes a basic approach that as nearly ALL the planks that travel to the bow will ALL be tapered gradually (it is like how a whiskey barrel) will look. In your case, I assume that what you have done so far in this image that you have already glued this 'area' down. If so, then looking at the left side of the new planking, you are probably going to have to "spile" the next planks. In other words BUTT the planks going from the left side of the new planks traveling towards the stern will have to be full-width planks. Usually, on Admiralty style, you can CUT the planks with a "curve" to it like they really do, but as I say, the kits really require for you to just taper the ends.
It would be the same principle as if you were trying to plank a football. All planks would nearly taper to a fine point and gradually work out the widest point in the middle of the ball and then be a mirror image of the other side.
I am not sure if my explanation makes any sense and I hope that I am not making it any more confusing. I will see if I can hunt down a picture of my Trinidad that I also cut out a template for the bow to get things lined up well. I will post again with the picture, so hang on.

This is the only image that I could find that shows the process of planking to the bow. This might not help, and when I built this, I was not the best at planking either. Just trying to help - I am sure that others here will offer better suggestions.

planking54.jpg
 
Last edited:
I understand what you are saying. It is unfortunate that all the Planks given in the kit are a fixed width. The approach to planking in kit form just takes a basic approach that as nearly ALL the planks that travel to the bow will ALL be tapered gradually (it is like how a whiskey barrel) will look. In your case, I assume that what you have done so far in this image that you have already glued this 'area' down. If so, then looking at the left side of the new planking, you are probably going to have to "spile" the next planks. In other words BUTT the planks going from the left side of the new planks traveling towards the stern will have to be full-width planks. Usually, on Admiralty style, you can CUT the planks with a "curve" to it like they really do, but as I say, the kits really require for you to just taper the ends.
It would be the same principle as if you were trying to plank a football. All planks would nearly taper to a fine point and gradually work out the widest point in the middle of the ball and then be a mirror image of the other side.
I am not sure if my explanation makes any sense and I hope that I am not making it any more confusing. I will see if I can hunt down a picture of my Trinidad that I also cut out a template for the bow to get things lined up well. I will post again with the picture, so hang on.
Donnie
The football analogy is dead on. Should help a new planker visualize the requirements.
John
 
Let me add - very important -
The planking that will be terminating at the stern will act to "spread out" -- think of it as a reverse taper !!! So, therefore, some of the planks near the waterline and wales will have some taper like the bow, BUT, as you get closer to the KEEL, then those planks are going to want to spread out like a FAN. So, this is where you install stealers and spiling. Of course, this is just a tip of the iceberg as they say - there are whole booklets written on correct planking. I am no expert.


IMG_1439.JPG
 
I made a template with the curve needed to eliminate the clinker effect towards the bow. The piece I have on the hull Is three planks glued together as a test. I see now how a severely curved plank does it’s job in this situation. My problem is how on earth am I supposed to make that curve with planks that are 4mm wide ? In many planking tutorials they give themselves the luxury of having wider planks available. I am stumped here. I’d like to keep the hull natural but soon I’m just going to plank it add daggers and paint it because I’m making no headway hour after hour. 1/64 Fly kit.
Thanks Tony

View attachment 185207

View attachment 185208
Newbie question about your twisted hooks compression clamping system. . . how are you getting the tension twisting after the hooks have been set? I see a piece in the middle of one that may be rotated parallel to the face of the other planks but it does not looks like it would have applied tension from twisting but just sidewise stretching outwards from the added dimension. . . however that also does not appear as such. How do you use this system? PT-2
 
Thanks Im still at it slowly but surely. Yes tapering as I go in the bow. Trying not to use dagger planks but I will in the stern if I have to. Seems now the hull is going to get filled and painted anyway. Already the planking is poor enough that I wont be satisfied with a natural finish. Worst case Ill copper the bottom. The clips rubber bands are pulled tight, making them tighter is just a matter of twisting before attaching, as for putting blocks in to increase or isolate tension just pull the rubber band out with tweezers or fingers and add the block.
 
Thanks Im still at it slowly but surely. Yes tapering as I go in the bow. Trying not to use dagger planks but I will in the stern if I have to. Seems now the hull is going to get filled and painted anyway. Already the planking is poor enough that I wont be satisfied with a natural finish. Worst case Ill copper the bottom. The clips rubber bands are pulled tight, making them tighter is just a matter of twisting before attaching, as for putting blocks in to increase or isolate tension just pull the rubber band out with tweezers or fingers and add the block.
Thanks for the application clarification to your compression clamping. PT-2
 
I made a template with the curve needed to eliminate the clinker effect towards the bow. The piece I have on the hull Is three planks glued together as a test. I see now how a severely curved plank does it’s job in this situation. My problem is how on earth am I supposed to make that curve with planks that are 4mm wide ? In many planking tutorials they give themselves the luxury of having wider planks available. I am stumped here. I’d like to keep the hull natural but soon I’m just going to plank it add daggers and paint it because I’m making no headway hour after hour. 1/64 Fly kit.
Thanks Tony

View attachment 185207

View attachment 185208
Try bending planks sideways based on your template. Here is the link to Chuck Passaro's tutorial:
 
Back
Top