The more I learn, the less I think I know.........
-

Win a Free Custom Engraved Brass Coin!!!
As a way to introduce our brass coins to the community, we will raffle off a free coin during the month of August. Follow link ABOVE for instructions for entering.
-

PRE-ORDER SHIPS IN SCALE TODAY!
The beloved Ships in Scale Magazine is back and charting a new course for 2026!
Discover new skills, new techniques, and new inspirations in every issue.
NOTE THAT OUR FIRST ISSUE WILL BE JAN/FEB 2026
You are using an out of date browser. It may not display this or other websites correctly.
You should upgrade or use an alternative browser.
You should upgrade or use an alternative browser.
Planking - New Method for me
- Thread starter KingDaddyo
- Start date
- Watchers 13
The more I learn, the less I think I know.........
The more you learn, the more you know you know!
Come to think of it, some years ago, a fellow with more ambition than experience decided to build a sailing ship he called Raw Faith, so named in defiance of those who told him his inexperienced DIY approach to ship building was courting disaster and to affirm that his raw faith in God would trump the sciences of naval architecture and marine engineering. She was planked with what appeared to be a double layer of recycled pallet planks, (just like the ship model kits that claim to be built "just like real ships!") which produced a hull not looking much different than many kit models posted online these days.
Raw Faith lasted for about seven years, during which time she left the dock a handful of times. After twice having been rescued and taken under tow by the USCG, her third "mayday call" proved to be her last when she sank in 6,000 feet of water off Nantucket Island following the USCG rescuing her crew with no loss of life.
See: https://en.wikipedia.org/wiki/RawFaith for the whole sordid story of Raw Faith.
Raw Faith:


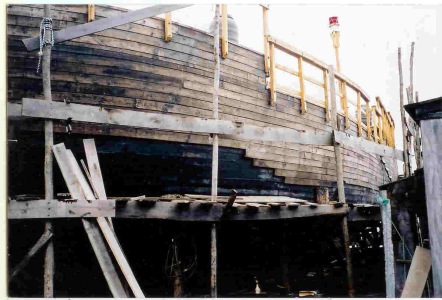
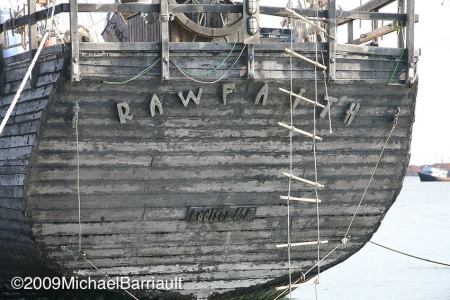




Well, I give him credit for getting it built and able to sail it. Guess it just wasn't to be for him. Cool story though!!
He could have saved the USCG a lot of trouble and the taxpayers a lot of money if he had wagered his faith against the law of gravity instead…
Very interesting story indeed.
I would love to be able to see and hear what a Marine Archeologist would have to say about this ship some 500-600 years into the future!
I would imagine it would spark all sorts of discussion as to what this ship was and its overall design and build - especially if there isn't any surviving data on the ship.
It definitely would be a real head scratcher for them and a lot of debate.
I doubt that will be the most dumb-founding relic of our society future archeologists will puzzle over.
But your comment conjures a memory of a book I read years ago called Motel of Mysteries. Not sure if anyone is familiar with that one. It came out around the same time as the world was still going bonkers over King Tut’s tomb and was a tongue-in-cheek illustrated account of the excavation of a “shrine” uncovered along the former route 66 by some future archeologist and his attempts to explain its many mysteries.
But your comment conjures a memory of a book I read years ago called Motel of Mysteries. Not sure if anyone is familiar with that one. It came out around the same time as the world was still going bonkers over King Tut’s tomb and was a tongue-in-cheek illustrated account of the excavation of a “shrine” uncovered along the former route 66 by some future archeologist and his attempts to explain its many mysteries.
- Joined
- Dec 5, 2022
- Messages
- 1,080
- Points
- 443

Hey,
I don't know what there is. I just don't understand why, as in Germany, a government agency has to inspect the ship in order for it to be authorised for shipping. Thank God no one died and no wheelchair user died either. After all, the man wanted to get people with disabilities on board. I think the motivation is great, but the naive construction method and the lack of understanding of physics, architecture and nature are incomprehensible to me. It reminds me of the Vasa, which was supposed to be the strongest ship in the world.... Yes, yes, yes ...
Cheers
Günther

I love the Motel of the Mysteries! I have a copy somewhere in my library. I thought the same as you when I read the above posts. I'll have to search my shelves for it. It's worth a re-read.But your comment conjures a memory of a book I read years ago called Motel of Mysteries. Not sure if anyone is familiar with that one. It came out around the same time as the world was still going bonkers over King Tut’s tomb and was a tongue-in-cheek illustrated account of the excavation of a “shrine” uncovered along the former route 66 by some future archeologist and his attempts to explain its many mysteries.
Found it! The name of the motel was "Toot 'n C'mon Inn." Every room had an "Inner Chamber" with a "Sacred Urn:"
"This most holy of relics was discovered in the Inner Chamber. It was carved from a single piece of porcelain and then highly polished. The Urn was the focal point of the burial ceremony. The ranking celebrant, kneeling before the Urn, would chant into it while water from the sacred spring flowed in to mix with sheets of Sacred Parchment."
The celebrant would wear a sacred headband with "Sanitized for your protection." written on it that was found wrapped around the lid of the Sacred Urn.
Still available forty-six years after its initial publication! See: https://www.amazon.com/Motel-Myster...?asin=0395284252&revisionId=&format=4&depth=1

"This most holy of relics was discovered in the Inner Chamber. It was carved from a single piece of porcelain and then highly polished. The Urn was the focal point of the burial ceremony. The ranking celebrant, kneeling before the Urn, would chant into it while water from the sacred spring flowed in to mix with sheets of Sacred Parchment."
The celebrant would wear a sacred headband with "Sanitized for your protection." written on it that was found wrapped around the lid of the Sacred Urn.

Still available forty-six years after its initial publication! See: https://www.amazon.com/Motel-Myster...?asin=0395284252&revisionId=&format=4&depth=1

I'm getting this book. Really funny reading!!
Cromwell proved his point about dry powder as he has been credited with having 600,000 Irish men, women, and children murdered. What a despicable human piece of garbage he was.Put your faith in God, but keep your power dry."
-
Allan
Well, throughout history we as humans have produced many many people like him. But on the flip side, we've produced many who were on the good side. Due to human nature I think we will have both sides of the coin from now till the end of times.
On a lighter note, I'm discovering thru chats on this forum there are varying levels of boat builders and knowledge. I thought I was not great but maybe passing bordering on good at this until I read thru some of the fine work all of you do and seeing the image posts that show a wonderful level of capabilities and creativity!! I am currently working on an Armed Launch and, although too ;ate to do the planking right, I am finishing it nicely and I think it will look good, just not great like some others I've seen. I have learned more about the stem rabbet and how to do the for my next ship and much more about planking from someone who had extensive knowledge on real and model planking that will come in handy on my next boat. But moving forward I'm going to look at my next steps, read and then ask for input before I jump in with both feet. I hope to really step up my game on building with all of your help and support!! I post these pictures of my third lay progress on the final planking on the starboard side. I've found by starting at the top of the rail and working down I think it's going to come together nicely. I'm stuck with the length of pieces I already cut cause I don't have enough walnut planking to add a fourth layer and do the lengths to a better scale. Next time it will be right. I have decided to not paint it. I want to finish it natural. Could anyone tell me the best steps to go from finished planking to a finished hull? I was just going to do a clear finish matte and not have any gloss to it. I saw a video where a guy finished the final coat with some kind of oil that gave it a natural color without making it all shiny and fake looking. I'm also going to finish and coat the inside of the hull before I go on to work that would keep me from reaching all of the inside of the hull planking. Thoughts? Another quick question. Should I use a pencil to simulate bolt heads on the planking or is that not something you do unless called for?
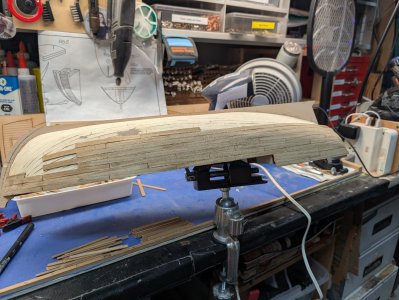
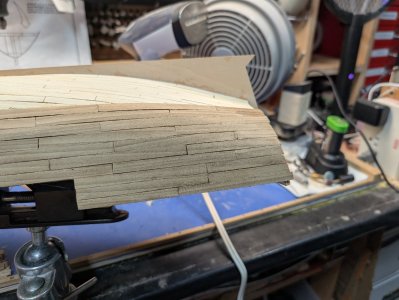
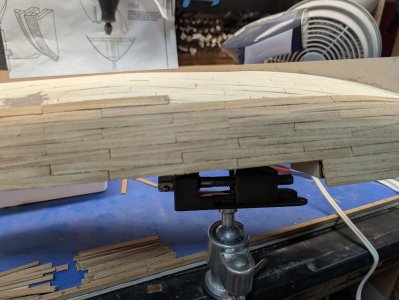
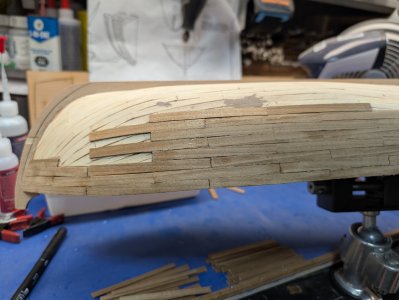
On a lighter note, I'm discovering thru chats on this forum there are varying levels of boat builders and knowledge. I thought I was not great but maybe passing bordering on good at this until I read thru some of the fine work all of you do and seeing the image posts that show a wonderful level of capabilities and creativity!! I am currently working on an Armed Launch and, although too ;ate to do the planking right, I am finishing it nicely and I think it will look good, just not great like some others I've seen. I have learned more about the stem rabbet and how to do the for my next ship and much more about planking from someone who had extensive knowledge on real and model planking that will come in handy on my next boat. But moving forward I'm going to look at my next steps, read and then ask for input before I jump in with both feet. I hope to really step up my game on building with all of your help and support!! I post these pictures of my third lay progress on the final planking on the starboard side. I've found by starting at the top of the rail and working down I think it's going to come together nicely. I'm stuck with the length of pieces I already cut cause I don't have enough walnut planking to add a fourth layer and do the lengths to a better scale. Next time it will be right. I have decided to not paint it. I want to finish it natural. Could anyone tell me the best steps to go from finished planking to a finished hull? I was just going to do a clear finish matte and not have any gloss to it. I saw a video where a guy finished the final coat with some kind of oil that gave it a natural color without making it all shiny and fake looking. I'm also going to finish and coat the inside of the hull before I go on to work that would keep me from reaching all of the inside of the hull planking. Thoughts? Another quick question. Should I use a pencil to simulate bolt heads on the planking or is that not something you do unless called for?


It was linseed oil. Thats what one guy used on the finished hull.
Looks great! Experimenting like this is exactly how we learn—trying new approaches is what makes your skills grow. Can’t wait to see the results!
It is gratifying to hear that the information and suggestions the more experienced modelers have provided you have helped you advance your modeling skills by leaps and bounds. There's often expressed the desire to increase the number of people involved in ship modeling and many creative approaches to this have been proposed from time to time, but, personally, I don't really think there's much to be gained by simply increasing the number of participants in the ship modeling craft. To my way of thinking, the more important effort is perpetuating the essential elements of the craft which are accuracy and superlative workmanship and doing that is best accomplished on an individual level, one modeler at a time and one model at a time. It's about all of us moving ever upward on our individual learning curves and reaching back to give those behind us on their learning curves an occasional hand up.I post these pictures of my third lay progress on the final planking on the starboard side. I've found by starting at the top of the rail and working down I think it's going to come together nicely. I'm stuck with the length of pieces I already cut cause I don't have enough walnut planking to add a fourth layer and do the lengths to a better scale. Next time it will be right. I have decided to not paint it. I want to finish it natural. Could anyone tell me the best steps to go from finished planking to a finished hull? I was just going to do a clear finish matte and not have any gloss to it. I saw a video where a guy finished the final coat with some kind of oil that gave it a natural color without making it all shiny and fake looking. I'm also going to finish and coat the inside of the hull before I go on to work that would keep me from reaching all of the inside of the hull planking. Thoughts? Another quick question. Should I use a pencil to simulate bolt heads on the planking or is that not something you do unless called for?
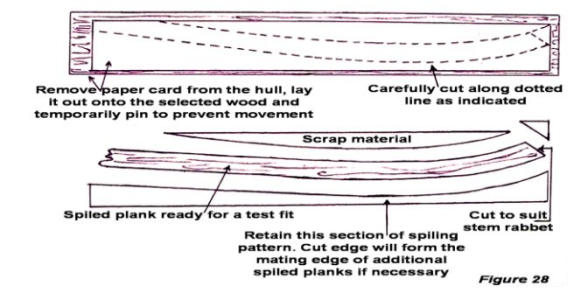
As for your walnut planking, the fact is that planks are not ever simply straight uniform widths of lumber. There are very few, if any, straight lines in a vessel's hull. In a real wooden hull, every plank is spiled (i.e., shaped) individually as dictated by the lining off of the planking. Consequently, the "strip wood" that kit manufacturers so often supply is really not suited for realistically depicting the planking of a model. Additionally, walnut, a favorite "quality" wood of kit manufacturers, is not a very suitable modeling wood because its grain figuring is radically out of scale and also its open grain requires filling to obtain a smooth surface. Moreover, walnut has quite poor bending qualities and good bending quality is essential for planking stock. Be that all as it may, when one sets out to build a kit model, they are often constrained to "dance with the girl they brought." This limitation can be overcome by purchasing some walnut veneer sheets, readily available online or at some hardware and craft stores. While large 8' sheets are not cheap, it's also available in smaller sizes priced very reasonably. 1/16" and even some 1/8" walnut veneer can be cut with a craft knife and sometimes even with a scissors. As your planking progresses downward to the keel rabbet, you will find the plank shapes will become increasingly shapely and your narrow strip wood pieces aren't going to do the job. Each plank will require being shaped to fit and making paper or card stock patterns trimmed to fit will be necessary to use to cut out the shapes required from a sheet or strip of veneer that will necessarily be much wider than the plank width because the plank must be curved. (Some species of wood can be "edge set" by heat bending across their flat dimension, but walnut isn't one of them.) When you get up to the bow, your planks will start looking like the diagram below and, as seen, you will require much wider stock than what came with your kit.
If you want to finish your hull "bright" (with the wood showing,) you should 1.) sand your hull fair with 220 or 320 grit sandpaper glued to a flexible wooden batten (stick.) when fairing, the batten should be bent to contact the shape of the hull. By sanding with the batten across the hull in various angles, fairness in all directions can be achieved. If a perfectly solid surface cannot be achieved due to seams and open grain, a wood filler should be applied to fill the defects and then sanded. The surface must be uniformly smooth without any nicks or divots anywhere. 2.) Using a soft cloth, run boiled linseed oil into the hull surface. (Raw linseed oil will take forever to dry. Boiled linseed oil, which isn't boiled at all, contains drying agents so that it dries similar to oil based paint.) Allow the oil to dry overnight and rub on another coat until you get the effect you desire. Additional coats will provide greater depth and luster to the finish.
Important caution: rags and other combustible material soaked with linseed oil will spontaneously combust as the linseed oil cures if not properly handled. Time was, everybody knew this, but for the benefit of the younger generations that may not have had the same exposure to the safe handling of once-common organic materials, rags and the like soaked in linseed oil must be:
- Spread Out to Dry: After use, extend the rags flat on a non-combustible outdoor surface like a driveway or patio, or hung without bunching on a clothesline. Allow them to dry completely, which can prevent heat build-up from the oxidation process.
- Soak in Water: Once dry, submerge the rags in water to ensure they are fully saturated. This step is vital as wet rags cannot ignite.
- Seal for Disposal: Place the soaked rags in a container, such as an old metal coffee can or a sealed plastic bag. Dispose of them at a local hazardous waste disposal facility or through a waste collection service that accepts hazardous materials.
It is wise to finish the interiors of open boats as they are built, doing so before details such as thwarts (seats) and stringers, etc., are installed in order to permit ease in painting areas made less accessible when subsequent parts are added to the model. Ideally, thought should be given to painting schedules before and during the construction of all parts of the model. Pre-finishing many parts prior to installation can often avoid a lot of cutting in and detail painting that will be difficult once the part is installed.
Do not attempt to depict "bolt heads" or other fastenings on your model. On the prototype of any wooden vessel, the fastenings are either wooden trunnels ("tree nails" - wooden pegs) or, where metal fasteners were used, the fasteners were countersunk and wooden plugs inserted over the metal fastening heads. This resulted in an appearance which was not discernable at scale viewing distances. Iron fasteners were always plugged to prevent their corrosion. The depiction of exposed fastenings and plugs and trunnels of contrasting colors, almost always placed incorrectly as well, is glaringly inaccurate.
If a modeler is uncertain about whether a detail is discernable at "scale viewing distance," they can easily determine if it is by conducting a simple practical experiment: multiply the denominator of the scale by the distance in feet from which the model will be viewed to get the number of feet equaling the "real viewing distance." For example, if someone is going to look at a model with their eyes three feet from the model and the scale is 1:96 (1/8" = 1',) the "real viewing distance" is about 300 feet (3' x 96,) or the length of an American football field. If the model is viewed from a distance of two feet and is built to 1:48 (1/4" = 1') scale, the "real viewing distance" is almost 100 feet (2' x 48.) If one must, it's easy enough to go outside and pace off the distance and see if the detail in question can be seen or not. Another way of determining what detail is discernable at scale viewing distance is to use the rules of thumb contained in the U.S. Navy's Specifications for Construction of Exhibition Models of U.S. Naval Vessels built under contract to the U.S.N.: "Generally, all items on the prototype twelve inches or larger for 1:96 scale (six inches or larger for 1:48 scale) will be reproduced."
I really appreciate your help!! I'll get the boiled linseed oil to try out. As for the spontaneous combustion, I have been (before retirement) an expert in fire investigation and accident reconstruction. Took my training thru many fire courses and the Indiana State Fire Marshals Office. My accident reconstruction training was thru Northwestern University accident training and many specialized courses in photogrammetry and 3d laser accident scenes as well as Cad accident drawings. I've done numerous fire investigations in spontaneous combustion fires. Good heads up though!! You seem to know a lot about ships and ship building. You have a background in this? I went to the Naval museum in Maryland once. I saw all of the shipyard models they had on display. I must have taken a hundred photos of all of the ships!! Thats what got me into the model and ship building.
I just added the caution about linseed oil spontaneous combustion because it seems like a lot of people these days aren't aware of the dangers of it. A lot of the general knowledge about such things that used to be routine can't be taken for granted these days. I think a lot of people have become entirely too dependent upon the "nanny state" regulations that have led them to assume that everything they can buy in a store is safe without any further general knowledge. Nobody seems to read the labels on stuff anymore, either! 
How true! How did you accumulate all the wood working or shipbuilding knowledge you have?


