Question: what wood for second planking?

Joined
Feb 1, 2024
Messages
143
Points
103

Location
Santimbù (Bergamo - Italia)
1) type of wood?
2) thickness?
In practice I was thinking of using 0.5 mm thickness wood, but I would like to avoid having to wet it again and heat it. Is there any wood that can bend when cold and dry?
Tks

1) tipo di legno
2) spessore?
In pratica io pensavo di usare legno spesso 0,5 mm , ma vorrei evitare di doverlo di nuovo bagnare e formare a caldo. Esiste un legno che di possa incurvare a freddo e asciutto?
 
The average thickness for second planking is 0.3mm. PVA glue will make the planking a bit softer as the water from the glue soaks into the wood, such that you may actually create soft bends across the plane, so it may be bent to run parallel to the sheer curve of the hull. It may be easier to follow a sharper sheer curve along the hull by using individual planks, say about 80-120mm long, instead of running a single, long plank from stem to stern. This in because there may be a small change in angle a the butt seams between planks which are in a line. However, smaller lengths of planking may make it more difficult to avoid long gaps between the rows of planks, particularly if you are new to planking and aren't as careful eliminating gaps that more experienced builders would watch for an eliminate as they go. Before the glue sets, push the most recent plank row toward the previous one to eliminate any gaps.

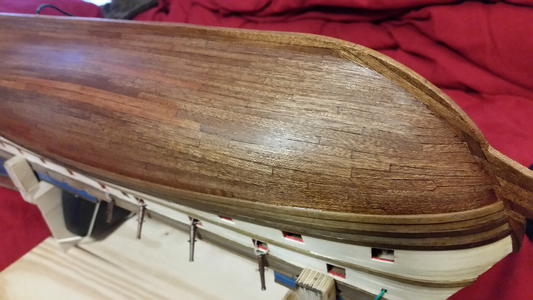
This hull was planked with 4mm wide, 0.3mm mahogany planking. The grain is a bit too course for 1:100 scale, but this is what you typically get in kits these days. A finer grain wood such as pear or cherry would probably look better. The keel, stem, and sternpost were also covered over with second planking in a symmetrical port-to-starboard pattern to simulate solid wood pieces, but the pattern of those seams was later determined not to be historically accurate. You learn more about real wood construction of ships as you go, reading and re-reading passages from books on ship construction and rigging. Each of the planks was 80mm long and glued down individually, and I worked to eliminate any gaps as I went, although there were a few very narrow gas that were missed, and those were filled later with a thick paste made of PVA glue and mahogany sawdust, re-sanded lightly after drying. Could this first planking job be improved upon? Of course, but it shows that careful, patient planking can achieve good results even if you are totally new to doing this. The locaton of butt seams could have been chose to better align consistently with hull frame locations underneath but the results are good enough for my first hull.
1714102682076.png
 
Last edited:
1) type of wood?
2) thickness?
In practice I was thinking of using 0.5 mm thickness wood, but I would like to avoid having to wet it again and heat it. Is there any wood that can bend when cold and dry?
Tks

1) tipo di legno
2) spessore?
In pratica io pensavo di usare legno spesso 0,5 mm , ma vorrei evitare di doverlo di nuovo bagnare e formare a caldo. Esiste un legno che di possa incurvare a freddo e asciutto?

Hi 'Morghy'
The 0.3-0.5mm thickness is already the veneer category. It is usually easy to bend (be cautious with walnut though) but for glueing it would probably require contact glue - with all his pluses and minuses. The base (the first planking) has to be smooth as, because you can forget sanding the veneer-thick second planking. One advantage of veneer is that the options for material are wide, although you have to be cautious with the grain, which is usually very visible in veneers.
János
Grazie janos & Darius architectus
thanks for your information.. in Italy I only found some 0,5mm walnut strips.. I'll do some tests for gluing
 
It depends on your planking pattern. If you're doing proper shipyard tapering then anything thinner than 1mm is difficult to edge bend, particularly walnut which totally refuses, it just splits (it's cheap, which is why it comes with the kit!) If you are planking kit style with planks that run to a point as infills to a midships gap you don't need to edge bend. Kits come with 0.6 veneer usually which gives you more tolerance when sanding than 0.3. Pear is the ideal, cherry will do the job better than walnut, but I would still soak and work it with your fingers to ease it and make it more pliable. There's no problem fitting while it is still a little moist. Do a couple of test fits before gluing.
 
Grazie janos & Darius architectus
thanks for your information.. in Italy I only found some 0,5mm walnut strips.. I'll do some tests for gluing
In one of my previous posts, I reported on a different type of gluing. It is used here in Germany to minimize contact problems. The first planking is prepared with a 10% dilution of the glue. Allow to dry well, of course. The advantage is that glue on glue forms a far better, more stable bond than glue on wood.
 
In one of my previous posts, I reported on a different type of gluing. It is used here in Germany to minimize contact problems. The first planking is prepared with a 10% dilution of the glue. Allow to dry well, of course. The advantage is that glue on glue forms a far better, more stable bond than glue on wood.

From experience as an aeromodeller... I intended to do as you advised me. I'm glad I have a good idea.
 
It depends on your planking pattern. If you're doing proper shipyard tapering then anything thinner than 1mm is difficult to edge bend, particularly walnut which totally refuses, it just splits (it's cheap, which is why it comes with the kit!) If you are planking kit style with planks that run to a point as infills to a midships gap you don't need to edge bend. Kits come with 0.6 veneer usually which gives you more tolerance when sanding than 0.3. Pear is the ideal, cherry will do the job better than walnut, but I would still soak and work it with your fingers to ease it and make it more pliable. There's no problem fitting while it is still a little moist. Do a couple of test fits before gluing.

I have now bought the 0.5 mm walnut... I will keep your observations in mind and see what I can do... next time I will buy the woods you recommended.
Thank you
 
I have now bought the 0.5 mm walnut... I will keep your observations in mind and see what I can do... next time I will buy the woods you recommended.
Thank you
If a kit is a 2mm inner and 0.6 outer I buy replacement timber. I build with 1.5 basswood inner so I can use a 1mm outer. Although eventually I ended up with a mini lumberyard! I do a lot of heavy kit bashing, to the extent of using a kit to build a different ship (many RN hulls in a class of ships are identical, ie Swan class and Cormorant class) Kits have limits regarding materials, particularly the established European kits, and questionable accuracy. At this point your hobby is fast becoming an obsession!!
 
Having double planked two 1:64 scale hulls, both from Jotika/Caldrecraft kits I find that their 3mm wide x 0.5 thick planking is quite straight forward for the final planking but I have a few tips.
I always dry fit each plnk and secure with pins against the underside to close the gap on the upper side against the previous plank. I NEVER put the pins through the plank! If the plank needs to be bent and or twisted to wards its end or ends, then the plank to be bent is made wet.
To do this I have a simple device, a piece of pvc drain pipe (for a sink or basin), about 600 mm/24" long with one end plugged/sealed. Stand this vertical and fill with warm water to near the top, then put the planks into the warm water for a good 10 minutes, it will then accept bot bending and twisting to fit.
NOT USE BOiLiNG WATER - IT IS JUST TOO DANGEROUS! Sometime if the job is going well I put 6 planks at a time into the water, and ufit/trim one plak at a time, this saves waiting for a plank to get properly wet through.
I then bend the planks at bow and/or stern and find the best position the make plank lay flat and mate with the previous plank, then mark the width at the end of the plck at the best "lay flat" condition with the planks wanting to overlap, thus the plank will need to be tapered towards the end before final fitting.
Remove the plank and cut the tapered ends if and where required. Then I use Cyano to secure the plank quickly starting from the centre of the hull in each direction, you can pin the plank to butt against the previous plank by pinning against the lower edge of the plank and apply THIN Cyano that will run under the plank and quickly set. Whilst it is setting go to the other end and repeat the pinning and gluing there, then continue at the first end again, and so on until the plank is s fitted over its while length.
The bow end will have to be trimmed to fit neatly against the bowstem, the stern can overlap the stern, by some margin, say 1/2" to 1" or 12mm to 25mm, and then be trimmed off with a razor saw and glass paper when all planking has been completed, and set for a few hours.
I'll take note... very interesting.
Thank you
 
Back
Top